Friday, 29 November 2024

Day 29 - Z is for Z-fold

It's time for the 12th Annual Month of Holiday Cards Challenge at Beccy's Place.
You can read the rules HERE or head over to Beccy's Challenges and enter HERE.

Beccy's inspiration is a stunning Z-fold card HERE,
the bold black background really makes the vintage sign image pop!

My Z is for Z-fold,
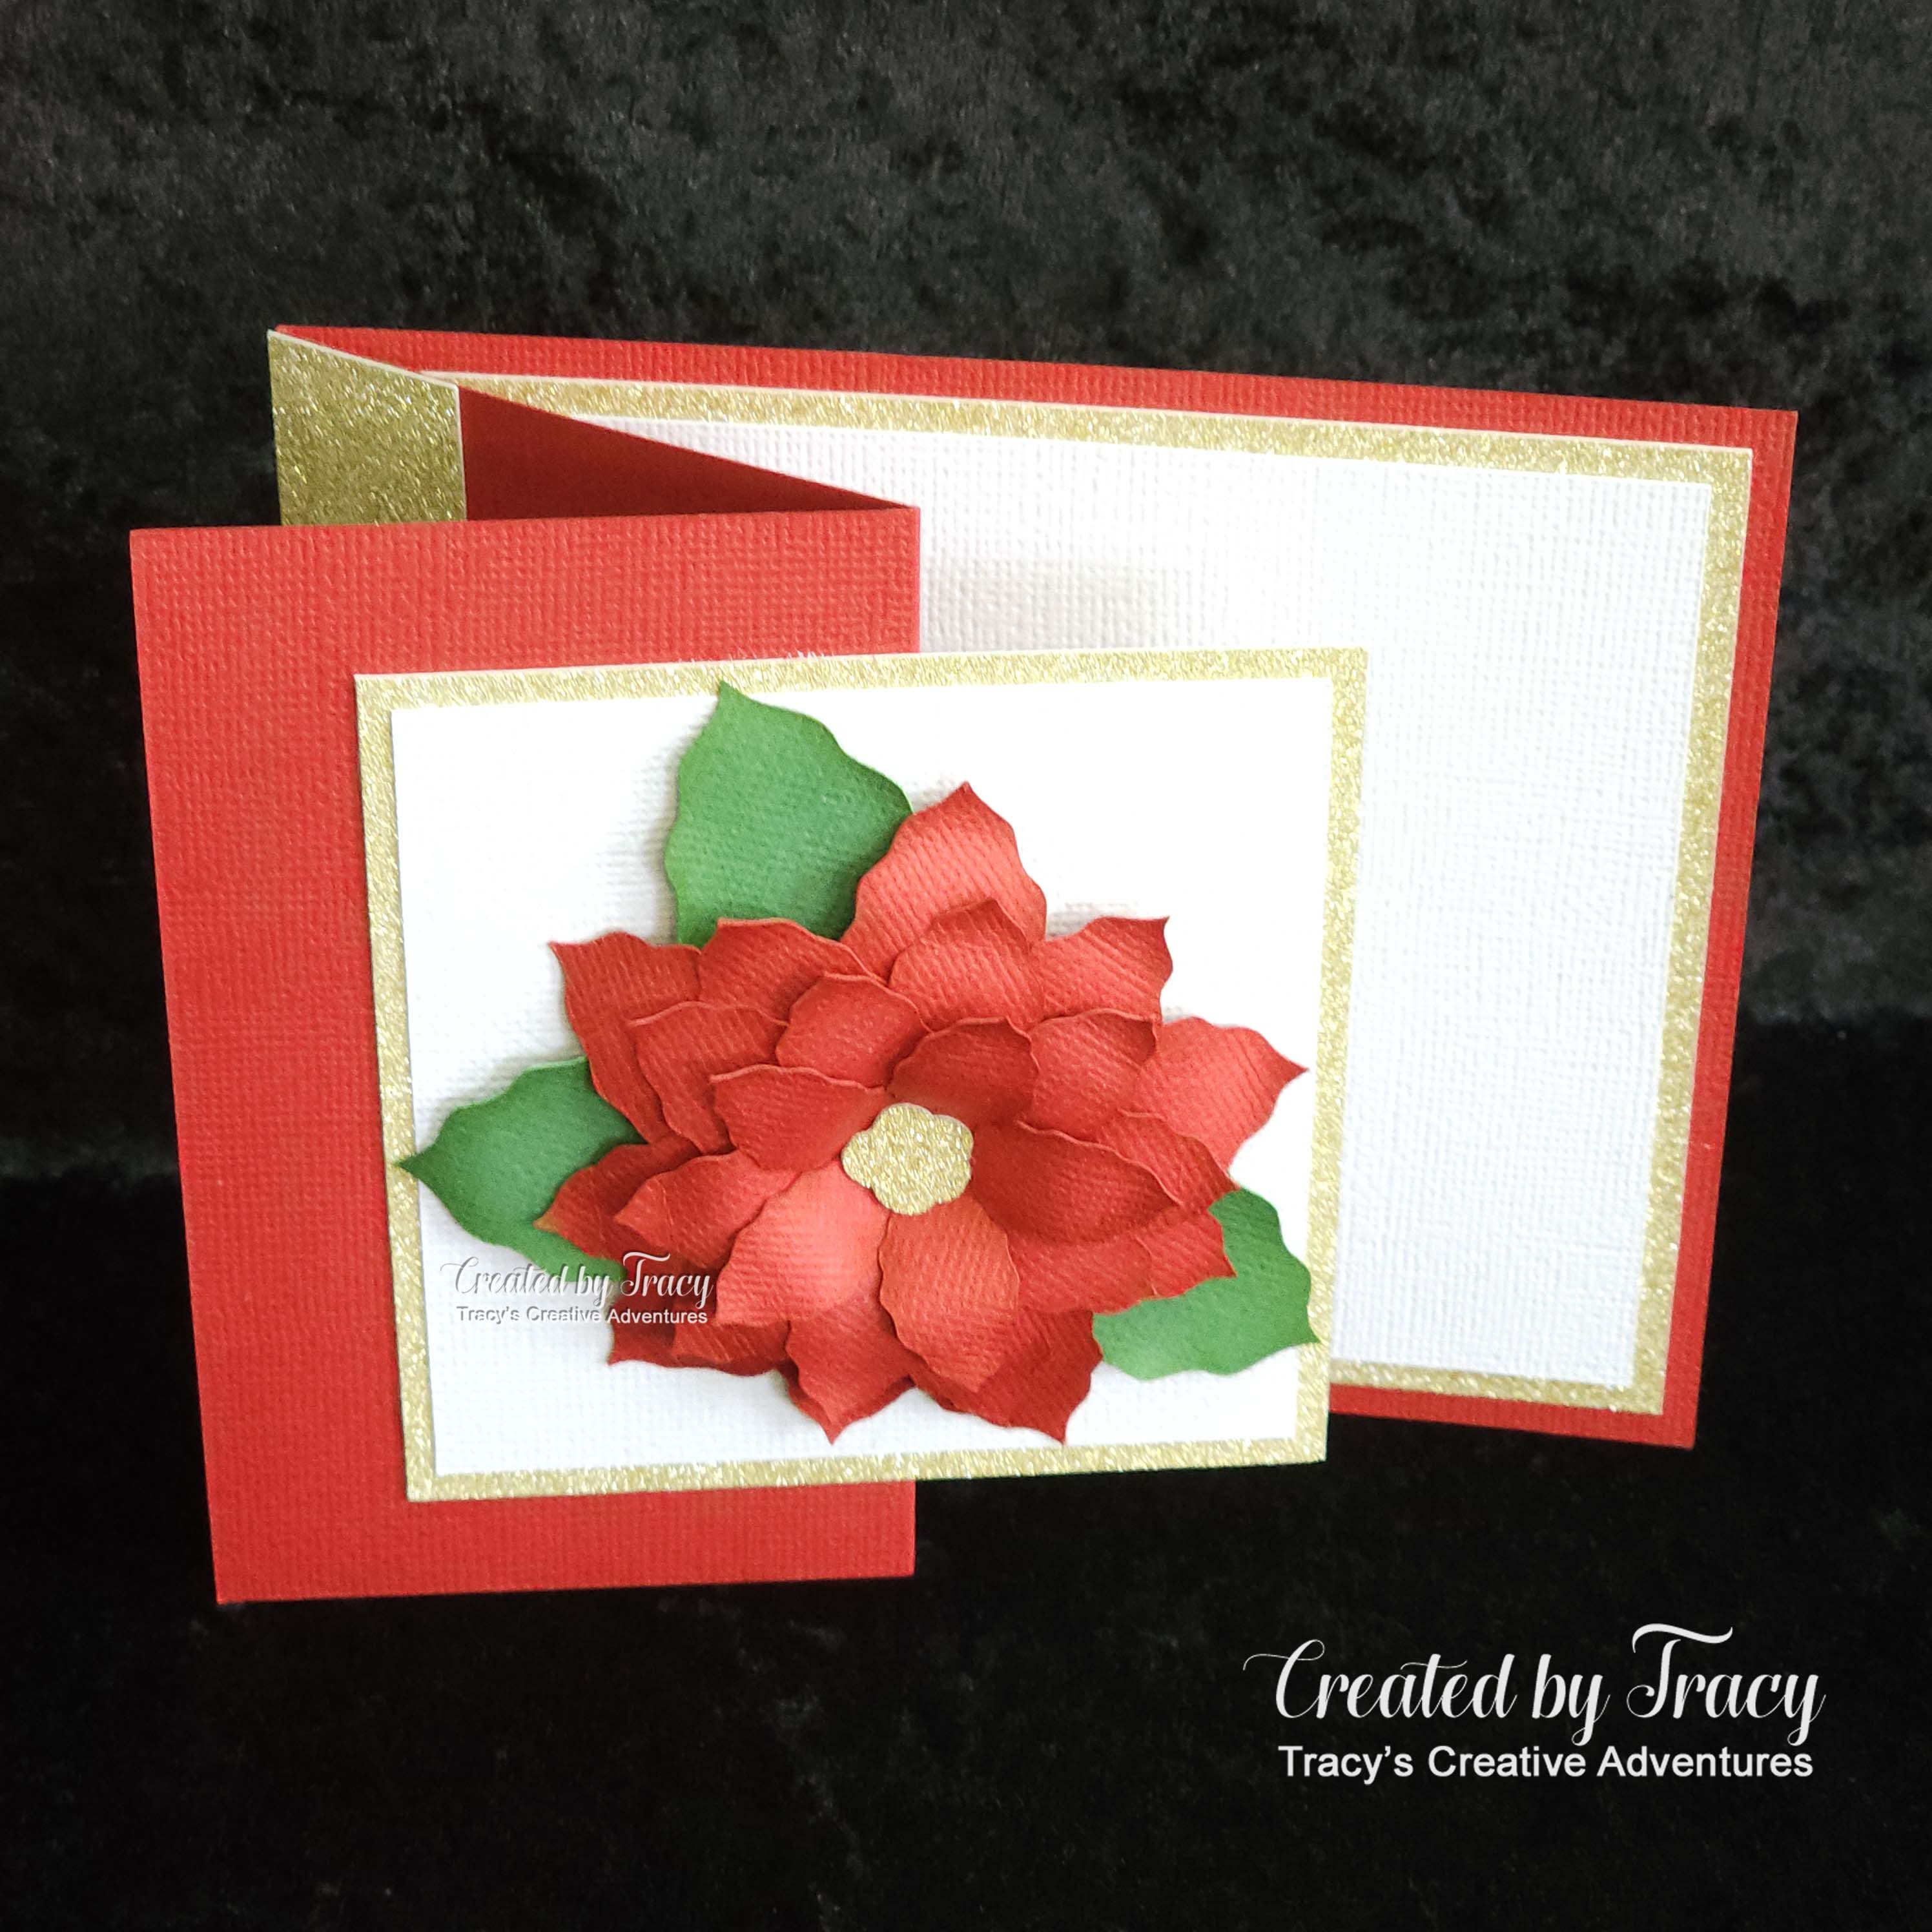
a festive poinsettia Z-fold card.


I opened the beautiful poinsettia Z-fold cut file (details and links below, available from two stores) in Silhouette Studio, sorted all the pieces by colour then cut the pieces with my Silhouette Cameo.  Things went a bit wonky when cutting the card base, technology can be a have a mind of its own sometimes.  Instead of a neat rectangle card base, I ended up with a parallelogram and it did not look good, so I went old school, quickly dragged out a new sheet of (my rare and getting rarer by the day) red textured cardstock, my stainless steel ruler, self healing cutting mat, craft knife and scoreboard.  I soon had a lovely card base with neat folds, ready for assembly.  I assembled the poinsettia flower first, giving the glue plenty of time to dry before going on the card front.  The poinsettia petals were inked with Fired Brick Distress Ink, the leaves inked with Mowed Lawn Distress Ink.  I used a paint brush handle to curl the petals and leaves then adhered them together to form the layered poinsettia flower.  The large matting layers were adhered inside the card, the accent strip adhered to the side fold and the smaller matting layers to the front of the card.  Lucky last came the poinsettia, I adhered it in place with liquid adhesive and gave it plenty time to dry before standing the card up.  
Note: this design comes with a "JOY" sentiment but I decided to
leave the main panel bare, letting the poinsettia be the focus.
Lucky last came a little photo-shoot and time to enjoy the fancy folds and festive flower.


Each petal and leaf has been thoroughly inked to give contrast between
the layers but it's hard to capture what I can see in front of me in the photos.


~~~*~~~*~~~
INGREDIENTS
The Z-fold cut file can be purchased from either
glitter cardstock
Distress Ink - Fired Brick and Mowed Lawn - to ink edges of poinsettia layers
ink blending brushes - to ink edges of poinsettia layers
Helmar Professional Acid Free Glue - to adhere poinsettia layers 
Helmar 450 Quick Dry liquid adhesive – to glue matting panels

~~~*~~~*~~~
I have entered my card in the

Thursday, 28 November 2024

Day 28 - Y is for Yellow Gold

It's time for the 12th Annual Month of Holiday Cards Challenge at Beccy's Place.
You can read the rules HERE or head over to Beccy's Challenges and enter HERE.

Beccy's inspiration is a delightful yellow bauble wreath card HERE  

My "Y" is for a shimmery Yellow gold mirror cardstock
the Yellow gold mirror cardstock pops against the red poinsettia


No you're not seeing things, I made a card just like this using Matte Mirror cardstock HERE.
The Mirror cardstock is a shinier, yellow gold
than the Matte Mirror cardstock of my first card.


My card started with the Christmas Fold Out Card – Poinsettia cut file from Craft With Sarah.  The flower has so much WOW that I decided to make it into an A5 top folding card with a big sentiment to go with it.  I sized the Merry Christmas digital sentiment from the Emu Parade digital stamp set from Beccy’s Place to fit on a matted panel below the poinsettia flower panel.  (Sadly this set is now retired.)  I printed the sentiment and manually trimmed to size.  I cut all the poinsettia layers using my Silhouette Cameo using a combination of luscious yellow gold mirror cardstock and assorted textured cardstock.  Then the fun began with lots of petal folding, foam dots, glue and layering.


Let's compare the Merry Mirror card with the Merry Matte Mirror card.
The Mirror cardstock is a shinier, yellow gold
than the Matte Mirror cardstock of my first card.


What do you think?
Enough WOW to make someone feel special?

~~~*~~~*~~~
INGREDIENTS
Merry Christmas digital sentiment – from the Emu Parade digital stamp set 
– from Beccy’s Place.  This set is now retired but you can see the set and projects created using it by clicking HERE or by clicking on the “Emu Parade” LABEL on the left hand side of the Beccy’s Place Blog.
Christmas Fold Out Card – Poinsettia - free cut file - from Craft With Sarah
To access the Craft With Sarah library, you need to register for a free account HERE.  When you sign in to your account scroll down through the Free Library to download the file and access the tutorial, or you can sign in to your Craft With Sarah account, click on THIS tutorial link and download directly from the button in the tutorial post.
textured cardstock
gold mirror cardstock
foam dots - to pop flower layers
Tombow Mono Multi Liquid Glue - to adhere delicate petals & around foam dots 
Helmar 450 Quick Dry liquid adhesive – to glue the larger pieces

~~~*~~~*~~~
I have entered my card in the

Tuesday, 26 November 2024

Day 24 - U is for UP . . . Stand Up Reindeer

It's time for the 12th Annual Month of Holiday Cards Challenge at Beccy's Place.
You can read the rules HERE or head over to Beccy's Challenges and enter HERE.

Beccy's inspiration is an Under the mistletoe card HERE  

My "U" is for UP,
Stand Up Reindeer Cards.


This is my second "U is for UP" card design.
I shared a pair of Stand Up Snowman cards HERE

These cute Stand Up Reindeer cards started as a cut file in Silhouette Studio.
The Reindeer is one cut file from the free Stand Up Christmas Cards cut file set from Kristi at SVGnation.  I kept the file at the original size as the reindeer are quite large, 4.653" wide x 6.894" tall (sorry my head is not in decimal converting mode today).  I printed then cut the sentiment-stand up panels, then cut all the other pieces.  I adhered the layers together with assorted liquid adhesives as each had a attributes that suited the different pieces best.
One is for smaller areas & gives wriggle room before drying, one is perfect for larger areas, has wriggle room & does not warp the cardstock, the last one is also great for small areas, has a strong bond, with the bonus of adding a "stiffness-hardness" to what is adhered.  The last one has been dispensed into a little fine tip bottle so I can use it for small pieces or areas like joining tabs.  It's not an "everything adhesive" as it tends to buckle cardstock when used over larger areas.  Sorry, I digress, I just wanted to explain why I used three adhesives on the one project.


The golden glitter looks so pretty framing each reindeer.


The reindeer stand up quite tall and could even be used as a decor piece.


Here is the Stand Up Snowman and Stand Up Reindeer together.
SO CUTE!!!


~~~*~~~*~~~
INGREDIENTS

Stand Up Reindeer Card - cut file - Stand Up Christmas Cards cut file set
this is a FREE cut file from Kristi at SVGnation
and includes Santa, an Elf, a Polar Bear, a Snowman and a Reindeer
You can access this free cut file by scrolling down the tutorial blog post and filling
in your first name and email address in the “get it now” form.  Don’t worry, you won’t
be spammed with a gazillion emails.  The projects and tutorials are focussed on
Cricut cutting machines but the SVGs work with most cutting machines,
including the Silhouette Cameo machine that I use.
textured cardstock
glitter cardstock
Tombow Mono Multi Liquid Glue - to adhere small pieces & glitter frame
Helmar Professional Acid Free Glue - to adhere snowman to flap
this is a book binding glue and goes quite hard when dry, so I used this
hoping in would add strength to the panel, especially the stick arms
Helmar 450 Quick Dry liquid adhesive – to glue the larger pieces

~~~*~~~*~~~
I have entered my cards in the

Day 24 - U is for UP . . . Stand Up Snowman

It's time for the 12th Annual Month of Holiday Cards Challenge at Beccy's Place.
You can read the rules HERE or head over to Beccy's Challenges and enter HERE.

Beccy's inspiration is an Under the mistletoe card HERE  

My "U" is for UP,
Stand Up Snowman Cards.


These sweet Stand Up Snowman cards started as a cut file in Silhouette Studio.
The Snowman is one cut file from the free Stand Up Christmas Cards cut file set from Kristi at SVGnation.  I kept the file at the original size as the snowman quite large, almost 4 1/2" wide x 6 3/4" tall.  I printed then cut the sentiment-stand up panel, then cut all the other pieces.  I adhered the layers together with assorted liquid adhesives as each had a attributes that suited the different pieces best.
One is for smaller areas & gives wriggle room before drying, one is perfect for larger areas, has wriggle room & does not warp the cardstock, the last one is also great for small areas, has a strong bond, with the bonus of adding a "stiffness-hardness" to what is adhered.  The last one has been dispensed into a little fine tip bottle so I can use it for small pieces or areas like joining tabs.  It's not an "everything adhesive" as it tends to buckle cardstock when used over larger areas.  Sorry, I digress, I just wanted to explain why I used three adhesives on the one project.


The green glitter looks so pretty framing each snowman.


The snowmen stand up quite tall and could even be used as a decor piece.


~~~*~~~*~~~
INGREDIENTS

Stand Up Snowman Card - cut file - Stand Up Christmas Cards cut file set
- this is a FREE cut file from Kristi at SVGnation
and includes Santa, an Elf, a Polar Bear, a Snowman and a Reindeer
You can access this free cut file by scrolling down the tutorial blog post and filling
in your first name and email address in the “get it now” form.  Don’t worry, you won’t
be spammed with a gazillion emails.  The projects and tutorials are focussed on
Cricut cutting machines but the SVGs work with most cutting machines,
including the Silhouette Cameo machine that I use.
textured cardstock
glitter cardstock
Tombow Mono Multi Liquid Glue - to adhere small pieces & glitter frame
Helmar Professional Acid Free Glue - to adhere snowman to flap
- this is a book binding glue and goes quite hard when dry, so I used this
hoping in would add strength to the panel, especially the stick arms
Helmar 450 Quick Dry liquid adhesive – to glue the larger pieces

~~~*~~~*~~~
I have entered my cards in the

Monday, 25 November 2024

Day 18 - P is for Pudding . . . Christmas Pudding

It's time for the 12th Annual Month of Holiday Cards Challenge at Beccy's Place.
You can read the rules HERE or head over to Beccy's Challenges and enter HERE.

Beccy's inspiration is a delightful presents card HERE  

My "P" is for Pudding,
a pair of tasty Christmas Pudding Treat Boxes.


I opened the Christmas Pudding Treat Box cut file in Silhouette Studio.  I need to make two of these "tasty" treats, and the pieces are quite large, so I left the file in its original size and was able to fit two of the base side panels on a 12" x 12" sheet of cardstock.  The bottom of the base is quite large, with each side of the hexagon 2 1/4" long.  To make the two treat boxes I used two sheets of brown cardstock for the bases, one sheet of white cardstock for the lids, along with small pieces of yellow (custard swirl), green (holly leaves) and red (holly berries) ... luckily I had plenty of scraps on hand for the custard and holly.

There are LOTS of folds to burnish for both the base and lid,
so my poor "chipped" bone folder had a good workout.
TOP TIP #1 - when burnishing folds in textured cardstock, I often get a "shiny" finish where the bone folder touches - I have found that if you put a piece of die cutting release paper between the bone folder and cardstock, the folds burnish crisply and there is not a spec of shine in sight.  
TOP TIP #2 - when making 3D objects like treat boxes, it makes a
neater finish to add a liner inside of the base and lid to cover the tabs.
I carefully adhered the tabs to form the bases and lids then finished off the treats with a swirl of custard, some holly leaves and holly berries.  Next on my list is to decide what to fill them with, maybe a gift card surrounded by some luscious Lindt Balls, making them both tasty to look at and to eat.


~~~*~~~*~~~
INGREDIENTS
Christmas Pudding Treat Box - free cut file - Bearly Art
textured cardstock
bone folder & die cutting release paper - to burnish folds
Helmar Professional Acid Free Glue - to adhere joins / tabs 
Tombow Mono Multi Liquid Glue – to adhere pudding accents

~~~*~~~*~~~
I have entered my treat boxes in the