Monday, 31 July 2023

With more love . . .

  Today I had some fun making some 5" x 7" cards
using a digital stamp from the Beccy's Place Store,
digital sentiments, also from Beccy's Place and
combined them with some fussy cutting and layering.
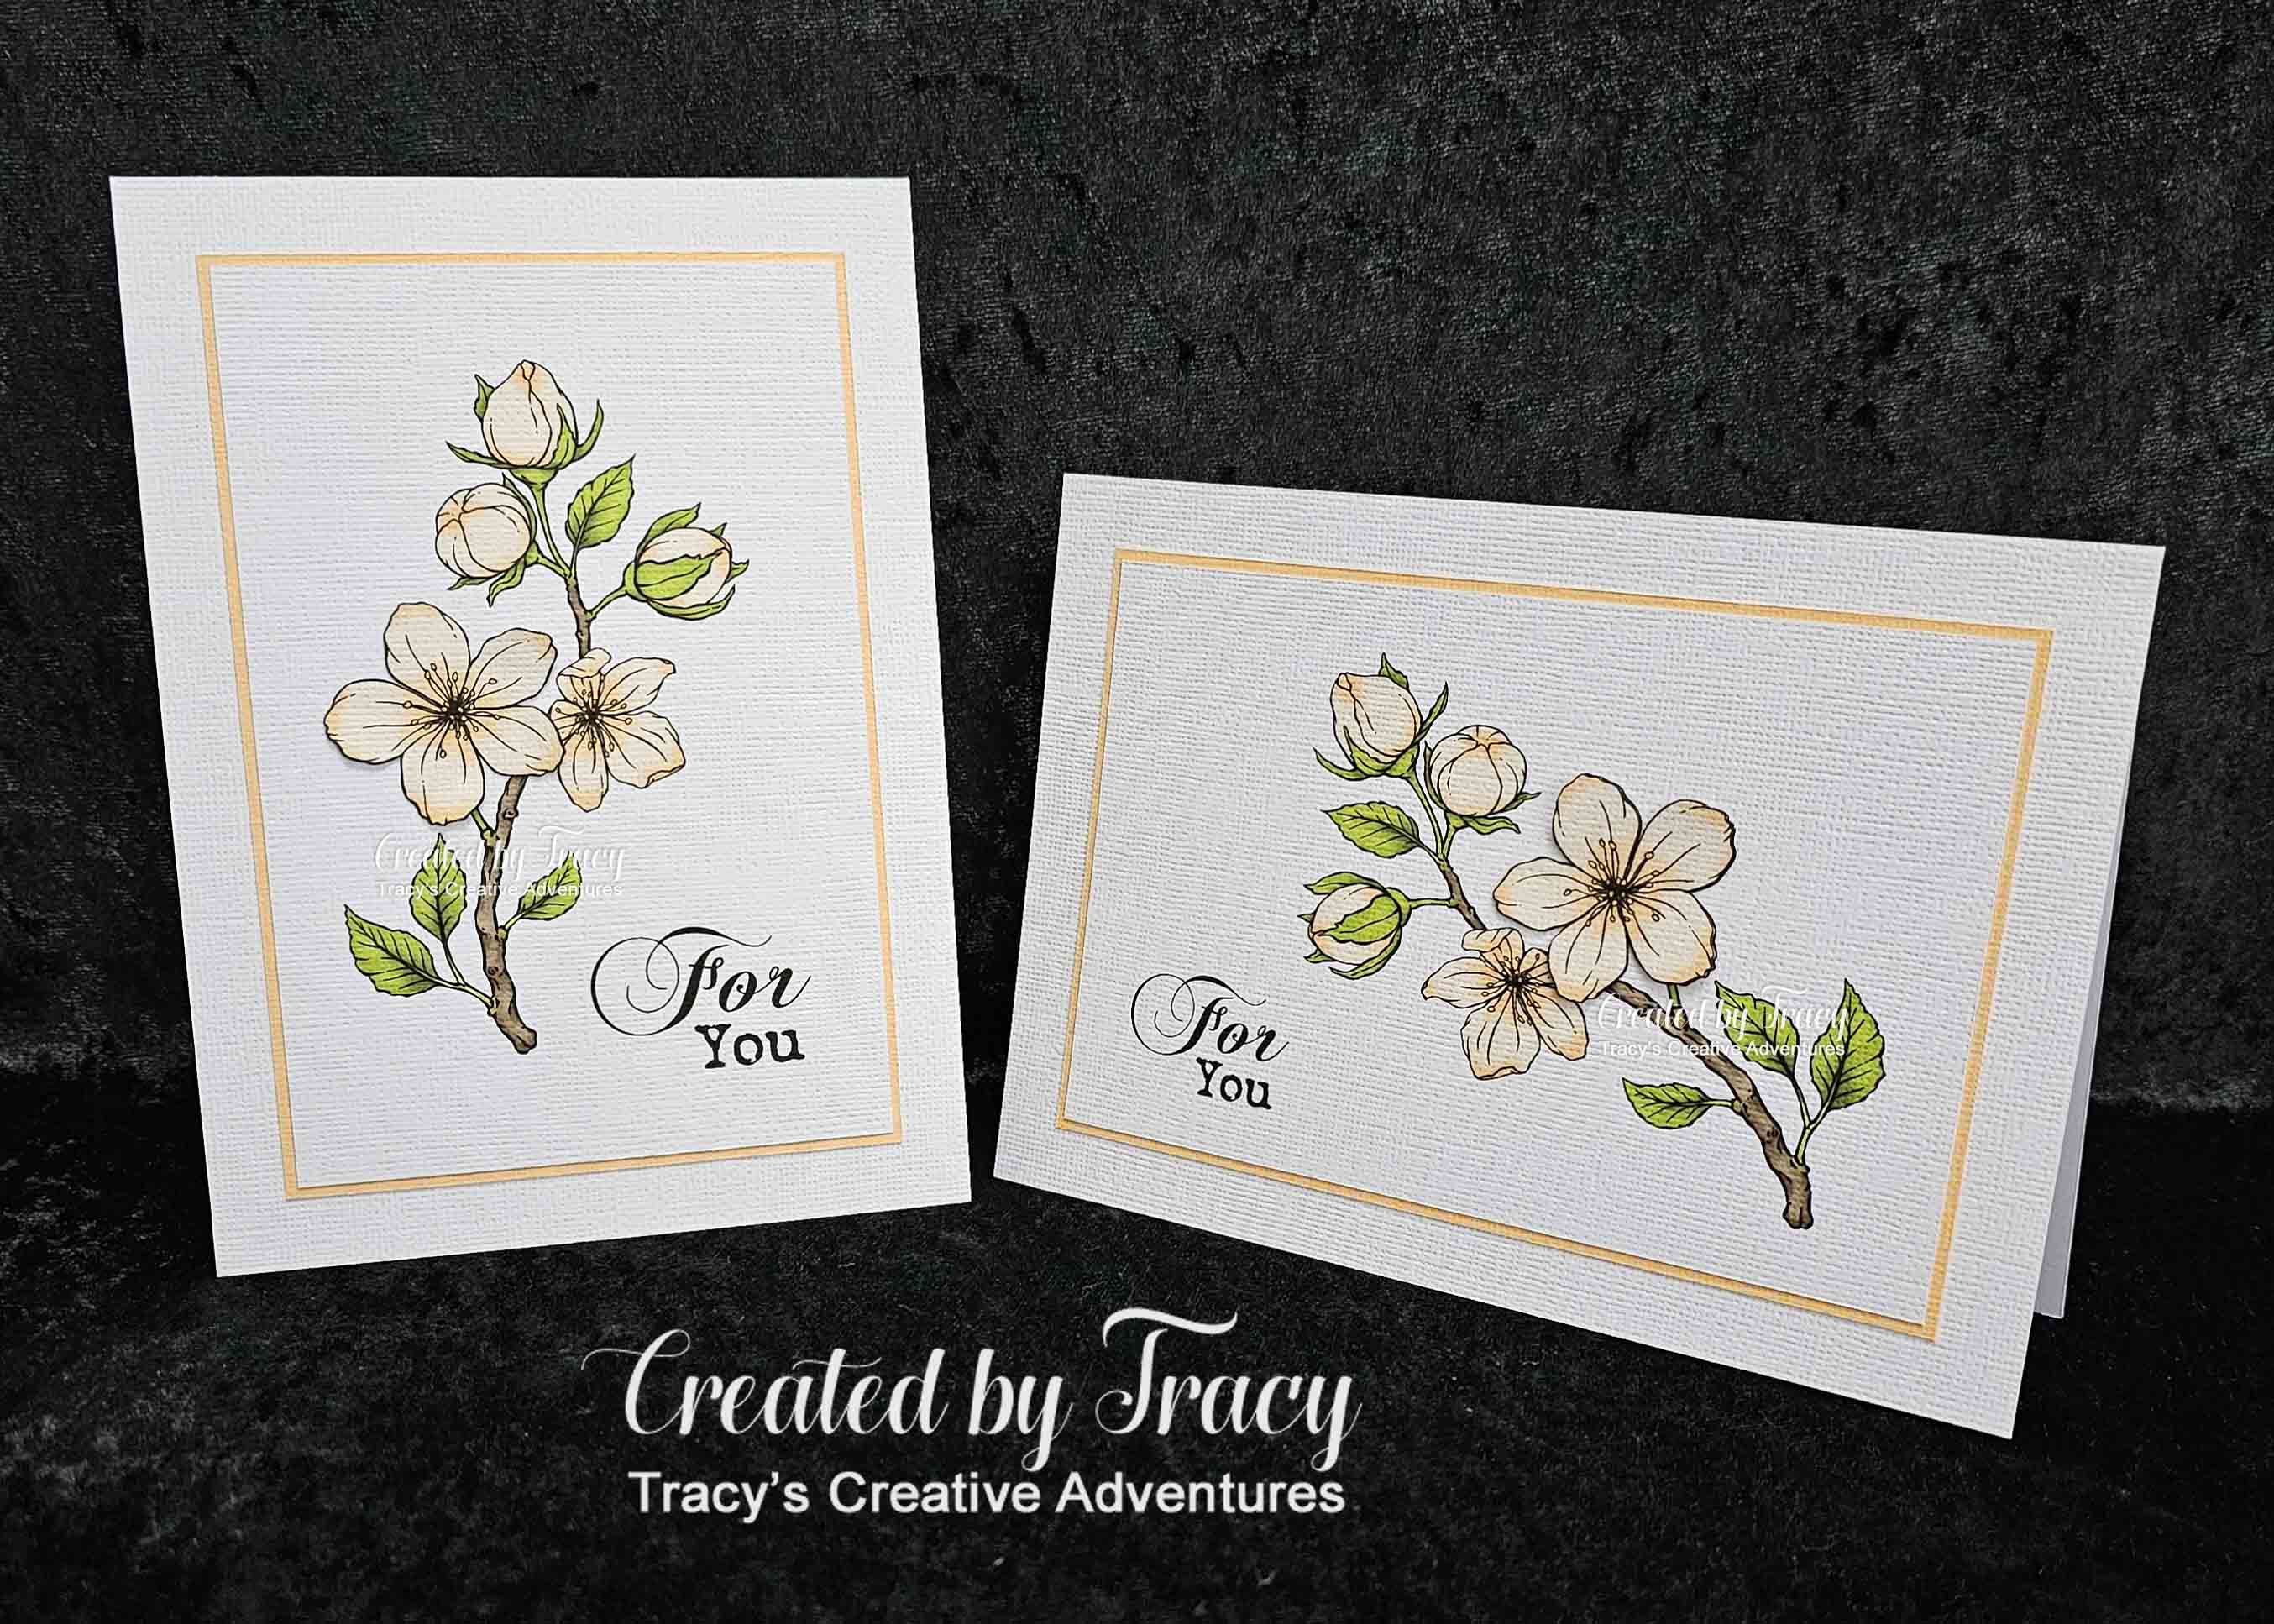
No, you're not seeing things, this is my fourth card today.  It's the same image as the third one shared earlier, except I have mirrored then rotated the image, used a different sentiment and made a top folding landscape card.


I printed the image panel on white textured cardstock, trimmed to size, matted with Apricot Weave cardstock, trimmed to 1/16" border using a Perfect Layers Ruler, adhered to a 5" x 7" cardstock panel, then adhered the panel to a top folding card base.
I made the card base by cutting two 5" x 7" 300gsm smooth cardstock panels,
scoring the "top back" at 3/4" then adhering the top panels together.
I printed off an extra large flower and if you look closely,
you will be able to see the subtle dimension it adds to the card.

Some days you need to do some "scissor therapy".
Although my hands were hurting, I fussy cut a large flower to go on the front of each of my four cards and it felt good to see them slightly curled in readiness for gluing.  I went around the edges of each flower with my Memento Tuxedo Black Ink dual tip marker, so that no white edges were visible.


And here is a pic of the card I mentioned earlier (3rd for the day).  The image is mirrored, then rotated and the same sentiment used.

And here it is compared to my second card, the images are
mirrored and different sentiments used.

~~~*~~~*~~~
INGREDIENTS
digital stamp set from Beccy's Place store
“For you” sentiment – from the Geums digital stamp set – no longer available in Beccy’s store but projects shared on the blog can be found HERE
“With love” sentiment – from the Magnolias digital stamp set – no longer available in Beccy’s store but projects shared on the blog can be found HERE
White textured cardstock - American Crafts
Apricot Weave cardstock - Kaisercraft
300gms smooth white cardstock - for card base
Helmar Acid Free Professional Glue -
liquid adhesive - to create top fold of card base
Helmar 450 Quick Dry -
liquid adhesive - to secure all the layers in place
Perfect Layers Ruler

~~~*~~~*~~~
I have entered my card in the July Challenge at Beccy's Place Challenges

With love . . .

 Today I had some fun making some 5" x 7" cards
using a digital stamp from the Beccy's Place Store,
digital sentiments, also from Beccy's Place and
combined them with some fussy cutting and layering.
No, you're not seeing things, this is my third card today, the same image as the first one shared earlier, except I have mirrored the image and used a different sentiment.


I printed the image panel on white textured cardstock, trimmed to size, matted with Apricot Weave cardstock, trimmed to 1/16" border using a Perfect Layers Ruler, adhered to a 5" x 7" cardstock panel, then adhered the panel to a top folding card base.
I made the card base by cutting two 5" x 7" 300gsm smooth cardstock panels,
scoring the "top back" at 3/4" then adhering the top panels together.
I printed off an extra large flower and if you look closely,
you will be able to see the subtle dimension it adds to the card.

Some days you need to do some "scissor therapy".
Although my hands were hurting, I fussy cut a large flower to go on the front of each of my four cards and it felt good to see them slightly curled in readiness for gluing.  I went around the edges of each flower with my Memento Tuxedo Black Ink dual tip marker, so that no white edges were visible.


I made another card using the same sentiment
and rotating the image.

And here is a pic of the card I mentioned earlier,
image is mirrored and a different sentiment used. 

~~~*~~~*~~~
INGREDIENTS
digital stamp set from Beccy's Place store
“For you” sentiment – from the Geums digital stamp set – no longer available in Beccy’s store but projects shared on the blog can be found HERE
“With love” sentiment – from the Magnolias digital stamp set – no longer available in Beccy’s store but projects shared on the blog can be found HERE
White textured cardstock - American Crafts
Apricot Weave cardstock - Kaisercraft
300gms smooth white cardstock - for card base
Helmar Acid Free Professional Glue -
liquid adhesive - to create top fold of card base
Helmar 450 Quick Dry -
liquid adhesive - to secure all the layers in place
Perfect Layers Ruler

~~~*~~~*~~~
I have entered my card in the July Challenge at Beccy's Place Challenges

More for you . . .

 Today I had some fun making some 5" x 7" cards
using a digital stamp from the Beccy's Place Store,
digital sentiments, also from Beccy's Place and
combined them with some fussy cutting and layering.
No, you're not seeing things, this is my second card today.  It's the same image as the first one shared earlier, except I have rotated the image, used the same sentiment and made a top folding landscape card.


I printed the image panel on white textured cardstock, trimmed to size, matted with Apricot Weave cardstock, trimmed to 1/16" border using a Perfect Layers Ruler, adhered to a 5" x 7" cardstock panel, then adhered the panel to a top folding card base.
I made the card base by cutting two 5" x 7" 300gsm smooth cardstock panels,
scoring the "top back" at 3/4" then adhering the top panels together.
I printed off an extra large flower and if you look closely,
you will be able to see the subtle dimension it adds to the card.

Some days you need to do some "scissor therapy".
Although my hands were hurting, I fussy cut a large flower to go on the front of each of my four cards and it felt good to see them slightly curled in readiness for gluing.  I went around the edges of each flower with my Memento Tuxedo Black Ink dual tip marker, so that no white edges were visible.


And here is a pic of the card I mentioned earlier, the image is mirrored,
then rotated and the same sentiment used.

I made another card by rotating the original image
to the right and added a different sentiment.

~~~*~~~*~~~
INGREDIENTS
digital stamp set from Beccy's Place store
“For you” sentiment – from the Geums digital stamp set – no longer available in Beccy’s store but projects shared on the blog can be found HERE
“With love” sentiment – from the Magnolias digital stamp set – no longer available in Beccy’s store but projects shared on the blog can be found HERE
White textured cardstock - American Crafts
Apricot Weave cardstock - Kaisercraft
300gms smooth white cardstock - for card base
Helmar Acid Free Professional Glue -
liquid adhesive - to create top fold of card base
Helmar 450 Quick Dry -
liquid adhesive - to secure all the layers in place
Perfect Layers Ruler

~~~*~~~*~~~
I have entered my card in the July Challenge at Beccy's Place Challenges

For you . . .

Today I had some fun making some 5" x 7" cards
using a digital stamp from the Beccy's Place Store,
digital sentiments, also from Beccy's Place and
combined them with some fussy cutting and layering.


I printed the image panel on white textured cardstock, trimmed to size, matted with Apricot Weave cardstock, trimmed to 1/16" border using a Perfect Layers Ruler, adhered to a 5" x 7" cardstock panel, then adhered the panel to a top folding card base.
I made the card base by cutting two 5" x 7" 300gsm smooth cardstock panels,
scoring the "top back" at 3/4" then adhering the top panels together.
I printed off an extra large flower and if you look closely,
you will be able to see the subtle dimension it adds to the card.

Some days you need to do some "scissor therapy".
Although my hands were hurting, I fussy cut a large flower to go on the front of each of my four cards and it felt good to see them slightly curled in readiness for gluing.  I went around the edges of each flower with my Memento Tuxedo Black Ink dual tip marker, so that no white edges were visible.


I made another card using the same sentiment
and rotating the image.

I mirrored the image and made another card
using a different sentiment. 

~~~*~~~*~~~
INGREDIENTS
digital stamp set from Beccy's Place store
“For you” sentiment – from the Geums digital stamp set – no longer available in Beccy’s store but projects shared on the blog can be found HERE
“With love” sentiment – from the Magnolias digital stamp set – no longer available in Beccy’s store but projects shared on the blog can be found HERE
White textured cardstock - American Crafts
Apricot Weave cardstock - Kaisercraft
300gms smooth white cardstock - for card base
Helmar Acid Free Professional Glue -
liquid adhesive - to create top fold of card base
Helmar 450 Quick Dry -
liquid adhesive - to secure all the layers in place
Perfect Layers Ruler

~~~*~~~*~~~
I have entered my card in the July Challenge at Beccy's Place Challenges

Wednesday, 28 December 2022

Reindeer Party Box

It's my pleasure to introduce the Reindeer Party Box
a fun Christmas treat box.


I opened the cut file in Silhouette Studio and cut the pieces from textured cardstock.  I did not adjust the size of this treat box and found that it was quite large, holding plenty of tasty treats inside.

I inked the medium brown head pieces for the box with Vintage Photo Distress Ink, the dark brown antlers with Walnut Stain Distress Ink, the noses with Barn Door Distress Ink and the muzzles with Antique Linen Distress Ink topped off with Tea Dye Distress Ink.  I was happy with the colour of the Antique Stain but it dried a lot paler than I expected on the coloured cardstock so I blended the edges with the Tea Dye to give more contrast and shading.  It really pays to do some test swatches when inking coloured cardstock AND to wait for them to fully dry.


I used Tombow Mono Multi Adhesive to secure the inner ears, antlers, muzzles and eyes in place.  I used a strong book binding glue (Helmar Acid Free Professional) to secure the "gusset" of the box, curving and joining it to the front, then securing the back panel in place to form the box.  I confess, I found this part a bit fiddly, perhaps the cardstock I used was a bit to heavy for making curves.
Lucky last came the noses.  I popped them in place with foam dots.


I made eight of these cuties so that there would be plenty to choose from.


I'm impressed with how many treats they hold too.
NINE individually wrapped treats fitted neatly in each one.


I've made three different Christmas treat boxes and 
ALL three treat boxes hold the same number of treats,
I could have tucked a few more inside this box but wanted everyone to get
the same number of treats regardless of the treat box style they chose.


You can read all about the Reindeer Belly Box HERE
and the Gingerbread Belly Box HERE.

*** INGREDIENTS ***
Reindeer Party Box from My Scrap Chick

Silhouette Cameo
12" x 12" textured cardstock
medium brown + dark brown + beige + pink + red + black + white
Tombow Mono Multi Adhesive - to adhere antlers, muzzle, inner ears and eyes
Helmar 450 Quick Dry - to adhere 
Helmar Acid Free Professional - to glue sides of box
foam dots - to adhere nose
Distress Inks
Vintage Photo + Walnut Stain + Antique Linen + Tea Dye
+ Barn Door + Spun Sugar
ink blending brush
ink dauber

Reindeer Belly Box

 It's my pleasure to introduce the Reindeer Belly Box
from My Scrap Chick,
a fun Christmas treat box.


I opened the cut file in Silhouette Studio and cut the pieces from textured cardstock.  I did not adjust the size of this treat box because the Gingerbread Belly Box that I made earlier (HERE) has the same sized front and side panels, so I knew it would hold plenty of tasty treats inside.

I inked the medium brown head pieces for the box with Vintage Photo Distress Ink, the dark brown antlers and hooves with Walnut Stain Distress Ink, the noses with Barn Door Distress Ink and the muzzles with Antique Linen Distress Ink topped off with Tea Dye Distress Ink.  I was happy with the colour of the Antique Stain but it dried a lot paler than I expected on the coloured cardstock so I blended the edges with the Tea Dye to give more contrast and shading.  It really pays to do some test swatches when inking coloured cardstock AND to wait for them to fully dry.


I used Tombow Mono Multi Adhesive to secure the inner ears, antlers, muzzles, eyes and front hooves in place.  I used a strong book binding glue (Helmar Acid Free Professional) to secure the sides to the front and back panels, forming the box.


Lucky last came the noses and back hooves.  I popped them in place with foam dots.


I made eight of these cuties so that there would be plenty to choose from.


I'm impressed with how many treats they hold too.
NINE individually wrapped treats fitted neatly in each one.


I've made three different Christmas treat boxes and 
ALL three treat boxes hold the same number of treats,


You can read all about the Reindeer Party Box HERE
and the Gingerbread Belly Box HERE.

*** INGREDIENTS ***
Reindeer Belly Box from My Scrap Chick
Silhouette Cameo
12" x 12" textured cardstock
medium brown + dark brown + beige + pink + red + black + white
Tombow Mono Multi Adhesive - to adhere antlers, muzzle, inner ears and eyes
Helmar 450 Quick Dry - to adhere 
Helmar Acid Free Professional - to glue sides of box
foam dots - to adhere nose
Distress Inks
Vintage Photo + Walnut Stain + Antique Linen + Tea Dye
+ Barn Door + Spun Sugar
ink blending brush
ink dauber

Gingerbread treats . . .

. . . after undergoing some creative summer surgery . . .


This super cute Gingerbread Belly Box is part of the Christmas Belly Boxes cut file set from My Scrap Chick HOWEVER, I must warn you, the original file comes wearing a warm woolly winter cap (see image of the original file under the store link store below).  I gave mine some snippy summer surgery so that it didn't overheat during our HOT Christmas celebrations.

I have to admit, I'm not so good drawing "freestyle" faces, so I planned ahead for my cutting and added a cut out smile to the face panel.  Instead of adhering the eyes on, I welded them with the face panel, along with the nose, so that they would all be cut out from the face panel.  I punched some 2" circles from black cardstock and adhered them behind the face so that his cute smiling face really popped.  I kept the "nose" pieces, inked the edges with Worn Lipstick Distress Ink, the sides with Picked Raspberry Distress Ink then popped back in place with a foam dot.

Before assembly, I inked all the edges of the brown body panels with Vintage Photo Distress Ink.  To get a good even coverage along his arms, I tucked some release paper under his arms and over his face.


The rosy pink cheeks are Worn Lipstick Distress Ink.  I used an ink dauber, dabbed off the excess ink, positioned it on the cheek and rotated firmly to get good ink coverage.  This was one of the first ones I made, I wasn't going to ink the cheeks in case I messed them up but he just didn't look complete without them.  The ink dauber was the perfect size and it made the process "Tracy-proof".  After the first eight boxes (yes, I made more, lots more), I inked the cheeks before assembling the boxes.


These cuties made me smile, from start to finish.


I used a thin line of Tombow Mono Multi Adhesive to secure the wibbly wobbly icing in place.  The bottom of the box overlaps to join the front and back panels.  Helmar 450 Quick Dry worked perfectly for that job.  I used a strong book binding glue (Helmar Acid Free Professional) to secure the sides to the front and back panels, forming the box.  Lucky last came the feet.  I popped them in place with foam dots.


They make me feel like Buddy the Elf . . .

"I just like to smile - smiling's my favourite"


. . . I can't resist, here's one last smile just for you . . .


NOTE: I didn't adjust the size of these treats.  I set up my pieces to cut from 12" x 12" textured cardstock.  One white sheet fitted just enough icing for eight Gingerbread Belly Boxes.  Five sheets of brown textured cardstock later and there were enough pieces to assemble EIGHT Gingerbread Belly Boxes.  ... that was my first eight ... I repeated this a couple of times and made 24 ... they're so addictive.

I'm impressed with how many treats they hold too.
NINE individually wrapped treats fitted neatly in each one.


I've made three different Christmas treat boxes and 
ALL three treat boxes hold the same number of treats,


You can read all about the Reindeer Party Box HERE
and the Reindeer Belly Box HERE.

*** INGREDIENTS ***
Silhouette Cameo
12" x 12" textured cardstock
Tombow Mono Multi Adhesive - to adhere icing
Helmar 450 Quick Dry - to glue bottom of box
Helmar Acid Free Professional - to glue sides of box
Distress Ink - Vintage Photo + Worn Lipstick + Picked Raspberry
ink blending brush
ink dauber