Wednesday, 25 October 2017

. . . more Lovely Lillies at the Crafty Gals Corner

It's time for another challenge with us at the

This week we are letting our creative juices flow with
Challenge #146 - Anything Goes

The sponsors for this challenge are:

Kitty Bee Designs

Prize ~ 1 Digital Image

Prize ~ 4 Digital Images

~~~*~~~*~~~

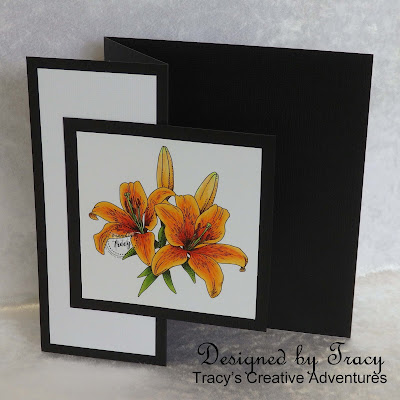
Today I have used the Lovely Lillies digital stamp from Delicious Doodles, one of our generous sponsors this week.  My cards are a "Z-fold with a twist".


The cards are a Z-fold, with the image panel becoming an offset flap.
They have fun and fancy dimension, folding flat for mailing.


This was my first time making this design, so my dimensions are an odd size.
The flat card is 6" wide x7" tall.
I scored a 7"x12" strip of cardstock at 3" and 6" using my scoreboard, firmly burnishing the folds with my bone folder for nice crisp folds.  The textured side of the cardstock is on the front LHS flap and the inner front RHS of the card as I like seeing the texture.
The white panel is 2 1/2" wide by 6 1/2" tall.

I sized the images to be 4" square, printed two sets of the image on an A5 panel of X-Press It Blending Card, heat set then coloured with Copic markers.

I trimmed the image panels down to 4" square then matted each one with 4 1/2" square black cardstock.

This post is to focus on my delicate pink lily card.


If you would like to learn more about my bold and beautiful tiger lily,
click HERE on on the image below.


*** INGREDIENTS ***
Delicious Doodles digital stamp - Lovely Lillies
Copic markers - flowers - RV0000-000-02-04 + RV55
Copic markers - stamens - E19 + YG03-25
Copic markers - buds - RV0000-000-02-04 + YG01
Copic markers - leaves - YG01-03-25-67
Martha Stewart 12 x 12 Scoreboard
Fiskars embossing stylus
soap (yes, soap, I rub the tip of stylus in it for smooth scoring)
American Crafts - 12x12 textured cardstock - white
American Crafts - 12x12 textured cardstock - black
Helmar 450 Quick Dry adhesive - to adhere the layers

~~~*~~~*~~~
Sending a big Thank You to Delicious Doodles for supplying the digital stamp I used today and for being a sponsor for Challenge #146 Anything Goes with us at the Crafty Gals Corner.
    
~~~*~~~*~~~
I am going to enter my card in the following challenges (alphabetical order):

Lovely Lillies at the Crafty Gals Corner

It's time for another challenge with us at the

This week we are letting our creative juices flow with
Challenge #146 - Anything Goes

The sponsors for this challenge are:

Kitty Bee Designs

Prize ~ 1 Digital Image

Prize ~ 4 Digital Images

~~~*~~~*~~~

Today I have used the Lovely Lillies digital stamp from Delicious Doodles, one of our generous sponsors this week.  My cards are a "Z-fold with a twist".


The cards are a Z-fold, with the image panel becoming an offset flap.
They have fun and fancy dimension, folding flat for mailing.


This was my first time making this design, so my dimensions are an odd size.
The flat card is 6" wide x7" tall.
I scored a 7"x12" strip of cardstock at 3" and 6" using my scoreboard, firmly burnishing the folds with my bone folder for nice crisp folds.  The textured side of the cardstock is on the front LHS flap and the inner front RHS of the card as I like seeing the texture.
The white panel is 2 1/2" wide by 6 1/2" tall.

I sized the images to be 4" square, printed two sets of the image on an A5 panel of X-Press It Blending Card, heat set then coloured with Copic markers.

I trimmed the image panels down to 4" square then matted each one with 4 1/2" square black cardstock.

This post is to focus on my bold and beautiful tiger lily card.


If you would like to learn more about my delicate pink lily,
click HERE on on the image below.


*** INGREDIENTS ***
Delicious Doodles digital stamp - Lovely Lillies
Copic markers - flowers - Y21-35-38 + YR04-09 + R08
Copic markers - stamens - E19 + YG03-25
Copic markers - buds - Y21-35-38 + YG01
Copic markers - leaves - YG01-03-25-67
Martha Stewart 12 x 12 Scoreboard
Fiskars embossing stylus
soap (yes, soap, I rub the tip of stylus in it for smooth scoring)
American Crafts - 12x12 textured cardstock - white
American Crafts - 12x12 textured cardstock - black
Helmar 450 Quick Dry adhesive - to adhere the layers

~~~*~~~*~~~
Sending a big Thank You to Delicious Doodles for supplying the digital stamp I used today and for being a sponsor for Challenge #146 Anything Goes with us at the Crafty Gals Corner.
    
~~~*~~~*~~~
I am going to enter my card in the following challenges (alphabetical order):

Tuesday, 24 October 2017

Crazy for Critters and magical unicorn wishes

It's time for another challenge with us at the Southern Girls.

This fortnight Team Trace have created projects to inspire you for the new challenge
(yes, I know I'm from Team Lou but I'm helping out while some DT members are away)


Our generous sponsors for this challenge are Louise and Dawn.
Someone is going to win a bundle of crafty awesomeness!

~~~*~~~*~~~

Today there is no colouring for me.

My Silhouette Cameo helped me make a big, magical unicorn birthday card.


I enlarged the elements by 150% on my Silhouette Studio mat before cutting them out.
I applied liquid adhesive to the horn panel and smothered it with glitter.
All the layers were quick and easy to adhere in place.
I curled the eyelashes and mane for added dimension.


I made a 7" x 7" x 1" pink box out of cardstock, instead of an envelope, so that there was plenty of room to keep the curls in place and tied it with a pretty pink ribbon for the Birthday Girl.


... and here are a couple more pics


What do you think?
Will it make her birthday a little more magical?

*** INGREDIENTS ***
Silhouette Cameo
Helmar Acid Free Professional Glue - to adhere the glitter to the horn
Tombow Mono Multi Liquid Adhesive - to adhere the eyes & horn
American Crafts WOW! glitter -

~~~*~~~*~~~

NOW it's YOUR turn!
I hope I have inspired you to get creative and look forward to seeing your work shared in the challenge gallery real soon.  Remember we are not just a card blog, we love to see scrapbook layouts, artjournal pages and all types of papercraft.

You have one week left to submit your critter project.

very MERRY hopping with the Stencil Specialist


Are you ready to hop along, be inspired and have the chance to win too?

Well you're in the right place!

It is time for the October Blop Hop with Julie and the Design Team at the

The Stencil Specialist is the Australian Wholesaler for Stampendous products and much, much more.

The prize for one lucky winner is the super cute
Stampendous CLD09 Seated Elf Stamp and Die Set


but before you go, I do hope you will check out my Christmas card using the Stampendous Seated Elf Stamp and Die Set and leave a comment for your chance to be a lucky winner so that you can have the chance to win a set of own.

To enter for your chance to win, all you need to do is leave a comment on one or all four of the Designers Blogs, one comment equals one entry, four comments equals four entries.  Only one comment per blog please.  Please include what state you live in, as this competition is open to Australian residents only.  Entries close midnight Friday 27th October AEST.

The Stencil Specialist - Julie
Donna
Robyn
Tracy - that's me and you're here
    
~~~*~~~*~~~

I had a very merry time creating with these cute stamps and dies.

I stamped a bundle of them on X-Press It Blending card using Memento Tuxedo Black Ink, coloured with Copic markers, cut each one out then went around the edges with a Memento Tuxedo Black Dual Tip marker.  The MISTI came in handy when it came to the sentiment, as I had cut the panels from textured cardstock, so all I had to do was apply some more ink, stamp again and the delicate sentiment came out crisp, clear and clean.

I used a Silhouette cut file to make a pair of slider window cards (enlarged to stand 6" tall)
The the RHS gifts were adhered to the slider panel, followed by the gorgeous bows, next came the elves.  I adhered the elves so that they were sitting on the gifts then popped them in place with foam squares for extra dimension.

The window slider cards are fun, because they can stand upright like standard cards and when the tag is pulled out, the sentiment is revealed and the elf sits up from the flat card.


Here are couple of close-up pics.


*** INGREDIENTS ***
Stampendous CLD09 Seated Elf Stamp and Die Set
Memento Tuxedo Black Ink
Sizzix Big Shot
Memento Tuxedo Black Dual Tip Marker - to go around edges of the images
Copic markers - skin - E0000-000-00-01-93
Copic markers - hair - E21-23-25-27
Copic markers - hat trim - C00-0-1
Copic markers - elf clothes / gift / bow - 
YG00-01-03-25-67
YR61-65-68
RV02-04-06-09
B01-02-04-06
BG53-57
Silhouette Cameo
Silhouette Design Store - A2 Santa Slider Window Card by Lori Whitlock
Design ID #100187
American Crafts - 12x12 textured cardstock - 100 sheet value pack
Kaisercraft Mint Twist Collection - 12x12 patterned paper - Trimmings
Kaisercraft Mint Twist Collection - 12x12 patterned paper - Candy Stripe

~~~*~~~*~~~

Sending a big Thank You to Julie from The Stencil Specialist for supplying the Stampendous CLD09 Seated Elf Stamp and Die Set that I used today.
I know that the lucky winner from this October Blog Hop Giveaway will have wonderful inky adventures with these stamps and dies, so don't forget to leave a comment with your state (Australian residents only) for your chance to win, then head on over to The Stencil Specialist blog to complete the Blog Hop.  Four blogs to visit, 4 chances to win => wishing you lots of luck!

We have a Blog Hop with prizes every month, so you might want to follow me so that you don't miss out on Stampendous inspiration and more chances to win with The Stencil Specialist.


~~~*~~~*~~~
I am going to enter my card in the following challenges (alphabetical order):
~~~*~~~*~~~

ABC Christmas Challenge - U for Unlimited, V for Vibrant
Crafting By Designs - Get Ready For Christmas October Edition
Crafty Friends Challenge Blog - Challenge #69 - Cute
Digi Choosday Craft Challenge - Wk 42 - Anything Goes
Fabrika Fantasy – Challenge #14 – Pink or Halloween
Happy Little Stampers - HLS October Christmas Challenge
My mischievous little Elves are wearing their cutest Christmas costumes
SheepSki Designs - Challenge #7 – Use Some Pink
The 12 Months of Christmas Link Up - Challenge #34 - Anything Christmas Goes
The Crafty Addicts Challenge Blog - Challenge #41 - Anything Goes
option Autumn Colours
Through The Craft Room Door - TTCRD 24th - 31st Oct Anything Goes

Wednesday, 11 October 2017

. . . if the broom fits . . .

Today I have used the Witch Bunny digital stamp from Sasayaki Glitter,
one of our generous sponsors for
"Challenge #144 - Make It Spooktacular" at the Crafty Gals Corner,
to make a pair of super cute, super spooktacular Halloween cards.


~~~*~~~*~~~

This post is to focus on my "if the broom fits, fly it" card.


I started with the image on my Silhouette Cameo Design Mat, sizing the image along with some circles and scalloped circles to fit on a 5" x 7" card front.  I also combined some fonts to make the sentiments "just a little bit wicked" and "if the broom fits, fly it".  I printed the images on A5 X-Press It blending card, heat set and coloured with Copic markers.  I printed the card front panels with the sentiment on white textured cardstock.  I cut some circles and scalloped circles from black cardstock and used the negative space from the circles to trace the size around the printed images and fussy cut them out, I had a couple of "spare" images, so I fussy cut out the broom heads.  I cut some 12" long, 1/4" and 3/8" strips from textured cardstock to use as accent strips.

I confess that my hand is usually firmly gripping my ruler, so it was very handy to be able to use the scallops to align the accent strips.  I started with the 3/8" orange strip, securing it in place with some Tombow Mono Multi liquid adhesive, then came the 1/4" purple and green strips. I placed the card front on my cutting mat grid then aligned the image panel and strips with the sentiment panel and secured it in place with liquid adhesive, making sure the strips were straight against the grids on my craft mat ... it worked a treat!

Next came the broom heads.  I adhered them in place with liquid adhesive, really like the added dimension and how they extend beyond the circle of the image panels.

Lucky last came the self adhesive black pearls.


~~~*~~~*~~~
Would you like to learn a little more about my other witchy Halloween card?
... just click on the sentiment or image below

JUST A LITTLE BIT Wicked

~~~*~~~*~~~

I hope that I have inspired you to get creative
and make a spooktacular project to enter our
Crafty Gals Corner - Challenge #144 - Make It SPOOKTACULAR

Click HERE to learn all about the challenge and all the fabulous sponsors.

~~~*~~~*~~~

*** INGREDIENTS ***
Sasayaki Glitter - digital stamp - Witch Bunny
Copic markers - light brown bunny - E0000-50-51-53
Copic markers - dark brown bunny - E30-31-33-35
Copic markers - hat - W3-5-7-9
Copic markers - hat buckle - YR65-68
Copic markers - broom - E53-43-47
Copic markers - green - scarf / hat trim - YG17-67
Copic markers - purple - scarf / hat trim - RV63-66
Memento Dual Tip Tuxedo Black Marker - to go around fussy cut edges
American Crafts - 12x12 textured cardstock - white
American Crafts - 12x12 textured cardstock - black
American Crafts - 12x12 textured cardstock - Summer
Grape
Silhouette Cameo
Silhouette Design Store - Design ID #57523
Scallop Circles with Inside Circles Nested by Stinkin Cute Paper Piecings
sentiment fonts - Arial Unicode MS (16pt) + Pristina (60pt)
black adhesive pearls
Helmar 450 Quick Dry adhesive - to adhere the layers
Tombow Mono Multi Liquid Adhesive - to adhere the broom head & strips
    
~~~*~~~*~~~
I am going to enter my card in the following challenges (alphabetical order):
~~~*~~~*~~~

2 Crafty Critter Crazies - Challenge #7 - Anything with a critter Goes
Delicious Doodles - October Challenge - Halloween (scary or cute)
Colour Crazy Challenge - WK 39 - Anything Goes
Colour It!  Create It!  Show It Off! - October Challenge - Halloween / Anything Goes
Come And Get It Challenges - Too Cute To Spook
Crafting From The Heart - Challenge #178 - Anything Goes
Crafty Catz - Challenge #387 - Anything Goes with optional twist CAS
Creative Moments - Challenge #129 Anything Goes
option Purple Paradise, add some purple - my card has a pop of purple
Cute Card Thursday - Challenge 498 - Anything Goes
Fabrika Fantasy - Challenge #14 - Pink or Halloween
Love To Scrap Challenge Blog - LTSCB #102 - Frightfully Fun
My Besties Art Spain - Challenge#17 - Anything Goes + Stamp
+ optional theme The Symbol Of Peace
Pammie's Inky Pinkies Challenges - PIP Challenge 1741 - Anything Goes
Pile It On - Pile It On #135 - Fantasy and/or Spiders / Cobwebs
QKR Stampede - Challenge #264 - Autumn Leaves or Anything Goes
The Crazy Challenge - Challenge #259 - Halloween

. . . just a little bit wicked

Today I have used the Witch Bunny digital stamp from Sasayaki Glitter,
one of our generous sponsors for
"Challenge #144 -Make It Spooktacular" at the Crafty Gals Corner,
to make a pair of super cute, super spooktacular Halloween cards.


~~~*~~~*~~~

This post is to focus on my "just a little bit wicked" card.


I started with the image on my Silhouette Cameo Design Mat, sizing the image along with some circles and scalloped circles to fit on a 5" x 7" card front.  I also combined some fonts to make the sentiments "just a little bit wicked" and "if the broom fits, fly it".  I printed the images on A5 X-Press It blending card, heat set and coloured with Copic markers.  I printed the card front panels with the sentiment on white textured cardstock.  I cut some circles and scalloped circles from black cardstock and used the negative space from the circles to trace the size around the printed images and fussy cut them out, I had a couple of "spare" images, so I fussy cut out the broom heads.  I cut some 12" long, 1/4" and 3/8" strips from textured cardstock to use as accent strips.

I confess that my hand is usually firmly gripping my ruler, so it was very handy to be able to use the scallops to align the accent strips.  I started with the 3/8" orange strip, securing it in place with some Tombow Mono Multi liquid adhesive, then came the 1/4" purple and green strips. I placed the card front on my cutting mat grid then aligned the image panel and strips with the sentiment panel and secured it in place with liquid adhesive, making sure the strips were straight against the grids on my craft mat ... it worked a treat!

Next came the broom heads.  I adhered them in place with liquid adhesive, really like the added dimension and how they extend beyond the circle of the image panels.

Lucky last came the self adhesive black pearls.


~~~*~~~*~~~
Would you like to learn a little more about my other witchy Halloween card?
... just click on the sentiment or image below

IF THE BROOM FITS ... fly it

~~~*~~~*~~~

I hope that I have inspired you to get creative
and make a spooktacular project to enter our
Crafty Gals Corner - Challenge #144 - Make It SPOOKTACULAR

Click HERE to learn all about the challenge and all the fabulous sponsors.

~~~*~~~*~~~

*** INGREDIENTS ***
Sasayaki Glitter - digital stamp - Witch Bunny
Copic markers - light brown bunny - E0000-50-51-53
Copic markers - dark brown bunny - E30-31-33-35
Copic markers - hat - W3-5-7-9
Copic markers - hat buckle - YR65-68
Copic markers - broom - E53-43-47
Copic markers - green - scarf / hat trim - YG17-67
Copic markers - purple - scarf / hat trim - RV63-66
Memento Dual Tip Tuxedo Black Marker - to go around fussy cut edges
American Crafts - 12x12 textured cardstock - white
American Crafts - 12x12 textured cardstock - black
American Crafts - 12x12 textured cardstock - Summer
Grape
Silhouette Cameo
Silhouette Design Store - Design ID #57523
Scallop Circles with Inside Circles Nested by Stinkin Cute Paper Piecings
sentiment fonts - Arial Unicode MS (16pt) + Pristina (60pt)
black adhesive pearls
Helmar 450 Quick Dry adhesive - to adhere the layers
Tombow Mono Multi Liquid Adhesive - to adhere the broom head & strips
    
~~~*~~~*~~~
I am going to enter my card in the following challenges (alphabetical order):

Make it . . . SPOOKTACULAR!

It's time for another challenge with us at the

This week we are letting our creative juices flow with
Challenge #144 - Make It SPOOKTACULAR

The sponsors for this challenge are:
Prize: 3 Digital Images

Prize: 3 Digital Images

Sasayaki Glitter
Prize: 1 Digital Image

~~~*~~~*~~~

Today I have used the Witch Bunny digital stamp from Sasayaki Glitter, one of our generous sponsors this week, to make a pair of super cute, super spooktacular Halloween cards.


Would you like to learn a little more about my cards?
... just click on the images or sentiments below.

JUST A LITTLE BIT Wicked        IF THE BROOM FITS fly it
       

~~~*~~~*~~~

Sending a big Thank You to Sasayaki Glitter for supplying the digital stamp I used today and for being a sponsor for Challenge #144 - Make It Spooktacular with us at the Crafty Gals Corner.

~~~*~~~*~~~

NOW it's YOUR turn!

I hope that I have inspired you to get creative
and make a spooktacular project to enter the