Showing posts with label shaker. Show all posts

Wednesday, 22 July 2020

Butterfly Birthday Wishes

It's time for a new challenge with us on the
As always, the challenge is Anything Goes.

~~~*~~~*~~~

The sponsors for this challenge are:
Fred She Said Digital Designs


~~~*~~~*~~~

Today I have used the SwallowTail Butterfly digital stamp by Fred She Said Digital Designs to make a pair of shaker cards.  This digital stamp set comes with a combination of black & white and pre-coloured images.  I have used the pre-coloured SwallowTail Butterfly digital stamp to try a new-to-me shaker card technique.


My cards started on my Silhouette Studio design mat.  I opened the pre-coloured SwallowTail Butterfly digital stamp and a pretty blue digital watercolour paper.  I confess, I printed a bundle of these butterflies, fussy cut each one, carefully inked the outer edges then decided on a different card design, so my kaleidoscope of butterflies (yes, I looked it up) have been set aside for another day.  I added an offset to the butterfly, printed a sheet of them then cut with my Cameo.  I trimmed the digital paper to 4 3/4" x 6 1/2", added a 3 1/2" round window and sized the butterfly to fit neatly inside, printed then cut with my Cameo.  I added an 1/16" offset to make a matting layer for the window panel and cut it with my Cameo.  I matted a card base 5 1/8" x 6 7/8" to allow for a 1/8" border around the matted shaker panel.  I die cut sets of black and white alphas to make layered "HAPPY" and sets of a layered "Birthday" for both cards, adhering the layers together before adhering to the card fronts.
I used double-sided tape to adhere acetate to the shaker window then added foam around the back of the matted card front, carefully sealing around the edges of the window.  I went around the outer and inner edges of the foam with a black marker to match the matting layer.  The butterflies were adhered together with some clear jewellery bead thread between the layers along the middle body line.  The layered butterfly was secured in place with double-sided tape, with the length at the top allowing the butterfly to float down in the window but not to the bottom and the length at the bottom allowing the butterfly to float up to the top of the window ... sure hope this makes sense ... the idea is to allow the butterfly to flutter around the window without going upside down.  You can read all about it HEREin this fabulous tutorial by Jennifer McGuire.  I put some double-sided tape on top of the thread, cutting slightly longer, folding back and putting more tape on top, to ensure the thread doesn't work loose.  I had so much fun making a special shaker mix, combining cupped and flat sequins, seed beads and bugle beads in a range of blues, black and sparkling clear.  The photo below was my second attempt at making the card.  The first time I sealed it closed it was way too full, so I quickly peeled off the backing layer before the liquid adhesive had dried, luckily my "Quick Dry" wasn't too quick!  I tipped the shaker mix out, made a huge mess, eventually dividing all the different elements in half and sharing them between the two cards.  This time I sealed the card again and it was much better.


Before I sealed the second card, I decided to carefully pick out the beads and add more sparkling clear flat sequins to give the butterfly more room to float around the window.  If you look closely in the shaker windows above and below, you will be able to see the clear thread limiting the movement of the butterflies.


~~~*~~~*~~~

I also had the pleasure of working the Paper Nest Dolls


~~~*~~~*~~~

NOW it's YOUR turn!
I hope that I have inspired you to get creative
and look forward to seeing your projects fill the gallery for
Penny's Challenge 476
on the
Penny's Paper-Crafty Challenge Blog

~~~*~~~*~~~

*** INGREDIENTS ***
Fred She Said Digital Designs - digital stamp - SwallowTail Butterfly
digital paper - Watercolor Backgrounds
this was a freebie set of nine papers from The Hungry JPEG
Silhouette Cameo
Sizzix Big Shot
Kaisercraft - decorative dies - Alphabet Uppercase
Cottage Cutz - layered Happy Birthday dies
acetate -
X-Press It - foam tape - X-Press It - double-sided tape -
Helmar 450 Quick Dry adhesive - to adhere the layers
Tombow Mono Multi Liquid Adhesive - to adhere the alphas

~~~*~~~*~~~
Sending a big Thank You to for supplying the digital stamp I used today and for being a sponsor for Challenge 476Penny's Paper-Crafty Challenge Blog
    
~~~*~~~*~~~
I am going to enter my card in the following challenges

Wednesday, 11 December 2019

Warm Hugs from Chilly Willy


It's time for a new challenge with us on the

As always, the challenge is Anything Goes.

~~~*~~~*~~~

The sponsor for this challenge is:


Oddball Art Co.

~~~*~~~*~~~

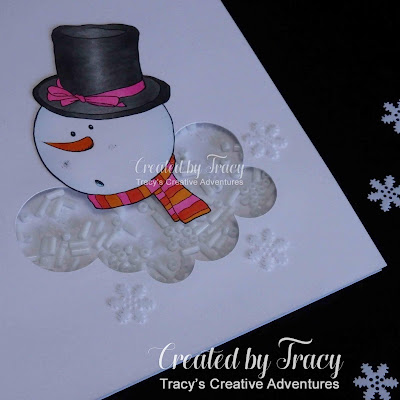
Today I have used the Chilly Willy digital stamp from Oddball Art Co., our generous sponsor for this challenge, to make a pair of fun shaker Christmas cards.


I printed the Chilly Willy image, heat set, fussy cut then coloured with Copic markers, finishing off the edges with a Memento Tuxedo Black dual tip marker.  I printed the front panels with the sentiment, heat set then cut the "melted snow" (cloud) shaped windows with my Silhouette Cameo, then manually trimmed the image panels down to size.  I coloured the sentiments with Copic markers.  Partially overlapping the pink and orange created an even more vibrant orange.  I adhered a panel of acetate to the melted snow windows, adhered foam tape around the windows and over the back of the front panels.  I filled the windows with assorted white beads and sequins then adhered the 7" x 5" card bases.  Lucky last came the fussy cut Chilly Willy images and snowflake sequins, which I adhered in place using liquid adhesive.
It's funny ... and frustrating ... how an idea sticks in your mind.  I was determined to create a melting snowman, an Olaf enjoying warm hugs and summer without his personal flurry.

The first card has the front panel covering the 7" x 5" card base.


The image panel on the second card is smaller
and pops out from the 7" x 5" card base.


~~~*~~~*~~~


NOW it's YOUR turn!

I hope that I have inspired you to get creative
and look forward to seeing your projects fill the gallery for
Penny's Challenge 460
on the
Penny's Paper-Crafty Challenge Blog

~~~*~~~*~~~

*** INGREDIENTS ***
Oddball Art Co. - digital stamp - Chilly Willy
The Hungry JPEG - sentiment font - Snowflake Wishes
* this font is currently a FREEBIE *
X-Press It A4 Blending Card
Copic markers - hat & trim - T1-3-5-7 + RV04-06
Copic markers - snowman - B0000-000-00
Copic markers - carrot nose - YR04-07
Copic markers - scarf - RV04 + YR04, overlapping gave a 3rd colour
Silhouette Cameo
Silhouette Design Store - Design ID #48259
Cloud Mask / Background / Template  by Sarah Hurley
Helmar 450 Quick Dry adhesive - to adhere the layers
Tombow Mono Multi Liquid Adhesive - to the acetate
foam tap - to secure the shaker window and front panel
acetate - to cover the shaker window
assorted beads and sequins - to fill the shaker

~~~*~~~*~~~
Sending a big Thank You to Oddball Art Co. for supplying the digital stamp I used today and for being our sponsor for Challenge 460 on Penny's Paper-Crafty Challenge Blog.
    
~~~*~~~*~~~
I am going to enter my card in the following challenges:
~~~*~~~*~~~

A Gem Of A Challenge - Wk 24 – Anything Goes

A Perfect Time To Craft - December Challenge #12 – Anything Goes
Addicted To Stamps Challenge - Challenge #180 – Our Last Challenge
Allsorts Challenge Blog - Week 549 – Snowmen and/or Snowflakes
Alphabet Challenge Blog - S is for Snow

Cardz 4 Galz - Challenge #111 – Cute Christmas
Colour Crazy Challenge - Week 47 – Anything Goes 
Crafting By Designs - December Anything Goes
Cute As A Button Challenge Blog - Challenge #51 – Anything Goes optional twist: Let It Snow
Die Cut Divas Challenge Blog - December Challenge – Get Ready For Winter / Christmas
Incy Wincy Designs - Dec 2-14 – Christmas Without Red or Green

Jan’s Digi Stamps Challenge Blog - Challenge #3 - Anything Goes 
Rabisco Challenge - Challenge #17 December 2019
Simon Says Stamp Wednesday Challenge Blog - Simon Says: Interactive Christmas
The 12 Months Of Christmas Link Up - Challenge #60 – Anything Goes
optional twist: Layer It Up - my cardstock is layered with acetate to make the shaker
The Cutie Pie Challenge Blog - Challenge #142 – Christmas Cuties
Time Out Challenges - Challenge #150 – Merry & Cheerful


Tuesday, 17 April 2018

Sunflowers with Through The Craft Room Door

I'm thrilled to be
Guest Designer

on the

~~~*~~~*~~~

The sponsor for this challenge is:

My Favorite Things
***  ***
I have linked the products available from the MFT store in my ingredients below.

~~~*~~~*~~~

I have made two projects to share with you today.
This post is all about the first one, a sunflower shaker card.


I have used one of the super cool My Favorite Things Circle Shaker Pouches to transform a pretty sunflower card into a super shaking sunflower card,
filled with fun and birthday cheer.


I confess that the only have MFT exclusive product I have in my crafty stash are circle shaker pouches, so it was a pleasure to get creative and give them a workout.
My card started out as a cut file for a sunflower card (link below).  There are bundles of layers in the middle of the flower, so I cut a 2" circle in the middle of the top layers to make a window for the shaker pouch to fit through.  (Note: I had to enlarge the cut file so that the I could fit the 2" window.)  I cut all the layers from textured cardstock and then the fun began.

I added dimension to the petals and leaves using the handle of a small paintbrush.
I gathered a bundle of 6mm gold/cream/black sequins (a mix in my stash), some 4mm gold sequins and black micro beads and mixed them together.  I aligned one of the top "ring" layers on top of the "backing" layer for the shaker window, so that I could see where to adhere some sequins so that when the card is standing, the top of the window is not empty.  I added a pile of my shaker mix to the middle then carefully removed the top layer that I used as a template, added adhesive to the edge of the circle shaker pouch and carefully positioned it in place.  I finished adhering all the flower layers together then adhered them to the card front, tucking in the leaves.


Next came the sentiment panel.  I added brown layers to match the sunflower, finishing off with a die cut sentiment.  At this stage I stood the card up and it was a bit "wobbly" because I added a lot more weight to the top of it, so I quickly gathered the brown sheets of cardstock and matted the inside with lots of layers ... it worked perfectly, the card now stands proud and tall.


~~~*~~~*~~~
You can learn all about my other TTCRD Guest Designer project HERE

~~~*~~~*~~~


NOW it's YOUR turn!

I hope that I have inspired you to get creative
and look forward to seeing your projects fill the gallery for

~~~*~~~*~~~

*** INGREDIENTS ***
My Favorite Things - Circle Shaker Pouches
My Favorite Things - QuickStik Pick-up Tool
My Favorite Things - Tombow Mono Multi Liquid Glue
Silhouette Cameo
Sizzix Big Shot
Spellbinders - Sentiments 3 - die set
Helmar 450 Quick Dry adhesive - to adhere the layers
Tombow Mono Multi Liquid Adhesive - to adhere the sentiment

~~~*~~~*~~~
Sending a big Thank You to My Favorite Things for sponsoring the challenge and to Deonna for inviting me to be Guest Designer on the Through The Craft Room Door Challenge Blog.
    
~~~*~~~*~~~
I am going to enter my card in the following challenges (alphabetical order):

Monday, 5 June 2017

Some quirky news . . . with feathers on top

I have some exciting news to share!
I am Guest Designer on the Quirky Crafts Challenge Blog for the month of June.

~~~*~~~*~~~ 

My Quirky Thing With Wings is the adorable Mini Bird Mummy digital stamp from Limited Runs Digital Stamps (one of the generous sponsors this month)
to make a 6x6" top folding shaker card.
It makes for a quirky mix of cuteness, spookiness and interactive fun.


I printed the image on X-Press It blending card, heat set, coloured with Copic markers, fussy cut then went around the edges with a Memento marker.  Once my feature image was done, I assembled all the parts to make the shaker card.  The base is 6x6" textured cardstock.  I cut a circle window in a 5 3/4" square patterned paper panel, matted it with a panel of black cardstock in the same size to make it sturdy.  I adhered two sheets of 5 1/2" square black foam together, placed it under the patterned paper panel and traced the window so that I could trim it out with extra sharp scissors.  I trimmed a circle of acetate to be 1/2" larger than the window, leaving plenty of room to securely adhere the edges and hold all the shaker elements inside.

Before adhering the layers together, I placed the patterned window panel over the card base and adhered some sequins and spooky eyes inside so that there would always be some sparkle and eyes visible, even when the card is standing.  I've been caught out before by not doing this and the empty space looks really sad when the card is standing, so I try to remember to decorate it each time I make a shaker.  Once the adhesive had dried, I went over the window panel and around the inner circle foam edges with my powder tool to reduce the amount of sequins and micro beads sticking together.  I adhered the foam window to the card front then poured a bundle of micro beads and sequins into it before adhering the acetate panel and card front in place.  Next came a 1/8" wide black ring of cardstock to cover the front edges of the window, making for a neater finish, ensuring that you can't see the foam inside.

The sentiment tag is a panel of the same patterned paper matted with black cardstock.  The "BOO" was cut from black cardstock using my Silhouette Cameo and the "untitled" font.  Lucky last came the super cute mini bird mummy.  I dotted the back with adhesive to secure it to the card front and the acetate window.

Here is a close-up of the "dirty" bandages and goodies inside the shaker.


Shakers are fun interactive cards but they sure are a challenge to photograph.
Here are some more pics of my quirky thing with wings.


*** INGREDIENTS ***
Limited Runs Digital Stamps - digital stamp - Mini Bird Mummy
X-Press It - A5 blending card
Copic markers - wing -Y11 Y13 Y15
Copic markers - beak - Y17 YR23
Copic markers - foot - YR23 YR24 YR27
Copic markers - bandages - W00 W1 W3 W5
Memento Tuxedo Black Dual Tip marker (edges of fussy cut image)
Glossy Accents (eyes)
acetate sheet
foam sheet (2 layered together)
Doodlebug Designs - eerie eyes sprinkles shapes
Simon Says Stamp - Halloween sequin mix
American Crafts - POP! - black micro beads
Helmar 450 Quick Dry (to adhere the layers together)
Tombow Mono Multi liquid adhesive
(to adhere the acetate, sequins, sentiment & fussy cut image)BOO sentiment - "untitled" font - cut using Silhouette Cameo
Kaisercraft - 12x12" patterned paper - 13th Hour collection - Midnight
American Crafts - 12x12" - black textured cardstock

~~~*~~~*~~~
Sending a big Thank You to Cazzy and the team at Quirky Crafts
for inviting me to be Guest Designer this month.

Sending a big Thank You to Limited Runs Digital Stamps for supplying
the digital stamp I used today and for being a sponsor for the
Quirky Things With Wings challenge on the Quirky Crafts Challenge Blog too.
    
I hope you have been inspired by my card and look forward to seeing your projects shared in the Quirky Crafts - Quirky Things With Wings challenge gallery.

~~~*~~~*~~~
I am going to enter my card in the following challenges (alphabetical order):
~~~*~~~*~~~

Wednesday, 30 November 2016

a shakin' White Christmas


*** INGREDIENTS ***
American Crafts textured cardstock - white 60 pack
Couture Creations intricutz dies - Falling Bauble Screen
Pretty Pink Posh - Sparkling Clear Sequins, 2mm, 4mm and 6mm
Cottage Cutz dies - Merry Christmas sentiment - tba
... the dies have gone MIA, so I can't share the name at the moment, wishing and a hoping that they haven't gone to play with my orange handled Fiskars Micro Tip Scissors because that pair has been so good at playing Hide 'N' Seek that I have almost given up on ever seeing them again!

~~~*~~~*~~~
I am going to enter my card in the following challenges (alphabetical order):

Wednesday, 23 November 2016

Crafty Gals Corner - Challenge #99 - 3 of a kind

It's time for another challenge with us at the
This week we are crafting in 3's with Challenge #99 3-of-a-kind
... use 3 of something on your project, eg 3 flowers, 3 gems etc


~~~*~~~ Our sponsors this week are ~~~*~~~

My Besties Shop / Etsy Bestie Store

Prize: 3 digital images below

Conie Fong
Prize: 3 digital images

~~~*~~~*~~~

Today I have used the cute Ariela Mermaid digital stamp from Conie Fong Art, one of our generous sponsors this week.


My "3-of-a-kind" includes 3 roses and 3 sets of leaves.
There are also 3 orange sea urchins and 3 blue spiral shells in the image.
I have also included three types of shaker elements in the window
(2 sized clear sequins + clear beads)

I have coloured Ariela using Copic markers (details below).
I have matted a 6 1/2" sheet of patterned paper and made the shaker frame using the same navy cardstock.  To make the scalloped frame, I adhered five layers together, adhered the image panel to the base, added sequins & beads, adhered an acetate panel then topped it off with a final scalloped frame layer.

Here are a couple more photos, taken in daylight.


Can you see the sparkle in her tail?

*** INGREDIENTS ***
Conie Fong Art - digital stamp - Ariela Mermaid
X-Press It - A4 blending card
Copic markers - skin - E50 E51 E53 E01
Copic markers - hair - E11 E13 E15
Copic markers - flowers & leaves in her hair - R24 R27 YG13 YG25 YG67
Copic markers - eye & eye shadow - B05 B06 BG11
Copic markers - lips - E01
Copic markers - top - RV02 RV04
Copic markers - tail - BG10 BG11 BG13 BG15 G02
Copic markers - rocky seat - E53 E55 E57 E59 E79
Copic markers - jellyfish - RV02 RV04 YR15
Copic markers - coral - R22 R24 R27 and RV66 V09
Copic markers - starfish - YR15 YR16 YR18
Copic markers - shells - B93 B95B97 and RV02 RV04
Copic markers - sea urchins - Y35Y38
Wink Of Stella - Glitter Brush - Clear
Kaisercraft 6 1/2" paper pad - Chase Rainbows
Kaisercraft - paper blooms - Fire Red
Kaisercraft mini paper blooms - Fire Red
Fiskars Squeeze Punch - Branching Out
acetate sheet
Pretty Pink Posh - Sparkling Clear Sequins - 4mm & 6mm
clear seed beads

~~~*~~~*~~~
Sending a big Thank You to Conie Fong Art for supplying the digital stamp I used today and for being a sponsor for Challenge #99 with us at the Crafty Gals Corner.
    

~~~*~~~*~~~
I am going to enter my card in the following challenges (alphabetical order):
~~~*~~~*~~~
ABC Challenges
T is for Three
~~~*~~~*~~~
Love To Scrap Challenge Blog
LTSCB #90 - Anything Goes
~~~*~~~*~~~
Morgan's ArtWorld
Challenge #23 - Use An Item From Your Stash
I was lucky to have the perfect elements in my stash for this card, from the patterned paper and navy cardstock to the flowers, sequins and beads used to embellish the shaker window.
~~~*~~~*~~~
Simon Says Says Stamp Monday Challenge Blog
Simon Says: Trio-Tastic
use three of something on your project
   
~~~*~~~*~~~
with Kathy Racoosin from The Daily Marker
#thedailymarker30day
All challenge entries are linked via her Day 1 post.
~~~*~~~*~~~
~~~*~~~*~~~