Saturday 30 September 2023

. . . more sunshine and daisies

Earlier today I had fun making a cheery, tall, slimline card using the
Daisy Elements digital set from the Beccy's Place Store. 
.... when I say "digital set", it's two little words for a "MEGA digital set"
filled with digital stamps (to colour and pre-coloured), digital sentiments, digital papers and card toppers too, definitely worth heading over to check it out!

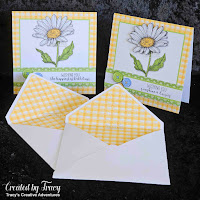
... well, the delightful pink shade reminded me so much of the Marguerite Daisies in my parent's garden and the image was such a pleasure to colour that I had to make another one with some green for a different contrast.


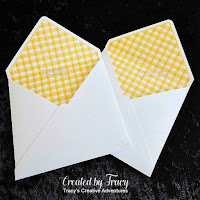
I opened the saved file from the card I made earlier (full details HERE) in Silhouette Studio.  The saved file used the Daisy Flower digital stamp and Sunshine and Daisies digital sentiment from the Daisy Elements digital stamp set from the Beccy's Place storeI printed the image panel on white textured cardstock (printer is pigment ink), coloured with alcohol (Copic) markers, trimmed to size and went to mat with green textured cardstock ... none of my greens matched the shades I coloured with, so I went over a panel of green cardstock with the darkest green Copic Marker I used to colour the stems of the daisies ... a perfect match.  I adhered the image and sentiment panels to the custom made green cardstock, trimmed to 1/16" border using a Perfect Layers Ruler, adhered to a 1/2" x 8 1/2" white cardstock panel, then adhered the panel to a slimline card base that I made from 300gsm smooth cardstock.


~~~*~~~*~~~

I mentioned earlier how wonderful the Daisy Elements digital stamp set
from the Beccy's Place Store is ... so I thought I would share some projects
I have made using other elements from the set.


~~~*~~~*~~~
INGREDIENTS
- Daisy Flower digital stamp
- sunshine and daisies digital sentiment
white textured cardstock - American Crafts
sharp craft knife + self healing cutting mat + steel ruler
- for cutting image panel
++ Copic Markers - pink - RV63-V05-RV66
++ Copic Markers - green - G21-G94-G99
Copic Markers - yellow - Y17-YR24-YR27
"0" Colourless Blender - for fixing when I went outside the lines
green textured cardstock - coloured with G99 Copic Marker
- to make a perfect match to the stems for matting the layers
Perfect Layers Ruler - to cut 1/16" matting layers
300gsm smooth white cardstock - to make card base
Helmar 450 Quick Dry -
liquid adhesive - to secure all the layers in place

~~~*~~~*~~~

++ Kit and Clowder (Alyce Keegan) is an excellent resource for colouring with markers and pencils.  The pink marker combo I used was Mulberry, a Kit and Clowder Colour Blend of the Week (they can all be found HERE).  The green marker combo I used was from Alyce's Favourite Copic Marker Colour Combos found HERE (click on Copic).

~~~*~~~*~~~
I have entered my card in the September Challenge at Beccy's Place Challenges

Wishing you sunshine and daisies

I had some fun making a cheery, tall, slimline card using the
Daisy Elements digital set from the Beccy's Place Store. 
.... when I say "digital set", it's two little words for a "MEGA digital set"
filled with digital stamps (to colour and pre-coloured), digital sentiments, digital papers and card toppers too, definitely worth heading over to check it out!


I designed my card in Silhouette Studio (no, I didn't use it to cut but it's a handy program to size and design cards and card elements), starting with the Daisy Flower digital stamp from the Daisy Elements digital stamp set from the Beccy's Place store.  I sized the image panel to 2.875” x 7.875” and the Sunshine and Daisies digital sentiment to fit neatly on a tall slimline card (3 1/2" x 8 1/2").  I printed the image panel on white textured cardstock (printer is pigment ink), coloured with alcohol (Copic) markers, trimmed to size, matted with pink textured cardstock, trimmed to 1/16" border using a Perfect Layers Ruler, adhered to a 1/2" x 8 1/2" cardstock panel, then adhered the panel to a slimline card base that I made from 300gsm smooth cardstock.  I trimmed the sentiment panel and matted to match.


It felt so good to give my Copic markers a pretty workout
and to try some new-to-me colour blends too ++


~~~*~~~*~~~

I mentioned earlier how wonderful the Daisy Elements digital stamp set
from the Beccy's Place Store is ... so I thought I would share some projects
I have made using other elements from the set.


~~~*~~~*~~~
INGREDIENTS
- Daisy Flower digital stamp
- sunshine and flowers digital sentiment 
white textured cardstock - American Crafts
sharp craft knife + self healing cutting mat + steel ruler
- for cutting image panel
++ Copic Markers - pink - RV63-V05-RV66
++ Copic Markers - green - G21-G94-G99
Copic Markers - yellow - Y17-YR24-YR27
"O" Colourless Blender - for fixing when I went outside the lines
pink textured cardstock - a perfect match to the flowers for matting the layers
Perfect Layers Ruler - to cut 1/16" matting layers
300gms smooth white cardstock - to make card base
Helmar 450 Quick Dry -
liquid adhesive - to secure all the layers in place

~~~*~~~*~~~

++ Kit and Clowder (Alyce Keegan) is an excellent resource for colouring with markers and pencils.  The pink marker combo I used was Mulberry, a Kit and Clowder Colour Blend of the Week (they can all be found HERE).  The green marker combo I used was from Alyce's Favourite Copic Marker Colour Combos found HERE (click on Copic).

~~~*~~~*~~~
I have entered my card in the September Challenge at Beccy's Place Challenges

Friday 29 September 2023

Special envelopes to match some special cards

Earlier today shared two cards made using the
Daisy Elements digital set from the Beccy's Place Store. 
.... when I say "digital set", it's two little words for a "MEGA digital set"
filled with digital stamps (to colour and pre-coloured), digital sentiments,
digital papers and card toppers too!


How could I resist making some special envelopes for them,
when the digital set includes coordinating patterned papers?


I designed my special envelopes in Silhouette Studio, combining the Daisy Elements Paper 4 from the Daisy Elements digital stamp set from the Beccy's Place store with the 5.5" Square Envelope with Liner cut file from My Scrap Chick.

My cards are 1/2" square and I like to have a little wriggle room, so I enlarged the envelope cut file from the original 8.472" square to 9" square.  I took the liner panel and enlarged the pretty patterned paper to be slightly larger, sent it to print on white textured cardstock and cut with my Silhouette Cameo, along with the white envelopes.  I burnished all the folds, adhered the liners in place then adhered the flaps to form the envelopes ... so pretty!


Here's how they look with the cards made from the same digital stamp set.


There's plenty of room inside, even with several layers foam dots.


~~~*~~~*~~~
INGREDIENTS
- Daisy Elements Paper 4
White textured cardstock - American Crafts
- I enlarged it from 8.472" square to 9" square to have some wriggle room 
Helmar 450 Quick Dry -
liquid adhesive - to secure the liner in the envelope
Helmar Acid Free Professional Glue - 
liquid adhesive - to secure the envelope flaps in place

~~~*~~~*~~~
I have entered my card in the September Challenge at Beccy's Place Challenges


Daisy Card Topper with extra POP

Earlier today I had shared a sweet daisy card
using the Daisy Elements digital set from the Beccy's Place Store. 
.... when I say "digital set", it's two little words for a "MEGA digital set"
filled with digital stamps (to colour and pre-coloured), digital sentiments,
digital papers and card toppers too!

My second card uses the same set with a different sentiment,
so that I could send some "just because" cheer
instead of the birthday wishes on the original card design,
along with some extra POP.


I designed my card in Silhouette Studio (no, I didn't use it to cut but it's a handy program to size and design cards and card elements), starting with the Daisy Card Topper 1 from the Daisy Elements digital stamp set from the Beccy's Place store.  I sized the panel to 5 1/2" square.  I duplicated the panel and roughly sliced the daisy and buttons out so that I could print them at the same time as the card front then fussy cut for added dimension later.  I duplicated another card panel and sliced the sentiment panel out, opened the "sunshine and daisies" sentiment (from the same Daisy Elements digital stamp set) and overlayed this sentiment over the original birthday one, sizing it to fit neatly on the sentiment strip and cover the one underneath.

I printed the image panel and extra elements on white textured cardstock.  I trimmed card topper panel to size and adhered to a 5 1/2" top folding square card base.  I made the card base from 300gsm smooth cardstock panel.  I trimmed the sentiment panel and adhered it in place on the card front, popping with foam squares.  I fussy cut the extra daisy and extra buttons and went around the edges with a Memento Tuxedo Black Dual Tip Marker.  I gently curled the petals of the daisy then popped the daisy and buttons in place with foam dots for added dimension.


HERE is the card I shared earlier using the same set,
this card uses the original Daisy Card Topper 1 design. 


... it doesn't look so different at first glance does it?

... but check out when they're side-by-side ...
click on the images if you want to see the detail in full screen


~~~*~~~*~~~
INGREDIENTS
White textured cardstock - American Crafts
sharp craft knife + self healing cutting mat + steel ruler
- for cutting card panel
sharp scissors - for fussy cutting flowers
Memento Tuxedo Black Dual Tip Marker
- to go around edges of fussy cut flowers
300gms smooth white cardstock - to make card base
Helmar 450 Quick Dry -
liquid adhesive - to secure all the layers in place
foam dots - to pop the sentiment, buttons and flower

~~~*~~~*~~~
I have entered my card in the September Challenge at Beccy's Place Challenges

Wishing you the happiest of birthdays

 Today I had some fun making a card
using the Daisy Elements digital set from the Beccy's Place Store. 
.... when I say "digital set", it's two little words for a "MEGA digital set"
filled with digital stamps (to colour and pre-coloured), digital sentiments,
digital papers and card toppers too!


I designed my card in Silhouette Studio (no, I didn't use it to cut but it's a handy program to size and design cards and card elements), starting with the Daisy Card Topper 1 from the Daisy Elements digital stamp set from the Beccy's Place store.  I sized the panel to 5 1/2" square and it was ready to print, that's it, all the work is done for us with this card topper.  I printed the image panel on white textured cardstock, trimmed to size then adhered to a top folding card base.  I made the card base from 300gsm smooth cardstock panel.

Quick as that this pretty birthday card was complete.


~~~*~~~*~~~
INGREDIENTS
White textured cardstock - American Crafts
sharp craft knife + self healing cutting mat + steel ruler
- for cutting card panel
300gms smooth white cardstock - to make card base
Helmar 450 Quick Dry -
liquid adhesive - to secure the card front in place

~~~*~~~*~~~
I have entered my card in the September Challenge at Beccy's Place Challenges