Showing posts with label WOW!. Show all posts

Thursday, 7 March 2019

Flora and Fauna with Team Lou

It's time for another challenge with us at the Southern Girls.

This fortnight Team Lou have created projects to inspire you for the new challenge


Our generous sponsors for this challenge are:

Waffle Flower Stamps & Dies


~~~*~~~*~~~

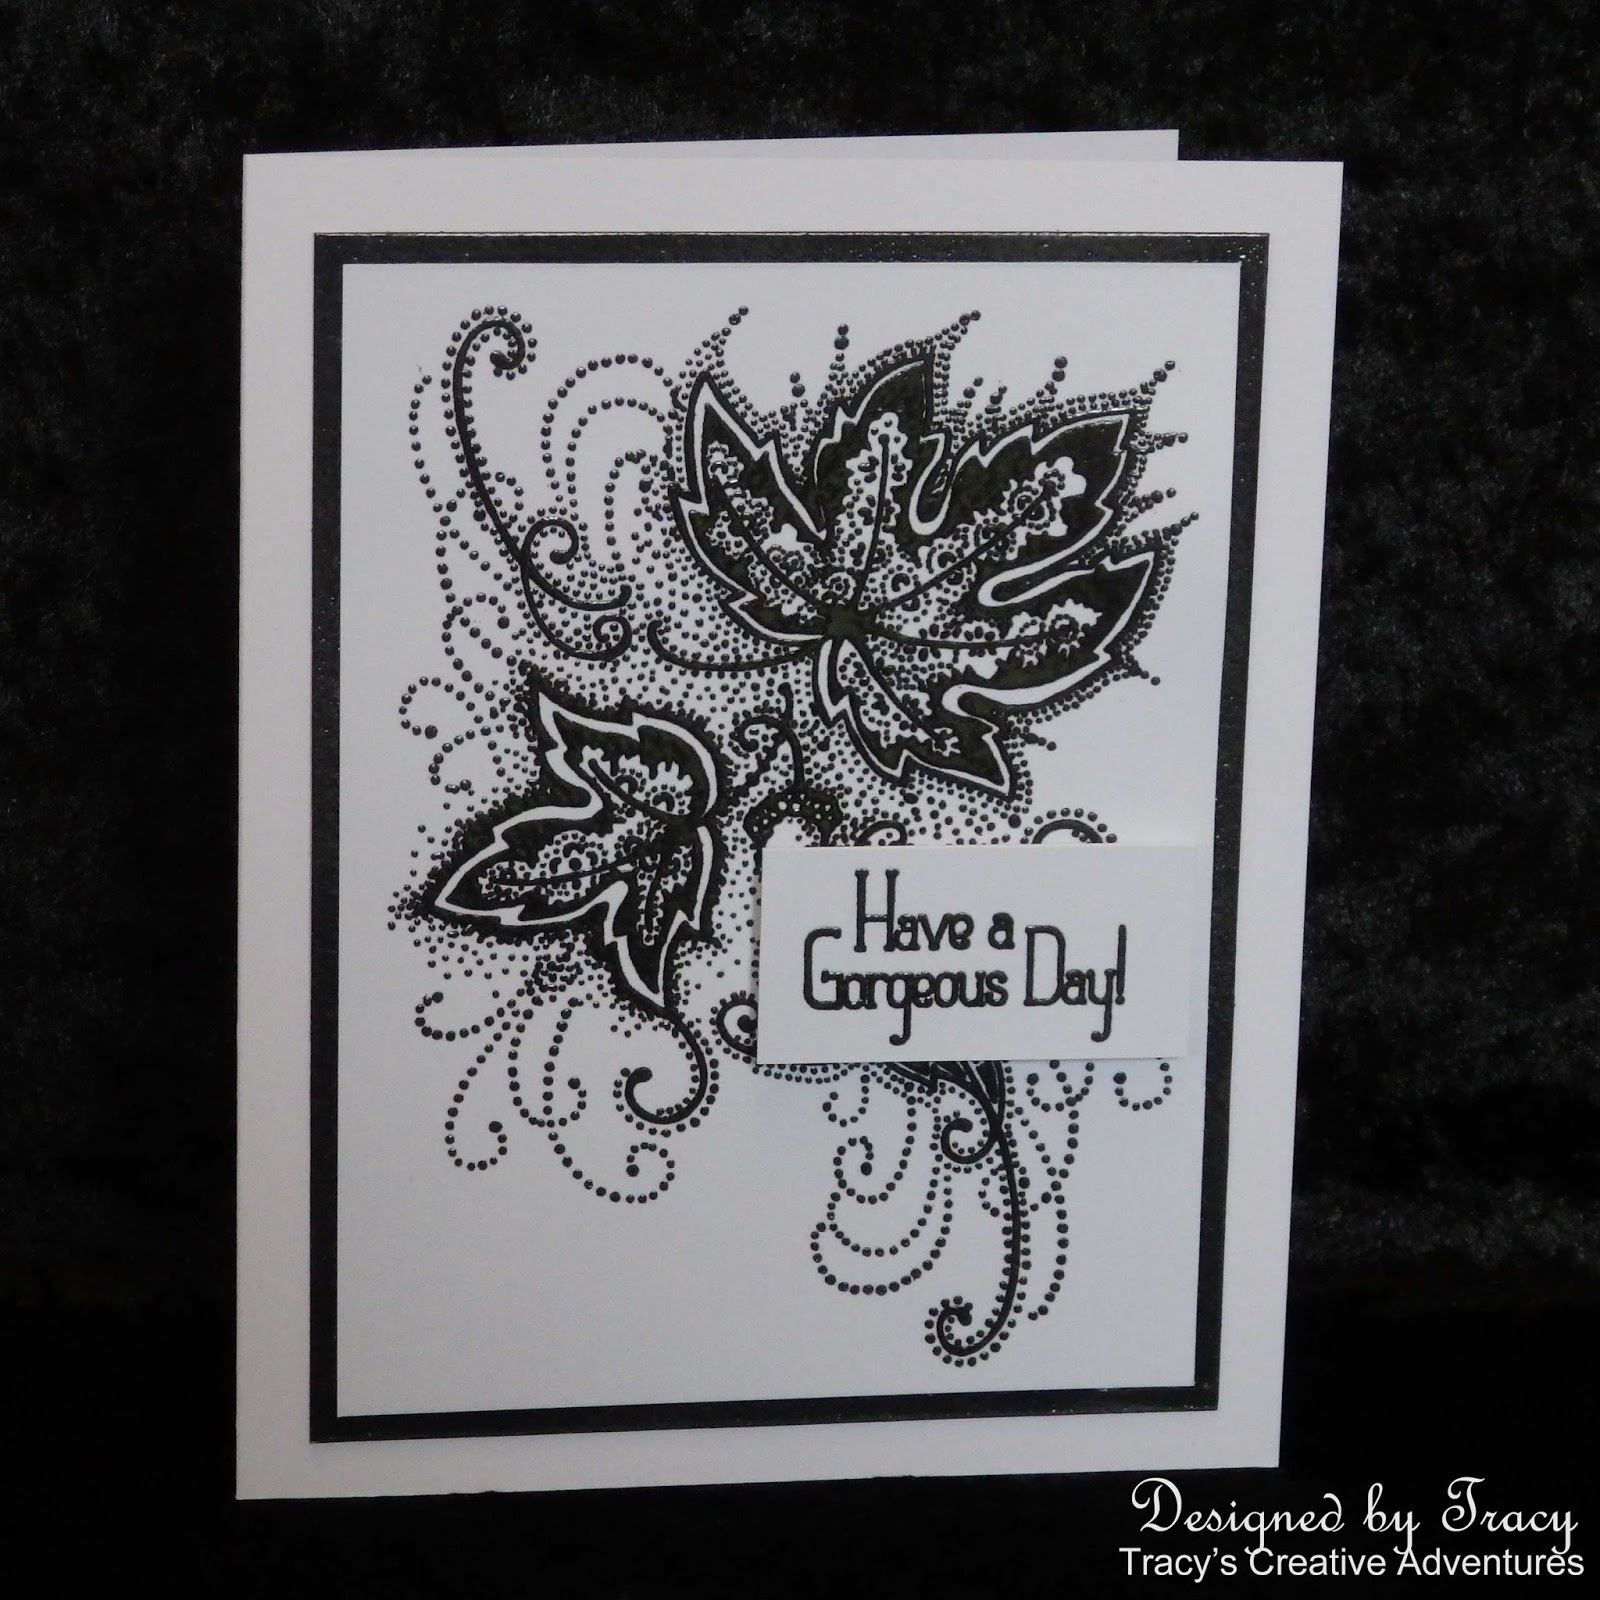
Today I have used the Lacy Flower clear stamp by Waffle Flower Stamps and Dies, one of our generous sponsors this fortnight.  I've had this stamp set in my stash for a while now but I'm thrilled to report that it's still in stock in the Waffle Flower store (link below) and highly recommend the design and quality ... you might add it to your shopping cart if you're the lucky challenge winner.

I tried something new for me, colouring on Kraft.  I dusted the front panel of the card base with powder, then, using my MISTI, I stamped the largest Lacy Flower image and sentiment on a Kraft card base with Versamark watermark ink.  I smothered the stamping with embossing powder, shook off the excess then gently removed any stray granules before zapping it with my heat tool.  I always love watching the magic happen when embossing powder melts.


I gave the card a few minutes to cool down then coloured the segments of the image with Kaisercraft metallic gel pens.  These pens are so juicy and have such a luscious metallic shimmer and shine which looks even more decadent against the Kraft cardstock.


It's not very often that I stamp and colour directly on to a card base.  It was nice not to worry about layers or colours bleeding through.  Using the MISTI would make it quick and easy to make a bundle of these CAS cards to have ready and waiting for some "colouring therapy".

~~~*~~~*~~~
NOW it's YOUR turn!

I hope that I have inspired you to get creative
and look forward to seeing your projects fill the gallery for

~~~*~~~*~~~
*** INGREDIENTS ***

~~~*~~~*~~~

Sending a big Thank You to our generous sponsors for sponsoring the
Flora and Fauna with Team Lou challenge with us at the Southern Girls.

I hope I have inspired you to get creative and look forward to seeing your work shared in the challenge gallery.  
Remember we are not just a card blog, we love to see scrapbook layouts, artjournal pages and all types of papercraft.

~~~*~~~*~~~
I am going to enter my card in the following challenges:

Monday, 21 August 2017

hello . . .

You may have seen these cards in my earlier post today.
They were made for the
where Aussie residents have the opportunity to win the
gorgeous Stampendous Autumn Points cling rubber stamp
that we have all used for the blog hop.
Head on over for your chance to win!


~~~*~~~*~~~

This post is to share my ingredients and
recipe for a cheery HELLO.


~~~*~~~*~~~

There is so much amazing detail in the Autumn Points stamp that I made another couple of CAS cards.  This time I rotated the stamp from portrait to landscape and added a die cut sentiment.

I placed the stamp in my MISTI (foam layer removed) and printed it twice on a piece of 4" x 5 1/4" smooth white cardstock panel using Versafine Onyx Black ink.
For the first card I cut a matting panel 4 1/4" x 5 3/8" and inked the edges with the black ink.
I cut a card base 5" x 6 1/8" to allow for an even border around the matted image panel and adhered all the layers together using liquid adhesive.
Next came the sentiment.  I die cut the "hello" sentiment twice, inking one with the same ink used to stamp the image and layered it on top of a plain white "hello".  I popped the sentiment panel with foam dots and I soon had a second cheery, CAS, SUPER FAST card.

Given how lovely the black ink and clear heat embossing looked on my earlier card, I decided to make another card, this time with a glossy shine.

I stamped the image on a 4" x 5 1/4" of smooth white cardstock, allowed the ink to dry, dusted the image panel liberally with my powder tool, stamped again with Versamark ink, smothered with clear embossing powder then heat set for an even bolder black and a luscious glossy finish.

I cut a matting panel (1/8" larger than on the first card), inked the outer edges with the same black ink, allowed to dry, inked with Versamark ink then heat embossed with clear embossing powder. 

I die cut another two "hello" sentiments, inking one with the same ink used to stamp the image, heat embossed with clear embossing powder and layered it on top of a plain white "hello".  I popped the sentiment panel with foam dots and I soon had a second cheery, CAS, SUPER FAST card, this time with a bolder, shiny black finish. 


*** INGREDIENTS ***
Stampendous Autumn Points cling rubber stamp
MISTI - the Most Incredible Stamping Tool Invented
EK Success Powder Tool
Versamark Ink Pad
Versafine Onyx Black Ink Pad
Winnie & Walter - In A Word - Hello Cutaway
WOW! embossing powder - super fine - Clear Gloss
heat tool
Helmar 450 Quick Dry adhesive - to adhere the layers
foam squares - to adhere the sentiment panels

~~~*~~~*~~~
Sending a big Thank You to Julie at The Stencil Specialist for supplying the Stampendous Autumn Points cling rubber stamp

Don't forget to HOP on over HERE
for the August Blog Hop with The Stencil Specialist
where Aussie residents have the opportunity to win this
gorgeous Stampendous Autumn Points cling rubber stamp

Four blogs, four stops filled with creative inspiration and four chances to win!
GOOD LUCK!

~~~*~~~*~~~
I am going to enter my cards in the following challenges (alphabetical order):
~~~*~~~*~~~

My cards are filled with elegant autumn leaves
and the first card was made in 8 minutes and 15 seconds.
Tuesday Throwdown - TT356 - Anything Goes

Have A Gorgeous Day


You may have seen these cards in my earlier post today.
They were made for the
where Aussie residents have the opportunity to win the
gorgeous Stampendous Autumn Points cling rubber stamp
that we have all used for the blog hop.
Head on over for your chance to win!
This post is to share my ingredients and
recipe for a gorgeous day.

~~~*~~~*~~~

There is so much amazing detail in the Autumn Points stamp that I would start with a set of CAS cards and I am thrilled with the results.

Here is the story of the first card.
I placed the stamp in my MISTI (foam layer removed) and conditioned it with some Versamark ink, testing it on some scrap paper to ensure the detail of the image was crisp and clear.
I measured the stamp and decided to try it with a 4" x 5 1/4" smooth white cardstock panel, stamping it with Versafine Onyx Black ink.  The image looked fabulous the first time but I inked it up again for an even richer / darker image.  The placement of the stamp was perfect too.
I cut a matting panel 4 1/4" x 5 3/8" and inked the edges with the black ink.
I cut a card base 5" x 6 1/8" to allow for an even border around the matted image panel and adhered all the layers together using liquid adhesive.
Next came the sentiment.  I placed the clear stamp on my cutting mat and measured it up, deciding to cut a 25mm x 51mm (yes, it's metric, I pick & choose between metric & imperial, taking the sizes that suit best).  I placed the card panel in the corner of my MISTI, lined the stamp up on top of it, closed the lid to secure the stamp and double inked the sentiment, same as the image panel.  I popped the sentiment panel with foam dots and my CAS card was made SUPER FAST (for me) in eight minutes and fifty-seven seconds, yes, you read right, 8:57.  If I had planned it better, I'm sure it would have been even faster.
What do you think?


Once this first card was completed, I decided to add some extra elegance with some embossing powders.

I stamped the image panel and sentiment on the same sized panels as my first card but made the matting panel 1/8" larger.  I inked the outer edges of the matting panel, inked with Versamark ink then heat embossed with clear embossing powder.  You may notice that there is a little time between this step and heat embossing the image and sentiment panels.  "Why?" you may well ask ... well that's because the ink wasn't dry on my matting panel and it turned my Versamark ink pad black.
I dusted the image panel and sentiment panels liberally with my powder tool, stamped them again with Versamark ink, smothered them with clear embossing powder then heat set for an even bolder black and a luscious glossy finish.


Next came my mini production line.
My final design was decided, so I cut some more image, sentiment and matting panels and some card bases too.  All I needed to do was decide what colours to use.  The only difference with these three is that no pigment inks were used, only Versamark under the luscious metallic embossing powders.

This card uses gold embossing powder. 

This card uses silver embossing powder.

This card uses platinum embossing powder.

The metallic embossing powders pick up the delicate detail
of the stamps and give such rich shimmer and shine. 

*** INGREDIENTS ***
Stampendous Autumn Points cling rubber stamp
MISTI - the Most Incredible Stamping Tool Invented
EK Success Powder Tool
Versamark Ink Pad
Versafine Onyx Black Ink Pad
Lil' Inker Designs - clear stamps - Modern Mehndi Stamps
WOW! embossing powder - regular - Gold Rich
WOW! embossing powder - regular - Silver
WOW! embossing powder - regular - Platinum
WOW! embossing powder - super fine - Clear Gloss
heat tool
burnt fingers ... the itty bitty sentiment panels were tough going!
Helmar 450 Quick Dry adhesive - to adhere the layers
foam squares - to adhere the sentiment panels

~~~*~~~*~~~
Sending a big Thank You to Julie at The Stencil Specialist for supplying the Stampendous Autumn Points cling rubber stamp

Don't forget to HOP on over HERE
for the August Blog Hop with The Stencil Specialist
where Aussie residents have the opportunity to win this
gorgeous Stampendous Autumn Points cling rubber stamp

Four blogs, four stops filled with creative inspiration and four chances to win!
GOOD LUCK!

~~~*~~~*~~~
I am going to enter my cards in the following challenges (alphabetical order):
~~~*~~~*~~~

Add sparkle, glitter, sequins, glimmery paper etc.  Just add some bling!
The metallic embossing powders I have used add a luscious shimmer and shine.
My cards are filled with elegant autumn leaves
and the first card was made in 8 minutes and 57 seconds.

Wednesday, 24 August 2016

... more embossing

I was super lucky and received two images for
the Crafty Gals Corner - Challenge #86 - Emboss It,
so I have two cards to share this week.


I coloured her with Copic markers, fussy cut then went around the edges with a Versamark Memento Tuxedo Black dual tip marker.  This was my first time using this marker and it worked wonderfully, no bleeding and good coverage of all the white edges ... I'm asking myself why didn't I order one of these years ago?!?!?
Needless to say, I highly recommend one for every crafty stash now that I've used it.

I also recommend that Copic markers are opened well away from your work.
I am fairly new to the wonderful world of Copic colouring and some of my markers are super juicy, leaving little splatters each time the caps are removed.
Splatters on your image are a real nuisance, especially if they land after an area has been coloured.  Even the Colourless Blender has its limitations.


I dry embossed the lines in the background, trying to make her look like she has the spotlight shining on this cute little ringmaster.  Or should I say ringmistress?

I heat embossed the die cut "celebrate" sentiment.  ... it was a fiddly job, but well worth it.  I die cut the sentiment, took each letter and covered them with Versamark Ink using the brush tip of the pen, smothered them with clear embossing powder then carefully placed them in the negative piece from the original die cutting.  I placed a strip of Washi Tape along the back, so that the letters stayed securely in place for when I zapped them with the heat gun.  It was my first time trying this technique and it worked a treat, not one letter went flying.


*** INGREDIENTS ***
Silhouette Cameo
Copic markers - skin - E50 E51 E53
Copic markers - cheeks - R01 R02
Copic markers - lips - R56R85
Copic marker- eye shadow - B24
Copic markers - hair - E29 E31 E33 E35 E37
Copic marker - clothes - R17 R27 Y32 Y35 Y38
Copic markers - shoes - C7 100 black
Copic markers - shorts and trims - 100 black
Copic markers - feather - B23 B24 B26 B29
Copic markers - bows - B29 B26
Copic markers - staff - C3 C5 C7
Copic markers - gaps - Y32 and tip-to-tip touch of Y35
(between right shoulder & hair, gap under left arm)
Versamark Memento Tuxedo Black Dual Tip Marker
American CraftsTextured Cardstock - 100 sheet value pack
Martha Stewart Scoreboard
Paper Smooches - Birthday Words Dies
Versamark Pen
WOW! Embossing Powder - Clear Gloss Super Fine
American Crafts - Zap! Embossing Heat Gun

~~~*~~~*~~~

Sending a big Thank You to The Paper Shelter for supplying the digital stamp I used today and for being a sponsor for Challenge #86 with the Crafty Gals Corner.


~~~*~~~*~~~
I'm going to enter my card in the following challenge
~~~*~~~*~~~

Simon Says Stamp Wednesday Challenge Blog
Simon Says: It's Hip To Be Square
my little Ringmistress is in the spotlight of the square circus frame
 
~~~*~~~*~~~

Crafty Gals Corner - Challenge #86 - Emboss It

It's time for another challenge on the Crafty Gals Corner Blog.

Today I have used the super cute Brittany Digital Stamp by Nikki Burnette, one of our generous sponsors this week.


I cut the tree layers using the Hansel and Gretal cut file byErin Doran from the Silhouette Design Store using my Silhouette Cameo machine.  I cut "Hansel & Gretal" out from the top layer and the little house from the middle layer, adding some more grass to it instead.  I punched out two strips of grass using a border punch to add more layers to fill the little hill around Brittany's feet.

I added lots of texture by dry embossing the tree trunks with a stylus and woodgrain texture plate.  This photo shows the back of the tree trunks as I embossed them, I moved the trunks around so that the grain was going in the right direction for each one.  Once the embossing was done, I lightly brushed each layer with Distress Ink to accent the texture.

I stamped and heat embossed stars on the background with clear embossing powder.
Initially I stamped the cluster of stars from the stamp set but found that they were too close together, so I placed the "loose" stars onto a block and randomly stamped them over the background.

I coloured Brittany with Copic markers (details of colours used listed below).

... and one last photo of the card.  This flat view shows the texture of the dry embossed trees and the shine of the heat embossed stars.


*** INGREDIENTS ***
Silhouette Cameo
American Crafts Textured Cardstock - 100 sheet value pack
Copic markers - face & skin - E50 E51 E53 E93
Copic markers - eyes - G07 G46
Copic markers - lips - R56 R85
Copic markers - hair - G40 G43 G46
Copic markers - clothes & hat - BV01 BV02 BV04 BV08
Copic markers - shoes & hat rim - C1 C3 C5 C7
Copic markers - stars on clothes & hat - Y06 Y08
Copic markers - pumpkin - Y35 Y38 YR04 and stalk YR27
Copic markers - book - E37 E35 W1 W2 R46
Fiskars - Texture Plate - Woodgrain
Fiskars - Embossing Stylus
Distress Inks - Walnut Stain, Tattered Rose, Gathered Twigs
(to accent the woodgrain embossed texture)
Winnie & Walter - stamps - Scenery: Big Bang Confetti
WOW! Embossing Powder - Clear Gloss Super Fine
American Crafts - Zap! Embossing Heat Gun
Fiskars - Border Punch - Grass
Tombow Mono Multi Glue
Foam Dots

~~~*~~~*~~~
Sending a big Thank You to Nikki Burnette for supplying the digital stamp I used today and for sponsoring Challenge #86 with the Crafty Gals Corner.


~~~*~~~*~~~
I am going to enter my card in the following challenge
~~~*~~~*~~~

Simon Says Stamp Blog
Work It Wednesday July 2016
The challenge this month is to use the August Birthstone, Peridot.
Brittany has long luscious locks of green hair.

~~~*~~~*~~~

Sunday, 15 February 2015

Sympathy card

  • My card is 6" x 6" square.
  • I used the beautiful "with sympathy" sentiment stamp from the fabulous "A Tree For All Seasons" stamp set by Winnie & Walter.
  • I stamped the sentiment in Versamark Ink on vellum then heat embossed using WOW "Calypso" glitter embossing powder, it melts like butter and the glitter sparkles beautifully.
  • The sentiment panel is Couture Creations "2 Tags & Bird Branch" die set, I die cut then layered vellum sentiment on cardstock, then double cut the frame to go on top.
  • The patterned paper is Kaisercraft Elegance 6 1/2 x 6 1/2" paper pad.
  • The bird is Fiskars Jenni Bowlin Flight squeeze punch, I layered 3 together for dimension.
  • The feathers are Feathers dies from Paper Smooches.
Challenges:
  1. I have entered my card in the Paper Issues: New Issue -The Perfect Pairing found here:  http://paperissues.blogspot.com.au/2015/02/new-issue-perfect-pairing-with-epiphany.html

    Birds & feathers go together => they are my perfect pairing for this challenge, along with all the love that is shared when sympathy cards are sent.