Showing posts with label heat embossing. Show all posts

Thursday, 7 March 2019

Flora and Fauna with Team Lou

It's time for another challenge with us at the Southern Girls.

This fortnight Team Lou have created projects to inspire you for the new challenge


Our generous sponsors for this challenge are:

Waffle Flower Stamps & Dies


~~~*~~~*~~~

Today I have used the Lacy Flower clear stamp by Waffle Flower Stamps and Dies, one of our generous sponsors this fortnight.  I've had this stamp set in my stash for a while now but I'm thrilled to report that it's still in stock in the Waffle Flower store (link below) and highly recommend the design and quality ... you might add it to your shopping cart if you're the lucky challenge winner.

I tried something new for me, colouring on Kraft.  I dusted the front panel of the card base with powder, then, using my MISTI, I stamped the largest Lacy Flower image and sentiment on a Kraft card base with Versamark watermark ink.  I smothered the stamping with embossing powder, shook off the excess then gently removed any stray granules before zapping it with my heat tool.  I always love watching the magic happen when embossing powder melts.


I gave the card a few minutes to cool down then coloured the segments of the image with Kaisercraft metallic gel pens.  These pens are so juicy and have such a luscious metallic shimmer and shine which looks even more decadent against the Kraft cardstock.


It's not very often that I stamp and colour directly on to a card base.  It was nice not to worry about layers or colours bleeding through.  Using the MISTI would make it quick and easy to make a bundle of these CAS cards to have ready and waiting for some "colouring therapy".

~~~*~~~*~~~
NOW it's YOUR turn!

I hope that I have inspired you to get creative
and look forward to seeing your projects fill the gallery for

~~~*~~~*~~~
*** INGREDIENTS ***

~~~*~~~*~~~

Sending a big Thank You to our generous sponsors for sponsoring the
Flora and Fauna with Team Lou challenge with us at the Southern Girls.

I hope I have inspired you to get creative and look forward to seeing your work shared in the challenge gallery.  
Remember we are not just a card blog, we love to see scrapbook layouts, artjournal pages and all types of papercraft.

~~~*~~~*~~~
I am going to enter my card in the following challenges:

Monday, 21 August 2017

hello . . .

You may have seen these cards in my earlier post today.
They were made for the
where Aussie residents have the opportunity to win the
gorgeous Stampendous Autumn Points cling rubber stamp
that we have all used for the blog hop.
Head on over for your chance to win!


~~~*~~~*~~~

This post is to share my ingredients and
recipe for a cheery HELLO.


~~~*~~~*~~~

There is so much amazing detail in the Autumn Points stamp that I made another couple of CAS cards.  This time I rotated the stamp from portrait to landscape and added a die cut sentiment.

I placed the stamp in my MISTI (foam layer removed) and printed it twice on a piece of 4" x 5 1/4" smooth white cardstock panel using Versafine Onyx Black ink.
For the first card I cut a matting panel 4 1/4" x 5 3/8" and inked the edges with the black ink.
I cut a card base 5" x 6 1/8" to allow for an even border around the matted image panel and adhered all the layers together using liquid adhesive.
Next came the sentiment.  I die cut the "hello" sentiment twice, inking one with the same ink used to stamp the image and layered it on top of a plain white "hello".  I popped the sentiment panel with foam dots and I soon had a second cheery, CAS, SUPER FAST card.

Given how lovely the black ink and clear heat embossing looked on my earlier card, I decided to make another card, this time with a glossy shine.

I stamped the image on a 4" x 5 1/4" of smooth white cardstock, allowed the ink to dry, dusted the image panel liberally with my powder tool, stamped again with Versamark ink, smothered with clear embossing powder then heat set for an even bolder black and a luscious glossy finish.

I cut a matting panel (1/8" larger than on the first card), inked the outer edges with the same black ink, allowed to dry, inked with Versamark ink then heat embossed with clear embossing powder. 

I die cut another two "hello" sentiments, inking one with the same ink used to stamp the image, heat embossed with clear embossing powder and layered it on top of a plain white "hello".  I popped the sentiment panel with foam dots and I soon had a second cheery, CAS, SUPER FAST card, this time with a bolder, shiny black finish. 


*** INGREDIENTS ***
Stampendous Autumn Points cling rubber stamp
MISTI - the Most Incredible Stamping Tool Invented
EK Success Powder Tool
Versamark Ink Pad
Versafine Onyx Black Ink Pad
Winnie & Walter - In A Word - Hello Cutaway
WOW! embossing powder - super fine - Clear Gloss
heat tool
Helmar 450 Quick Dry adhesive - to adhere the layers
foam squares - to adhere the sentiment panels

~~~*~~~*~~~
Sending a big Thank You to Julie at The Stencil Specialist for supplying the Stampendous Autumn Points cling rubber stamp

Don't forget to HOP on over HERE
for the August Blog Hop with The Stencil Specialist
where Aussie residents have the opportunity to win this
gorgeous Stampendous Autumn Points cling rubber stamp

Four blogs, four stops filled with creative inspiration and four chances to win!
GOOD LUCK!

~~~*~~~*~~~
I am going to enter my cards in the following challenges (alphabetical order):
~~~*~~~*~~~

My cards are filled with elegant autumn leaves
and the first card was made in 8 minutes and 15 seconds.
Tuesday Throwdown - TT356 - Anything Goes

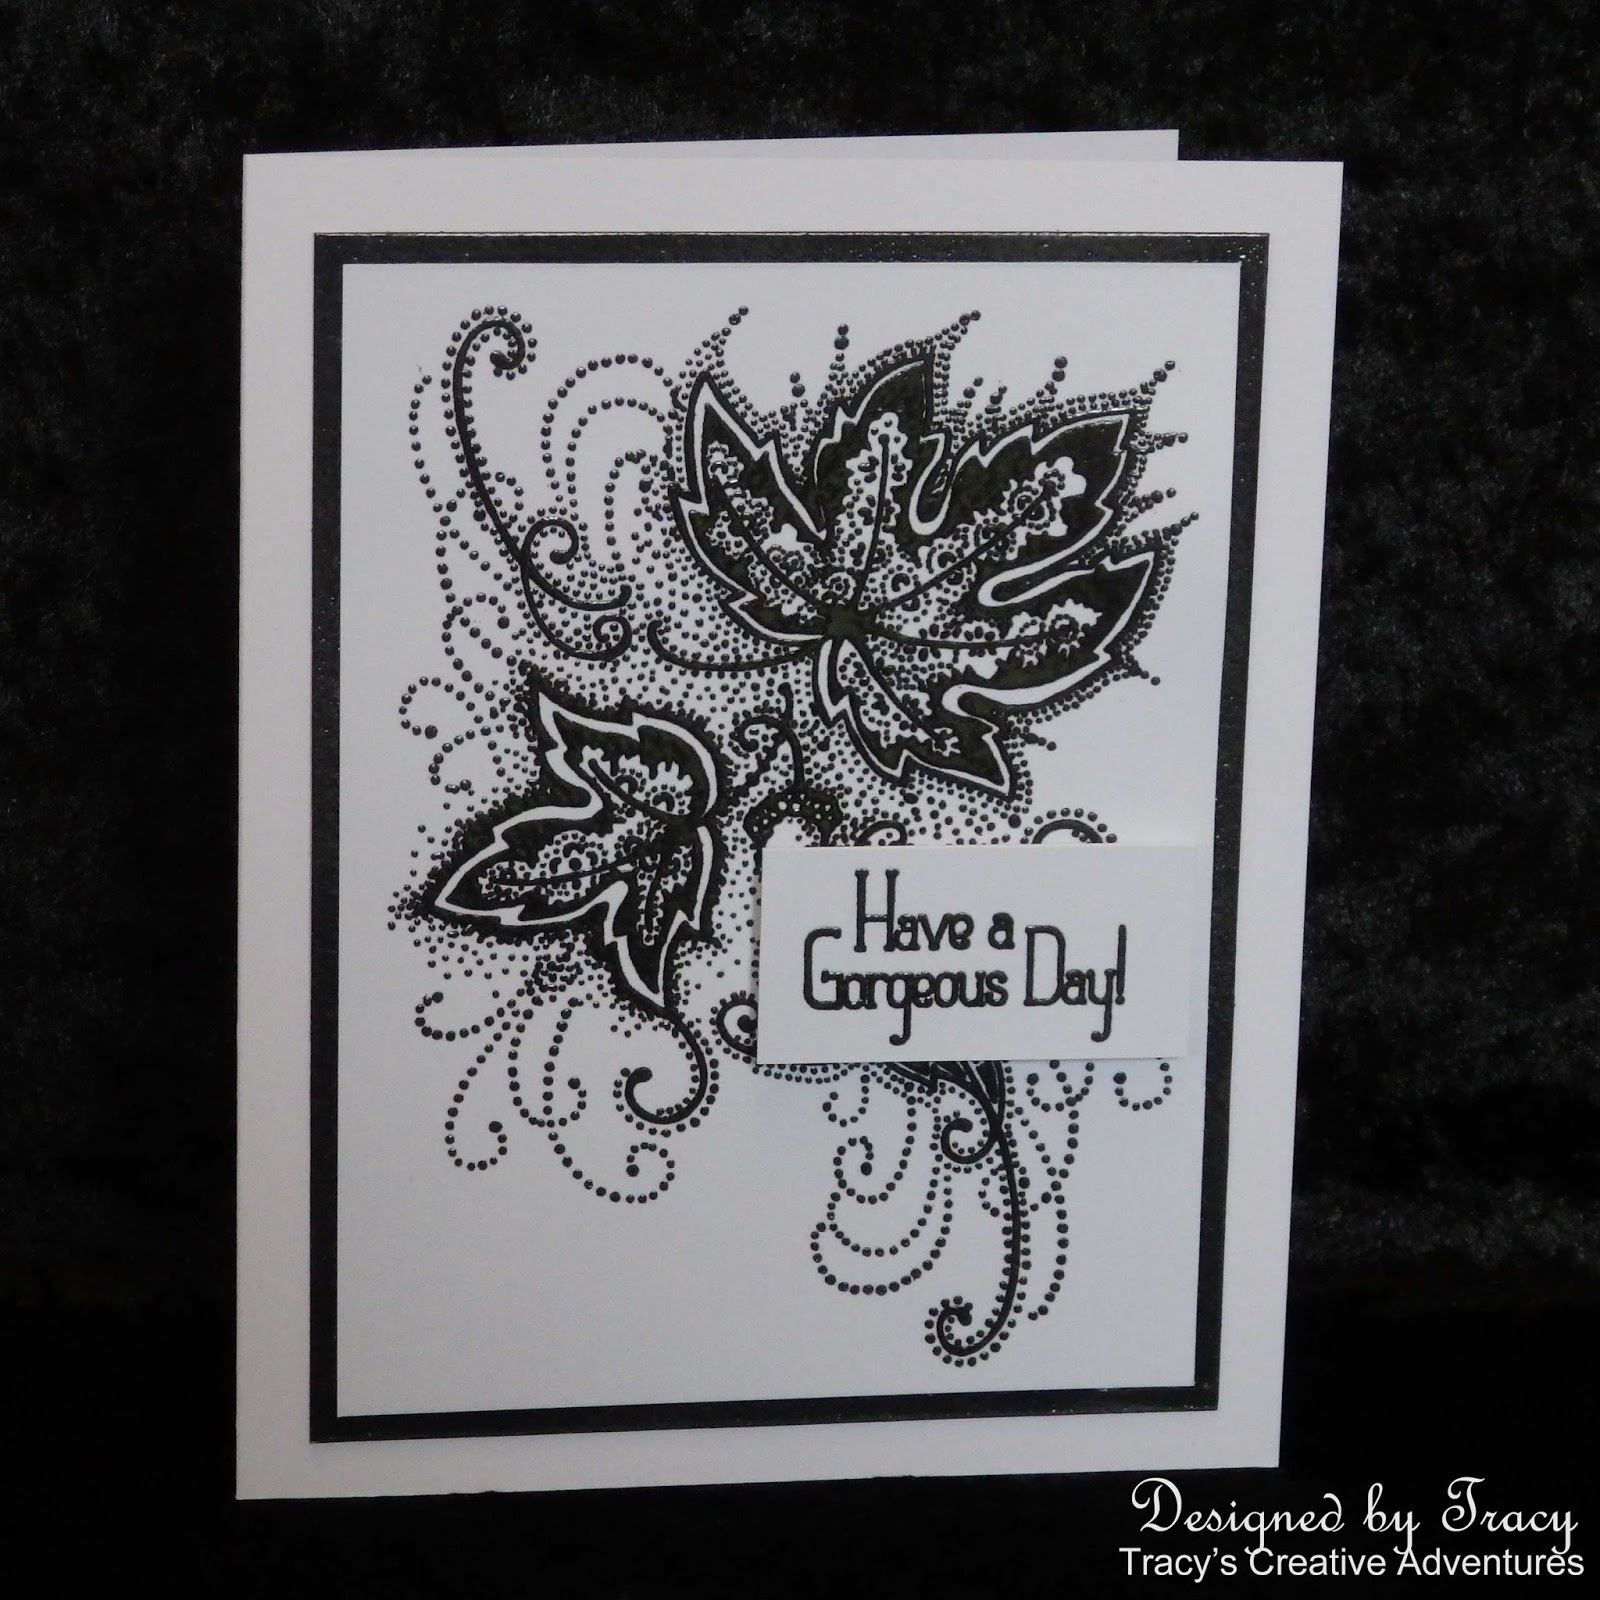
Have A Gorgeous Day


You may have seen these cards in my earlier post today.
They were made for the
where Aussie residents have the opportunity to win the
gorgeous Stampendous Autumn Points cling rubber stamp
that we have all used for the blog hop.
Head on over for your chance to win!
This post is to share my ingredients and
recipe for a gorgeous day.

~~~*~~~*~~~

There is so much amazing detail in the Autumn Points stamp that I would start with a set of CAS cards and I am thrilled with the results.

Here is the story of the first card.
I placed the stamp in my MISTI (foam layer removed) and conditioned it with some Versamark ink, testing it on some scrap paper to ensure the detail of the image was crisp and clear.
I measured the stamp and decided to try it with a 4" x 5 1/4" smooth white cardstock panel, stamping it with Versafine Onyx Black ink.  The image looked fabulous the first time but I inked it up again for an even richer / darker image.  The placement of the stamp was perfect too.
I cut a matting panel 4 1/4" x 5 3/8" and inked the edges with the black ink.
I cut a card base 5" x 6 1/8" to allow for an even border around the matted image panel and adhered all the layers together using liquid adhesive.
Next came the sentiment.  I placed the clear stamp on my cutting mat and measured it up, deciding to cut a 25mm x 51mm (yes, it's metric, I pick & choose between metric & imperial, taking the sizes that suit best).  I placed the card panel in the corner of my MISTI, lined the stamp up on top of it, closed the lid to secure the stamp and double inked the sentiment, same as the image panel.  I popped the sentiment panel with foam dots and my CAS card was made SUPER FAST (for me) in eight minutes and fifty-seven seconds, yes, you read right, 8:57.  If I had planned it better, I'm sure it would have been even faster.
What do you think?


Once this first card was completed, I decided to add some extra elegance with some embossing powders.

I stamped the image panel and sentiment on the same sized panels as my first card but made the matting panel 1/8" larger.  I inked the outer edges of the matting panel, inked with Versamark ink then heat embossed with clear embossing powder.  You may notice that there is a little time between this step and heat embossing the image and sentiment panels.  "Why?" you may well ask ... well that's because the ink wasn't dry on my matting panel and it turned my Versamark ink pad black.
I dusted the image panel and sentiment panels liberally with my powder tool, stamped them again with Versamark ink, smothered them with clear embossing powder then heat set for an even bolder black and a luscious glossy finish.


Next came my mini production line.
My final design was decided, so I cut some more image, sentiment and matting panels and some card bases too.  All I needed to do was decide what colours to use.  The only difference with these three is that no pigment inks were used, only Versamark under the luscious metallic embossing powders.

This card uses gold embossing powder. 

This card uses silver embossing powder.

This card uses platinum embossing powder.

The metallic embossing powders pick up the delicate detail
of the stamps and give such rich shimmer and shine. 

*** INGREDIENTS ***
Stampendous Autumn Points cling rubber stamp
MISTI - the Most Incredible Stamping Tool Invented
EK Success Powder Tool
Versamark Ink Pad
Versafine Onyx Black Ink Pad
Lil' Inker Designs - clear stamps - Modern Mehndi Stamps
WOW! embossing powder - regular - Gold Rich
WOW! embossing powder - regular - Silver
WOW! embossing powder - regular - Platinum
WOW! embossing powder - super fine - Clear Gloss
heat tool
burnt fingers ... the itty bitty sentiment panels were tough going!
Helmar 450 Quick Dry adhesive - to adhere the layers
foam squares - to adhere the sentiment panels

~~~*~~~*~~~
Sending a big Thank You to Julie at The Stencil Specialist for supplying the Stampendous Autumn Points cling rubber stamp

Don't forget to HOP on over HERE
for the August Blog Hop with The Stencil Specialist
where Aussie residents have the opportunity to win this
gorgeous Stampendous Autumn Points cling rubber stamp

Four blogs, four stops filled with creative inspiration and four chances to win!
GOOD LUCK!

~~~*~~~*~~~
I am going to enter my cards in the following challenges (alphabetical order):
~~~*~~~*~~~

Add sparkle, glitter, sequins, glimmery paper etc.  Just add some bling!
The metallic embossing powders I have used add a luscious shimmer and shine.
My cards are filled with elegant autumn leaves
and the first card was made in 8 minutes and 57 seconds.

Hopping along with The Stencil Specialist

EDITED
entries close midnight 31st August 2017
~~~*~~~*~~~

Are you ready to hop along, be inspired and have the chance to win too?

Well you're in the right place!

It is time for the August Blop Hop with Julie and the Design Team at the

The Stencil Specialist is the Australian Wholesaler for Stampendous products and much, much more.

The prize for one lucky winner is the beautiful 
STAMPendous Autumn Points Cling Rubber Stamp

but before you go, I do hope you will check out my projects using the beautiful Stampendous Autumn Points Cling Rubber Stamp and leave a comment for your chance to be a lucky winner.

To enter for your chance to win, all you need to do is leave a comment on one or all of the Designers Blogs, one comment equals one entry, four comments equals four entries.  Only one comment per blog please.  Please include what state you live in, as this competition is open to Australian residents only.  Entries close midnight Friday 25th August AEST
EDITED
Entries close midnight Thursday 31st August AEST

The Stencil Specialist - Julie
Donna
Robyn
Tracy - that's me and you're here
    
~~~*~~~*~~~

There is so much amazing detail in this stamp, I decided to go with a set of CAS cards.

These three were heat embossed with metallic embossing powders.

These two were stamped with Versafine Onyx Black ink,
with one stamped again and heat embossed with clear embossing powder.

These next two card show that this stamp looks just as awesome in landscape.


This one was heat embossed with clear embossing powder
and have such a rich black shine.

Here are some close up pics to show the gorgeous detail.

Rich gold embossing powder.

Shimmering silver embossing powder.

Precious platinum embossing powder.

~ ~ ~ MORE TO COME ~ ~ ~

Today was sharing my set of CAS cards, tomorrow there will be some other designs.

*** INGREDIENTS ***
Stampendous Autumn Points Cling Rubber Stamp
MISTI

~~~*~~~*~~~

Sending a big Thank You to Julie from The Stencil Specialist for supplying the Stampendous Autumn Points Cling Rubber Stamp that I used today.
I know that the lucky winner from this August Blog Hop Giveaway will have wonderful inky adventures with this stamp, so don't forget to leave a comment with your state (Australian residents only) for your chance to win this beautiful stamp and then head on over to The Stencil Specialist blog to complete the Blog Hop.

We have a Blog Hop with prizes every month, so you might want to follow me so that you don't miss out on Stampendous inspiration and more chances to win with The Stencil Specialist.

Monday, 24 July 2017

Glamorous rose gold Christmas wishes . . . part 2

This card features the Stampendous Pine Ornaments Cling Rubber Stamp and Rose Gold Embossing Enamel, the sentiment by Ultimate Crafts.  This CAS design was quick and easy to prepare and assemble and I know I will be making more to send out in time Christmas this year.


Here is a close-up pic showing the beautiful detail of the stamp
and the delicate shimmer of the rose gold embossing enamel.


*** INGREDIENTS ***


~~~*~~~*~~~
I am going to enter my card in the following challenges (alphabetical order):

Glamorous rose gold Christmas wishes

Hopefully you have already heard my exciting news,
seen my cards in THIS post and
entered for your chance to win on The Stencil Specialist Blog HOP.

This pair of cards use the Stampendous Pine Ornaments Cling Rubber Stamp and
Rose Gold Embossing Enamel with sentiments by Kaisercraft and Ultimate Crafts.
These CAS designs were quick and easy to prepare and assemble.


I measured the stamp and cut some 3" x 4 1/4" panels to stamp them on.
I aligned the stamp with a panel in my MISTI and started stamping.

I stamped each panel with Tattered Rose Distress Ink first, to give a solid background for the heat embossing to come.  I heat set each panel, dusted with my powder tool, stamped with Versamark ink, smothering each panel with embossing powder, then held my breath in awe as the magic happened before my eyes with the heat gun - WOW!

I cut some slightly larger panels to mat each image panel, went around the edges with Versamark ink and heat embossed to match the image panel to give me perfectly matching matting panels.
I die cut the pair of Merry Christmas sentiments and heat embossed them too.

The smaller card is 5x7", the larger A5.


Here is a close-up pic showing the beautiful detail of the stamp
and the delicate shimmer of the rose gold embossing enamel.


It's gorgeous, so hard to photograph, pure magic in real life,
a delicate pinkish gold that shimmers & sparkles in the light!

*** INGREDIENTS ***
Stampendous - Pine Ornaments Cling Rubber Stamp
MISTI
Tattered Rose Distress Ink
EK Success Powder Tool
Versamark Ink Pad
Stampendous - Rose Gold Embossing Enamel
heat tool
Sizzix Big Shot
Kaisercraft Release Paper
Kaisercraft Decorative Die Words - Merry Christmas
Ultimate Crafts - Merry Christmas Script Die
(Ultimate Crafts are the parent company of Couture Creations)
Helmar 450 Quick Dry Liquid Adhesive - to adhere layers
Tombow Mono Multi Adhesive - to adhere the sentiments

~~~*~~~*~~~

Don't forget to hop on over to my The Stencil Specialist Blog Hop post for your chance to win the awesome prize pack - good luck!

~~~*~~~*~~~
I am going to enter my card in the following challenges (alphabetical order):

Sparkling tinsel Christmas wishes . . . part 2


This card features the Stampendous Pine Ornaments Cling Rubber Stamp and Gold Tinsel Glitter Embossing Powder, the sentiment by Ultimate Crafts.  This CAS design was quick and easy to prepare and assemble and I know I will be making more to send out in time Christmas this year.


Here is a close-up pic showing the delicate detail of the stamp
and the stunning sparkle of the tinsel embossing powder.


*** INGREDIENTS ***


~~~*~~~*~~~
I am going to enter my card in the following challenges (alphabetical order):

Sparkling tinsel Christmas wishes

Hopefully you have already heard my exciting news,
seen my cards in THIS post and
entered for your chance to win on The Stencil Specialist Blog HOP.

This pair of cards feature the Stampendous Pine Ornaments Cling Rubber Stamp and Gold Tinsel Glitter Embossing Powder, with sentiments by Kaisercraft and Ultimate Crafts.  These CAS designs were quick and easy to prepare and assemble.


I measured the stamp and cut some 3" x 4 1/4" panels to stamp them on.
I aligned the stamp with a panel in my MISTI and started stamping.

I stamped each panel with Fossilized Amber Distress Ink first, to give a solid background for the heat embossing to come.  I heat set each panel, dusted with my powder tool, stamped with Versamark ink, smothering each panel with embossing powder, then held my breath in awe as the magic happened before my eyes with the heat gun - WOW!

I cut some slightly larger panels to mat each image panel, went around the edges with Versamark ink and heat embossed to match the image panel to give me perfectly matching matting panels.
I die cut the pair of Merry Christmas sentiments and heat embossed them too.

The smaller card is 5x7", the larger A5.


Here is a close-up pic showing the delicate detail of the stamp
and the stunning sparkle of the tinsel embossing powder.


It's gorgeous, so hard to photograph, pure magic in real life!

*** INGREDIENTS ***
Stampendous - Pine Ornaments Cling Rubber Stamp
MISTI
Fossilized Amber Distress Ink
EK Success Powder Tool
Versamark Ink Pad
Stampendous - Gold Tinsel Glitter Embossing Powder
heat tool
Sizzix Big Shot
Kaisercraft Release Paper
Kaisercraft Decorative Die Words - Merry Christmas
Ultimate Crafts - Merry Christmas Script Die
(Ultimate Crafts are the parent company of Couture Creations)
Helmar 450 Quick Dry Liquid Adhesive - to adhere layers
Tombow Mono Multi Adhesive - to adhere the sentiments

~~~*~~~*~~~

Don't forget to hop on over to my The Stencil Specialist Blog Hop post for your chance to win the awesome prize pack - good luck!

~~~*~~~*~~~
I am going to enter my card in the following challenges (alphabetical order):

EXCITING news + The Stencil Specialist Blog Hop

Today I have some exciting news to share!

I have been invited by the talented Julie to join her Design Team at

The Stencil Specialist is the Australian Wholesaler for Stampendous products and much, much more.

My first post is part of a Blog Hop filled with creative inspiration and it's topped off with the chance to win a bundle of seriously awesome crafting goodies.
The prize pack includes:
- Two Stampendous stamps
- Two Dreamweaver Die sets
- Two packs of adhesive rhinestones
- Two specialty embossing powders
- One jar of the new "Twinkle Glitter"
Pretty awesome, right?!?!?

but before you go, I do hope you will check out my projects using the beautiful Stampendous Pine Ornaments Cling rubber stamp and leave a comment for your chance to be a lucky winner.
To enter for your chance to win, all you need to do is leave a comment on one or all of the Designers Blogs, one comment equals one entry, four comments equals four entries.  Only one comment per blog please.  Please include what state you live in, as this competition is open to Australian residents only.  Entries close Friday 29th July AEST.

The Stencil Specialist - Julie
Robyn
Donna
Tracy - that's me and you're here
    
~~~*~~~*~~~

Now, time for my first projects with The Stencil Specialist.
You can learn more about each card by clicking on the photo.

This pair of cards use the Pine Ornaments Cling Rubber Stamp and Gold Tinsel Glitter Embossing Powder.  These CAS designs were quick and easy to prepare and assemble.


Here is a close-up pic showing the delicate detail of the stamp
and the stunning sparkle of the tinsel embossing powder.


This pair of cards use the Pine Ornaments Cling Rubber Stamp and Rose Gold Embossing Enamel.


Here is a close-up pic showing the beautiful detail of the stamp
and the delicate shimmer of the rose gold embossing enamel.


For this next card, I stamped the Pine Ornaments and coloured them with Copic markers.


And lucky last comes some burlap and woodgrain.
I stamped the Pine Ornaments, masked the ornaments, inked the background with Distress Inks, coloured the ornaments with Copic markers and finished them off with a touch of Wink Of Stella.
I considered adding some sparkling clear sequins to this card.
What do you think?  Add some?


Here is a close-up pic showing the sparkle of the golden ornaments.


That's all my cards for today.
I hope that I have inspired you and that you can see how versatile
the Pine Ornaments stamp can be, from sparkling elegance
to bold & bright, even rustic too.

*** INGREDIENTS ***
Stampendous Pine Ornaments Cling Rubber Stamp
Stampendous - Gold Tinsel Glitter Embossing Powder
Stampendous - Rose Gold Embossing Enamel
FULL details for each card can be found on the individual posts for each card found by clicking on the images or
HERE for the sparkling gold tinsel cards
HERE for the shimmering rose gold cards
HERE for the bright, bold, pine & bow card
HERE for the rustic burlap & woodgrain card

~~~*~~~*~~~

Sending a big Thank You to Julie for supplying the Stampendous Pine Ornaments cling rubber stamp that I used today and for being a inviting me to join the Design Team at The Stencil Specialist.  I look forward to having exciting inky adventures with the team.

Don't forget to leave a comment with state (Australian residents only) for your chance to win the awesome prize pack and then head on over to The Stencil Specialist blog to complete the Blog Hop.

We have a Blog Hop with prizes every month, so you might want to follow me so that you don't miss out on Stampendous inspiration and more chances to win with The Stencil Specialist.