Wednesday 31 January 2024

One day at a time, together

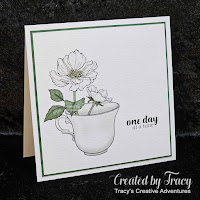
 Today I have used the Stem In A Teacup digital set
from the Beccy's Place Store to make some special cards.


I designed my cards in Silhouette Studio (no, I didn't use it to cut but it's a handy program to size and design cards and card elements), starting with the Stem In A Teacup digital set from the Beccy's Place Store.  I used the "Wild Rose" pre-coloured digital stamp and combined it with the "one day at a time" digital sentiment from the same set.  My cards are slimline style, so I sized an image panel to 8 1/2" wide x 3 1/2" tall.  

I duplicated and mirrored the image to create my design, an image on each side, with the sentiment in the middle between them.  I added "together" to the sentiment as the cards are going to some couples still going through tough times from the 2022 floods.  I printed the image panel on 300gms smooth white cardstock, scored, folded, then trimmed to size.


~~~*~~~*~~~
INGREDIENTS
Stem In A Teacup digital set from the Beccy's Place store
"together" sentiment - Caramello Font - Creative Fabrica
300gsm smooth white cardstock - to print card
scoreboard & bone folder - to create top folding card
sharp craft knife + self healing cutting mat + steel ruler
- for cutting the card

~~~*~~~*~~~
I have entered my cards in the following challenges:
My "F" is Flowers

One day at a time . . .

  Today I had some fun making some cards
using the Stem In A Teacup digital set from the Beccy's Place Store.


I designed my cards in Silhouette Studio (no, I didn't use it to cut but it's a handy program to size and design cards and card elements), starting with the Stem In A Teacup digital set from the Beccy's Place Store.  I used the "Wild Rose" pre-coloured digital stamp and combined it with the "one day at a time" digital sentiment from the same digital stamp set.  As I was making two cards, I duplicated and mirrored the image, so that my two cards are the-same-but-different.  I sized the image panels to 5 1/2" square, added the images and sentiments and they were ready to print.  I printed the image panels on white textured cardstock, trimmed to size, matted with green cardstock, trimmed to 1/16" border with a Perfect Layers Ruler, adhered to 6" square white cardstock panels, then adhered to top folding card bases.


~~~*~~~*~~~
INGREDIENTS
Stem In A Teacup digital set from the Beccy's Place store
white & green textured cardstock - American Crafts
sharp craft knife + self healing cutting mat + steel ruler
- for cutting image panel
Perfect Layers Ruler - to trim 1/16" matting layers
Helmar 450 Quick Dry -
liquid adhesive - to adhere the layers

~~~*~~~*~~~
I have entered my cards in the following challenges:
My "F" is Flowers