Showing posts with label interactive. Show all posts

Wednesday, 11 December 2019

Warm Hugs from Chilly Willy


It's time for a new challenge with us on the

As always, the challenge is Anything Goes.

~~~*~~~*~~~

The sponsor for this challenge is:


Oddball Art Co.

~~~*~~~*~~~

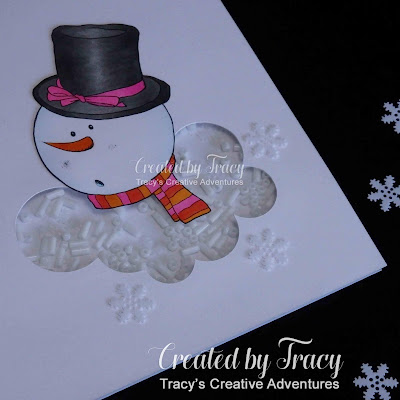
Today I have used the Chilly Willy digital stamp from Oddball Art Co., our generous sponsor for this challenge, to make a pair of fun shaker Christmas cards.


I printed the Chilly Willy image, heat set, fussy cut then coloured with Copic markers, finishing off the edges with a Memento Tuxedo Black dual tip marker.  I printed the front panels with the sentiment, heat set then cut the "melted snow" (cloud) shaped windows with my Silhouette Cameo, then manually trimmed the image panels down to size.  I coloured the sentiments with Copic markers.  Partially overlapping the pink and orange created an even more vibrant orange.  I adhered a panel of acetate to the melted snow windows, adhered foam tape around the windows and over the back of the front panels.  I filled the windows with assorted white beads and sequins then adhered the 7" x 5" card bases.  Lucky last came the fussy cut Chilly Willy images and snowflake sequins, which I adhered in place using liquid adhesive.
It's funny ... and frustrating ... how an idea sticks in your mind.  I was determined to create a melting snowman, an Olaf enjoying warm hugs and summer without his personal flurry.

The first card has the front panel covering the 7" x 5" card base.


The image panel on the second card is smaller
and pops out from the 7" x 5" card base.


~~~*~~~*~~~


NOW it's YOUR turn!

I hope that I have inspired you to get creative
and look forward to seeing your projects fill the gallery for
Penny's Challenge 460
on the
Penny's Paper-Crafty Challenge Blog

~~~*~~~*~~~

*** INGREDIENTS ***
Oddball Art Co. - digital stamp - Chilly Willy
The Hungry JPEG - sentiment font - Snowflake Wishes
* this font is currently a FREEBIE *
X-Press It A4 Blending Card
Copic markers - hat & trim - T1-3-5-7 + RV04-06
Copic markers - snowman - B0000-000-00
Copic markers - carrot nose - YR04-07
Copic markers - scarf - RV04 + YR04, overlapping gave a 3rd colour
Silhouette Cameo
Silhouette Design Store - Design ID #48259
Cloud Mask / Background / Template  by Sarah Hurley
Helmar 450 Quick Dry adhesive - to adhere the layers
Tombow Mono Multi Liquid Adhesive - to the acetate
foam tap - to secure the shaker window and front panel
acetate - to cover the shaker window
assorted beads and sequins - to fill the shaker

~~~*~~~*~~~
Sending a big Thank You to Oddball Art Co. for supplying the digital stamp I used today and for being our sponsor for Challenge 460 on Penny's Paper-Crafty Challenge Blog.
    
~~~*~~~*~~~
I am going to enter my card in the following challenges:
~~~*~~~*~~~

A Gem Of A Challenge - Wk 24 – Anything Goes

A Perfect Time To Craft - December Challenge #12 – Anything Goes
Addicted To Stamps Challenge - Challenge #180 – Our Last Challenge
Allsorts Challenge Blog - Week 549 – Snowmen and/or Snowflakes
Alphabet Challenge Blog - S is for Snow

Cardz 4 Galz - Challenge #111 – Cute Christmas
Colour Crazy Challenge - Week 47 – Anything Goes 
Crafting By Designs - December Anything Goes
Cute As A Button Challenge Blog - Challenge #51 – Anything Goes optional twist: Let It Snow
Die Cut Divas Challenge Blog - December Challenge – Get Ready For Winter / Christmas
Incy Wincy Designs - Dec 2-14 – Christmas Without Red or Green

Jan’s Digi Stamps Challenge Blog - Challenge #3 - Anything Goes 
Rabisco Challenge - Challenge #17 December 2019
Simon Says Stamp Wednesday Challenge Blog - Simon Says: Interactive Christmas
The 12 Months Of Christmas Link Up - Challenge #60 – Anything Goes
optional twist: Layer It Up - my cardstock is layered with acetate to make the shaker
The Cutie Pie Challenge Blog - Challenge #142 – Christmas Cuties
Time Out Challenges - Challenge #150 – Merry & Cheerful


Wednesday, 19 June 2019

You're Turtle-y Awesome

It's time for another challenge with us at the

This week we are letting our creative juices flow with
Crafty Gals Corner Challenges are bi-weekly.
Each crafter may only submit 3 projects per challenge.

~~~*~~~*~~~

The sponsors for this challenge are:

Prize ~ $10 Gift Certificate


Prize ~ 1 digital image (non colored)


Prize ~ $10 Gift Certificate (Images Only) 

~~~*~~~*~~~

Today I have used the Honu Love digital stamp from Kitty Bee Designs , one of our generous sponsors this week, to make a 6 1/4" square top folding birthday card.  It's funny how things work out when you're crafting.  This card started out in my mind as soft colours and lots of waves ... it has ended up being a bright, bold, de-constructed rainbow!


I started by opening the digital stamp in Silhouette Studio.  After deciding on the card size, I sized the elements to fit, starting with the 5 3/4" square striped background.  Next came the star frame, which I decided to fill with polka dots (bubbles).  I made some changes to the bubble background, filling the gaps between the bubbles, instead of having each one "framed".  I sized the bubble panel to fill the star frame.  I cut a white panel the same size as the star frame, then fussy cut the bubble panel to fill the inside.  I also cut some yellow stars to fill the stars of the frame.  I cut all of the pieces from textured cardstock using my Silhouette Cameo.
Next came the sentiment.  I sized the font to make my turtle-y awesome sentiment, printed on textured cardstock, heat set, cut to size, then coloured with Copic markers.

I adhered all the elements using a combination of liquid adhesives.

Lucky last came the most important element, the super cute turtle.  I sized it to fit inside the star frame, making a few different sizes, printed on X-Press It blending card, heat set then fussy cut before deciding on the perfect sized on to fit perfectly on the card.  I coloured the turtle with Copic markers and finished off the edges with a Memento Tuxedo Black dual tip marker.  Initially I was going to adhere the turtle directly to the card, then it was going to be foam dots, then, finally, I tried it with an Action Wobble mechanism ... it fitted perfectly under the shell, so Action Wobble it was.  They always make me smile and I hope the birthday boy enjoys the wobbly action hidden in the envelope too.

Here are some close-up photos of the Action Wobble mechanism.
Click on the photo if you would like to see them in full screen.


~~~*~~~*~~~


NOW it's YOUR turn!

I hope that I have inspired you to get creative
and look forward to seeing your projects fill the gallery for
Crafty Gals Corner Challenges are bi-weekly.
Each crafter may only submit 3 projects per challenge.

~~~*~~~*~~~

*** INGREDIENTS ***
Kitty Bee Designs - digital stamp - Honu Love
X-Press It A4 Blending Card
Copic markers - turtle - YG21-01-03-25 + Y08
Copic markers - shell - E41-42-43-44 + YG21-01-03-25-17
Copic markers - hearts - RV09 + R29
Fiskars - micro tip scissors - to fussy cut the image
Memento Tuxedo Black dual tip marker (to finish off the edges of the image)
Sentiment - Francis Nico V 0.2 font - sorry, I can't find the link
Copic markers - sentiment - RV09 + R29 +V17
American Crafts - 12x12 textured cardstock
Silhouette Cameo
Silhouette Design Store - Design ID #186289
Square Stencil Stripes by Amanda McGee
Silhouette Design Store - Design ID #267987
Star Circle Frame by Studio Ilustrado
Silhouette Design Store - Design ID #42010
Bubbles Mask / Template / Background / Stencil by Sarah Hurley
NOTE: I filled the background so that only the bubbles were cut, not the borders
Action Wobble mechanism (under turtle)
Helmar 450 Quick Dry adhesive - to adhere the layers and sentiment panel
Tombow Mono Multi Liquid Adhesive - to adhere the stripes & spots panels
foam squares - under sentiment panel

~~~*~~~*~~~
Sending a big Thank You to Kitty Bee Designs for supplying the digital stamp I used today and for being a sponsor for Challenge #194 Polka Dots and/or Stripes at the Crafty Gals Corner.
    
~~~*~~~*~~~
I am going to enter my card in the following challenges:
~~~*~~~*~~~

2 Crafty Critter Crazies - Challenge #27 – Anything With A Critter Goes
A Bit More Time To Craft Challenge - Challenge #94 – Anything Goes
Addicted To Stamps Challenge – Challenge #175 – For A Boy / Man
Aud Sentiments Challenge Blog - Challenge #229 – Anything Goes + A Sentiment
CCC Digi Creations - Challenge #104 – Eileen’s Anything Goes
Colour Crazy Challenge - Week 23 – Anything Goes
Crafting By Designs – June Anything Goes
Crafting By Designs - Happy Birthday Challenge
Crafting From The Heart – Challenge #245 – Anything Goes
Crafty Catz - Challenge #466 – Anything Goes - optional twist: Male/Father’s Day
Creatalicious Challenges - Challenge #165 – AG optional Spots and/or Stripes
Cupcake Inspirations - CIC472 – Add A Pop Up Element
the turtle is on an Action Wobble mechanism, it sits flat inside the envelope
and Pops Up when taken out, sharing some fun wobbly action

Cut It Up Challenge Blog – Challenge #176 – Welcome Summer
the stripes & polka dots are abstract summery ocean waves & bubbles
Die Cut Divas Challenge Blog – Celebrate Birthdays
Get Creative Challenges - Challenge #81 – Anything Goes
optional twist: Favorite Color Combo - I hope that "rainbow" counts as a
colour, as I love them all and my turtle is part of a "deconstructed rainbow"
Love To Scrap Challenge Blog - LTSCB #122 – No Rulz 3
(use anything from your stash)
Penny’s Paper-Crafty Challenge Blog - Challenge 435 – Anything Goes
Sasayaki Glitter - June Challenge – Making Waves
the stripes & polka dots are abstract summery ocean waves & bubbles
Simon Says Stamp – Work It Wednesday – May 2019: Summer Vibes
The Paper Shelter - Challenge #388 – Stripes and/or Dots

Saturday, 1 December 2018

Doing more of what I love ... for Beccy's Day 30 (3)

It's that time of year again . . .
we all need to get our Christmas cards sorted and
what better way to do it than playing along with the
at

The prompt from Day 30 is to "Do what we love"

I love to make CAS (Clean And Simple) cards,
interactive cards and cards with fancy folds.

I made some more CAS cards and another with fancy folds,
now it's time for some more interactive cards.

I made my very first X-fold card the other day (HERE)


They're a fancy fold that is also interactive, as you can get the snowflake to swirl and twirl with the lightest tap or puff of air.  Today I decided that I needed some more of these pretties, along with some more sentiments.

I combined two different cut files (details linked below), one for the X-card base and matting layers, one for the layered snowflake.  I opened my Silhouette Studio mat, sized the layered snowflake to fit inside the "window", added sentiments to the banners, then used my Cameo to cut all the layers from textured cardstock.  I used liquid adhesive to secure the snowflake layers together, adding a strand of metallic twine in each one, then adhered the X panels together, placing the snowflake/twine just before the final layers were pushed together.

And here is my pretty pastel flurry of snowflakes on display.


Here is one that is sending Warm Winter Wishes.


~~~*~~~*~~~ ingredients ~~~*~~~*~~~

Sihouette Design Store - cut file - Design ID #169792
A2 X-card Birthday Balloon by Lori Whitlock
(I used the card base, didn't use the balloon)
Silhouette Design Store - cut file - Design ID #164485
Snowflake by Echo Park
sentiment - Merry - Leelawadee UI font
sentiment - Christmas - Invitation Script font
sentiment - warm winter - Lily Bloom Regular font
sentiment - wishes - Invitation Script font
metallic twine

~~~*~~~*~~~
I am going to enter my cards in the following challenges:

Die Cut Divas Challenge Blog - December Theme: Winter or Winter Holidays

Friday, 30 November 2018

R is for more ... Rudolph the Red Nosed Reindeer

It's that time of year again . . .
we all need to get our Christmas cards sorted and
what better way to do it than playing along with the
at

The prompt from Day 20 is the letter "R"

My "R" is Rudolph the Red Nosed Reindeer
and each reindeer has a wobbly bobble head.

These interactive reindeer cards were made using a cut file with my Silhouette Cameo.  I enlarged the file before cutting and assembling the pieces.  It is a very CAS design but the reindeer is so cute that I didn't think it needed any embellishments.

The cool thing about this card is the wobbling action.


His head wobbles and bobs around at the slightest touch or puff of air.

We have a lovely breeze flowing through the house today, so it was fun watching these dear little deer with heads bobbing about while waiting to get their photo taken.


Here is what the Action Wobble Spring looks like.


Although there a lot of dimension and movement with the Action Wobble Spring,
it squashes down flat for mailing.


~~~*~~~*~~~ ingredients ~~~*~~~*~~~

Silhouette Design Store cut file - Design ID #236656
Bobble Head Card Reindeer by Lori Whitlock
Action Wobble mechanism

~~~*~~~*~~~

Here are some other Action Wobble Christmas Cards that might make you smile
(just click on the image to visit and learn more about each one)


S is for . . . Super Swinging Snowman

It's that time of year again . . .
we all need to get our Christmas cards sorted and
what better way to do it than playing along with the
at

The prompt from Day 21 is the letter S

My "S" card was a Sweet Snowman Shaped card.
see HERE

Things didn't work out so well with this card, as he would not stand up.

Luckily I found this problem before I adhered the rest of the Snowman face panels to the card bases.  I decided to take the opportunity to transform them into rocking cards.

I had used my Silhouette Cameo and a cut file to create the snowman panels (enlarged to be 5 3/4" tall).  Once I decided to make them in to rocking cards, I opened the snowman cut file again in my Silhouette Studio, added a snowflake frame, sized it to fit the snowman face, then added a small circle to partially cover the snowflake, a larger circle to frame the snowflakes, then cut the panels using my Cameo.  I cut the snowflake frame in half, scored the circles halfway then started adhering the layers together - large circle, half snowflake frame, small circle then snowman.

The result is a pair of snowman cards that rock and roll when you tap them.


Here is a closer look at my Super Swinging Snowman.


Isn't it funny, how when things don't work out as expected when crafting,
you make some changes that result in a project even better than planned?

~~~*~~~*~~~

Silhouette Design Store - cut file - Design ID #280567
Snowman Shaped Card by Lori Whitlock
Silhouette Design Store - cut file - Design ID #52460
Snowflake Frame Coaster by Suzanne Cannon
Silhouette Cameo
textured cardstock
scoreboard and embossing stylus (to score the folds)
bone folder (to burnish the folds)
red Goosebumps (textured rhinestones)

S is for . . . Sweet Snowman Shaped Card

It's that time of year again . . .
we all need to get our Christmas cards sorted and
what better way to do it than playing along with the
at

The prompt from Day 21 is the letter S

My "S" card is a Sweet Snowman Shaped card.

I used my Silhouette Cameo and a cut file to create this card.  I opened my Silhouette Studio mat, enlarged the card base to be 5 3/4" tall, then used my Cameo to cut all the pieces from textured cardstock.

I cut enough pieces to make four of these Sweet Snowman Shaped cards, had all the front face panels assembled, the bases scored and folded, then adhered one panel to the base ... that's when things went from SWEET to SILLY.

... I went to stand the first finished card up and he just kept toppling over!
Sadly he has a severe case of vertigo.

So here is my Silly Snowman Shaped card.
The only way I could take his photo was by propping him against the wall.


He is still a Sweet Snowman Shape,
so I have an idea to make the other three Snowman Shaped panels into
Super Swinging cards
=> watch this space

~~~*~~~*~~~

Silhouette Design Store - cut file - Design ID #280567
Snowman Shaped Card by Lori Whitlock

Tuesday, 27 November 2018

X is for . . . Xtremely Xciting X-card

It's that time of year again . . .
we all need to get our Christmas cards sorted and
what better way to do it than playing along with the
at

The prompt from Day 27 is the letter X

My "X" card is an Xtremely Xciting X-card.

I've not made one of these fancy folds before and now I'm wondering why not, because they're fun, fabulous and fold flat for mailing
... like I said before
the X-card is Xtremely Xciting!

I combined two different cut files (details linked below), one for the X-card base and matting layers, one for the layered snowflake.  I opened my Silhouette Studio mat, sized the layered snowflake to fit inside the "window" then used my Cameo to cut all the layers from textured cardstock.

It has been a hot day here today and it was nice to open up the windows and doors to let the cooler evening breeze come through.  Unfortunately this beautiful breeze wasn't so nice when it came to taking a photo of this card ... the little snowflake in the middle window of the "X" kept on spinning around, making it a challenge to focus ... hope it will be as pretty on someone's mantle-piece soon.


I had to take this photo XTREMELY FAST, so that I could join the
RACE at Beccy's Place

~~~*~~~*~~~

Sihouette Design Store - cut file - Design ID #169792
A2 X-card Birthday Balloon by Lori Whitlock
(I used the card base, didn't use the balloon)
Silhouette Design Store - cut file - Design ID #164485
Snowflake by Echo Park

Monday, 26 November 2018

U is for . . . Upside Down

It's that time of year again . . .
we all need to get our Christmas cards sorted and
what better way to do it than playing along with the
at

The prompt from Day 24 is the letter U

and my "U" is an Upside Down Santa.


... hmm, after looking at this photo I think I will need to mat the
inside with some scalloped blue cardstock to match the front ...

He is a flat view so that you can see the dimension of the Action Wobble Spring and the shingles on the roof.


He's so much fun that I had to make four . . .
think I might even make some more!


Let me know if you would to see a little video of Santa struggling to fit down the chimney.  I confess, I could tap his boots and watch him jiggle all day long.

~~~*~~~*~~~ ingredients ~~~*~~~* ~~~

Silhouette Design Store - cut file - Design ID #236671
Bobble Head Card - Santa Chimney by Lori Whitlock
Silhouette Cameo
textured cardstock
Action Wobble Spring

Saturday, 24 November 2018

L is for . . . Lots and Long

It's that time of year again . . .
we all need to get our Christmas cards sorted and
what better way to do it than playing along with the
at

The prompt from Day 14 is the letter L

My pair of snowman cards are Long with Lots of Layers.


These fancy folds are called a telescopic card, they are flat for mailing,
then, when you hold him up by his hat, the body drops down.

The secret to this fold is to have the layers linked with brads.


These cards are 12 3/4" long when fully open,
5 3/4" tall when closed and flat.


~~~*~~~*~~~

Silhouette Design Store - Design ID #72745
Snowman Telescope Card by Lori Whitlock