Friday 30 November 2018

R is for more ... Rudolph the Red Nosed Reindeer

It's that time of year again . . .
we all need to get our Christmas cards sorted and
what better way to do it than playing along with the
at

The prompt from Day 20 is the letter "R"

My "R" is Rudolph the Red Nosed Reindeer
and each reindeer has a wobbly bobble head.

These interactive reindeer cards were made using a cut file with my Silhouette Cameo.  I enlarged the file before cutting and assembling the pieces.  It is a very CAS design but the reindeer is so cute that I didn't think it needed any embellishments.

The cool thing about this card is the wobbling action.


His head wobbles and bobs around at the slightest touch or puff of air.

We have a lovely breeze flowing through the house today, so it was fun watching these dear little deer with heads bobbing about while waiting to get their photo taken.


Here is what the Action Wobble Spring looks like.


Although there a lot of dimension and movement with the Action Wobble Spring,
it squashes down flat for mailing.


~~~*~~~*~~~ ingredients ~~~*~~~*~~~

Silhouette Design Store cut file - Design ID #236656
Bobble Head Card Reindeer by Lori Whitlock
Action Wobble mechanism

~~~*~~~*~~~

Here are some other Action Wobble Christmas Cards that might make you smile
(just click on the image to visit and learn more about each one)


Do what you love . . . for Day 30

It's that time of year again . . .
we all need to get our Christmas cards sorted and
what better way to do it than playing along with the
at

The prompt from Day 30 is the "Do what you love"

I love to make CAS (Clean And Simple) cards,
interactive cards and cards with fancy folds.

My project for Day 30 is a pair of CAS cards.

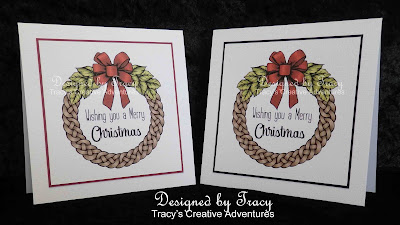
I used a beautiful pre-coloured image from the delightful
Build A Wreath digital stamp set from Beccy's Place.

Unfortunately I can't colour at the moment so it is a real bonus having pre-coloured images in this set of digital stamps.

I used my Silhouette Cameo design mat to size the image panel and add a digital sentiment.  I printed the wreath image on textured cardstock, it really looks like a painting with the texture and rich colours.  I printed two image panels, trimmed them down to size (5" square) then matted using a combination of textured cardstock with my Perfect Layers Rulers before adhering them to 6 1/4" square card bases.

One card has a black contrasting layer


... the other card has a deep red contrasting layer to match the bow.


Which do you prefer?
The red or the black?


~~~*~~~*~~~ ingredients ~~~*~~~*~~~

Digital Stamp Set - Build A Wreath - by Beccy Muir - Beccy's Place
(it is such a bonus having beautiful pre-coloured images in this set)
sentiment - wishing you a Merry - Lily Bloom Regular Font
sentiment - Christmas - Gold Bullion Font
textured cardstock
scoreboard and embossing stylus
Perfect Layers Rulers (for the matting layers)

~~~*~~~*~~~
I am going to enter my card in the following challenges:

Polkadoodles Craft Challenge - Wk 48 - Anything Goes

S is for . . . Super Swinging Snowman

It's that time of year again . . .
we all need to get our Christmas cards sorted and
what better way to do it than playing along with the
at

The prompt from Day 21 is the letter S

My "S" card was a Sweet Snowman Shaped card.
see HERE

Things didn't work out so well with this card, as he would not stand up.

Luckily I found this problem before I adhered the rest of the Snowman face panels to the card bases.  I decided to take the opportunity to transform them into rocking cards.

I had used my Silhouette Cameo and a cut file to create the snowman panels (enlarged to be 5 3/4" tall).  Once I decided to make them in to rocking cards, I opened the snowman cut file again in my Silhouette Studio, added a snowflake frame, sized it to fit the snowman face, then added a small circle to partially cover the snowflake, a larger circle to frame the snowflakes, then cut the panels using my Cameo.  I cut the snowflake frame in half, scored the circles halfway then started adhering the layers together - large circle, half snowflake frame, small circle then snowman.

The result is a pair of snowman cards that rock and roll when you tap them.


Here is a closer look at my Super Swinging Snowman.


Isn't it funny, how when things don't work out as expected when crafting,
you make some changes that result in a project even better than planned?

~~~*~~~*~~~

Silhouette Design Store - cut file - Design ID #280567
Snowman Shaped Card by Lori Whitlock
Silhouette Design Store - cut file - Design ID #52460
Snowflake Frame Coaster by Suzanne Cannon
Silhouette Cameo
textured cardstock
scoreboard and embossing stylus (to score the folds)
bone folder (to burnish the folds)
red Goosebumps (textured rhinestones)

S is for . . . Sweet Snowman Shaped Card

It's that time of year again . . .
we all need to get our Christmas cards sorted and
what better way to do it than playing along with the
at

The prompt from Day 21 is the letter S

My "S" card is a Sweet Snowman Shaped card.

I used my Silhouette Cameo and a cut file to create this card.  I opened my Silhouette Studio mat, enlarged the card base to be 5 3/4" tall, then used my Cameo to cut all the pieces from textured cardstock.

I cut enough pieces to make four of these Sweet Snowman Shaped cards, had all the front face panels assembled, the bases scored and folded, then adhered one panel to the base ... that's when things went from SWEET to SILLY.

... I went to stand the first finished card up and he just kept toppling over!
Sadly he has a severe case of vertigo.

So here is my Silly Snowman Shaped card.
The only way I could take his photo was by propping him against the wall.


He is still a Sweet Snowman Shape,
so I have an idea to make the other three Snowman Shaped panels into
Super Swinging cards
=> watch this space

~~~*~~~*~~~

Silhouette Design Store - cut file - Design ID #280567
Snowman Shaped Card by Lori Whitlock

Thursday 29 November 2018

T is also for . . . Twisted Tree

It's that time of year again . . .
we all need to get our Christmas cards sorted and
what better way to do it than playing along with the
at

The prompt from Day 23 is the letter T

My "T" is a Twisted Tree card.

This fancy shaped Christmas Tree card is a fun modern design,
created using my Silhouette Cameo (cut file details below).
I added a touched of sparkle to the star with Stardust Stickles.


~~~*~~~*~~~ ingredients ~~~*~~~*~~~
Silhouette Design Store - cut file - Design ID #167560
Modern Christmas Tree Card by Studio Illustrado
Silhouette Cameo
textured cardstock
Stardust Stickles

T is for . . . Tall Tree Tied up with Twine

It's that time of year again . . .
we all need to get our Christmas cards sorted and
what better way to do it than playing along with the
at

The prompt from Day 23 is the letter T

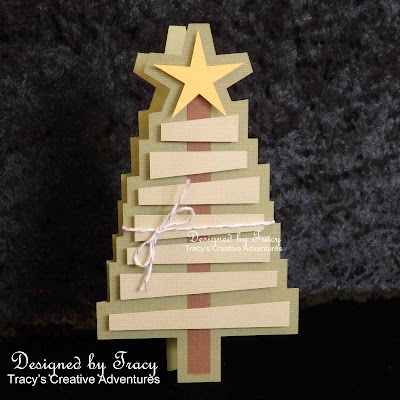
My "T" is a Tall Tree Tied up with Twine card.

This fancy shaped Christmas Tree card has a fun modern design and dimension.


It's amazing how stable this tall card is while standing open,
with only the tiny trunk for support.


The branches are secured in place with foam squares for fun dimension.


~~~*~~~*~~~ ingredients ~~~*~~~*~~~
Silhouette Design Store - cut file - Design ID #50419
Christmas Tree Card by Jamie Cripps
Silhouette Cameo
textured cardstock
foam squares
twine

Z is for . . . Z fold

It's that time of year again . . .
we all need to get our Christmas cards sorted and
what better way to do it than playing along with the
at

The prompt from Day 29 is the letter Z

My "Z" is a Z-fold card.

I used a delightful pre-coloured image from the delightful
Build A Wreath digital stamp set from Beccy's Place.

Unfortunately I can't colour at the moment so it is a real bonus having pre-coloured images in this set of digital stamps.

I printed the wreath image on textured cardstock, it looks like a painting with the texture and rich colours, fussy cut then went around the edges with a black marker (details below).

Next came the card base.  I cut a sheet of textured cardstock 5 3/4" by 11 1/2", scored at 2 7/8" and 5 3/4" making a mountain and valley fold.

I adhered the wreath to the front panel (mountain fold), so that the image sits squarely in the middle when the card is flat.


When the card is opened, the folds give fun dimension.


~~~*~~~*~~~ ingredients ~~~*~~~*~~~

Digital Stamp Set - Build A Wreath - by Beccy Muir - Beccy's Place
(it is such a bonus having beautiful pre-coloured images in this set)
Memento Tuxedo Black Dual Tip Marker
textured cardstock
scoreboard and embossing stylus
Perfect Layers Rulers (for the matting layers)

Y is for . . . Yellow

It's that time of year again . . .
we all need to get our Christmas cards sorted and
what better way to do it than playing along with the
at

The prompt from Day 28 is the letter Y

My "Y" is a set of Yellow (with white & blue) ornament cards.

This ornate design is a cut file (details below) that was made using my Silhouette Cameo.

I made four cards for this set, two with bling, two without.


Which do you prefer ... bling or no bling?


~~~*~~~*~~~ ingredients ~~~*~~~*~~~
Silhouette Design Store - cut file - Design ID #233132
Christmas Ornament Layer Card by Daniela Angelova
Silhouette Cameo
textured cardstock
clear rhinestones

W is for . . . White-on-white

It's that time of year again . . .
we all need to get our Christmas cards sorted and
what better way to do it than playing along with the
at

The prompt from Day 26 is the letter W

My "W" is a set of White-on-white "we wish you a Merry Christmas" cards.
These cards can have the sentiment panel popped with foam dots but I was wearing my "how will this go through the post" hat and decided to flat.  Although it is white-on-white, the sentiment has shadowy dimension around the edges.


Which berries do you prefer ... rhinestones, goosebumps or cardstock?
... maybe I should resist the bling and go super flat for mailing ...

~~~*~~~*~~~ ingredients ~~~*~~~*~~~
Silhouette Design Store - cut file - Design ID #105337
We Wish You A Merry Christmas Layered Card by Kolette Hall
Silhouette Cameo
textured cardstock
red rhinestones
red "Goosebumps" bling

Anything Goes with Team Lou & the Southern Girls

It's time for another challenge with us at the Southern Girls.

This fortnight Team Lou have created projects to inspire you for the new challenge


Our generous sponsor for this challenge is

KC

Lacy Sunshine
*** EDITED 2019 ***
Lacy Sunshine Stamps is now Colour Of Love

~~~*~~~*~~~

Today I have used the Steampunk Owl (from the Tangled Gems Collection) digital stamp by Lacy Sunshine Stamps, one of our generous sponsors this fortnight, to make a pair of Gel Pen Colouring Cards.

Unfortunately I am unable to colour at the moment, so I have been thinking of different ways to use my digital stamps.  


My Gel Pen Colouring Cards are 5 1/2" wide x 7 3/8" high x 1/2" deep
so the image is a nice size to colour and securely holds the gel pens.


~~~*~~~*~~~
NOW it's YOUR turn!

I hope that I have inspired you to get creative
and look forward to seeing your projects fill the gallery for

~~~*~~~*~~~
*** INGREDIENTS ***
Lacy Sunshine Stamps - digital stamp - Steampunk Owl
Silhouette Cameo
Silhouette Design Store - Design ID #249841
Happy Birthday Coloring Card - Cactus - by MiniLou
(note: I used the original sized crayon holders from this cut file and added sets of three to a scalloped rectangle to fit the gel pens, I also used the Steampunk Owl digital stamp by Lacy Sunshine Stamps, instead of the cactus image supplied with the cut file)
Kaisercraft Metallic Gel Pens

~~~*~~~*~~~

Sending a big Thank You to Krafter's Cart and Lacy Sunshine Stamps for sponsoring the Anything Goes with Team Lou Challenge with us at the Southern Girls.

I hope I have inspired you to get creative and look forward to seeing your work shared in the challenge gallery.  
Remember we are not just a card blog, we love to see scrapbook layouts, artjournal pages and all types of papercraft.

~~~*~~~*~~~
I am going to enter my card in the following challenges (alphabetical order):
~~~*~~~*~~~

Tuesday 27 November 2018

X is for . . . Xtremely Xciting X-card

It's that time of year again . . .
we all need to get our Christmas cards sorted and
what better way to do it than playing along with the
at

The prompt from Day 27 is the letter X

My "X" card is an Xtremely Xciting X-card.

I've not made one of these fancy folds before and now I'm wondering why not, because they're fun, fabulous and fold flat for mailing
... like I said before
the X-card is Xtremely Xciting!

I combined two different cut files (details linked below), one for the X-card base and matting layers, one for the layered snowflake.  I opened my Silhouette Studio mat, sized the layered snowflake to fit inside the "window" then used my Cameo to cut all the layers from textured cardstock.

It has been a hot day here today and it was nice to open up the windows and doors to let the cooler evening breeze come through.  Unfortunately this beautiful breeze wasn't so nice when it came to taking a photo of this card ... the little snowflake in the middle window of the "X" kept on spinning around, making it a challenge to focus ... hope it will be as pretty on someone's mantle-piece soon.


I had to take this photo XTREMELY FAST, so that I could join the
RACE at Beccy's Place

~~~*~~~*~~~

Sihouette Design Store - cut file - Design ID #169792
A2 X-card Birthday Balloon by Lori Whitlock
(I used the card base, didn't use the balloon)
Silhouette Design Store - cut file - Design ID #164485
Snowflake by Echo Park

Monday 26 November 2018

V is for . . . Vase

It's that time of year again . . .
we all need to get our Christmas cards sorted and
what better way to do it than playing along with the
at

The prompt from Day 25 is the letter V

My "V" is a Very beautiful Vase of Holly
using the Blessings Of The Season digital stamps from Beccy's Place.

Unfortunately I can't colour at the moment so it is a real bonus having pre-coloured images in this set of digital stamps.


This stamp is so beautiful, I made several more with contrasting backgrounds.


~~~*~~~*~~~ ingredients ~~~*~~~*~~~

Digital Stamp Set - Blessings Of The Season - by Beccy Muir - Beccy's Place
(it is such a bonus having beautiful pre-coloured images in this set)

~~~*~~~*~~~

I used this beautiful image earlier this month to make
some "cropped image" cards HERE and HERE


~~~*~~~*~~~
I am going to enter my white card in the following challenges: