Showing posts with label Morgan's Art World. Show all posts

Wednesday, 31 July 2019

Loving all the layers at the Crafty Gals Corner

It's time for another challenge with us at the

This week we are letting our creative juices flow with
Crafty Gals Corner Challenges are bi-weekly.
Each crafter may only submit 3 projects per challenge.

~~~*~~~*~~~

The sponsors for this challenge are:

Prize ~ 3 Digital Images

Prize ~ 3 Digital Images

~~~*~~~*~~~

Today I have used the August Flower Vase digital stamp from Morgan’s ArtWorld, one of our generous sponsors this week, to make birthday card.


I opened the August Flower Vase image in Silhouette Studio, along with the Artisan Label cut file (link below).  The image is 4 1/2" tall and I "squashed" the cut file shape to fit the image.  I added an internal offset to the shape, then created a compound path to make them into a frame.  I decided the design, sizing of the sentiment and layers to fit on to an A5 top folding card base.  I printed the image panel on X-Press It blending card, heat set then coloured with Copic markers.  The colouring was quite slow, as the detail in the flowers is quite delicate and I tried to shade them like the gerbera growing in my sister's garden.  I used my Silhouette Cameo to cut the ornate design of the frame and, I confess, I used it to cut the matting layers too.  I assembled all the layers then adhered the panel to an A5 top folding card base.

Here are another couple of photos.  I used Copic Multi Liners to add some detail to the flower centres and some darker golden yellow shades to the spikes.


~~~*~~~*~~~


NOW it's YOUR turn!

I hope that I have inspired you to get creative
and look forward to seeing your projects fill the gallery for
Crafty Gals Corner Challenges are bi-weekly.
Each crafter may only submit 3 projects per challenge.

~~~*~~~*~~~

*** INGREDIENTS ***
Morgan’s ArtWorld - digital stamp - August Flower Vase
sentiment - Sugar Heart font - from Font Bundles
Copic markers - vase - B23-26-28
Copic markers - flower petals - RV21-23-25-29
Copic markers - flower centres - Copic Multi Liner 0.1-0.3 + T7
Copic markers - foliage - YG21-24-28
Copic markers - ornate spikes - Y21 + YR21-23-24-27
American Crafts - 12x12 textured cardstock
Silhouette Cameo
Silhouette Design Store - Design ID #83494
Artisan Nested Label by Michelle Renee
NOTE: I "squashed" the shape to fit the image
then added an internal offset to create a frame

Helmar 450 Quick Dry adhesive - to adhere the layers

~~~*~~~*~~~
Sending a big Thank You to Morgan’s ArtWorld for supplying the digital stamp I used today and for being a sponsor for Challenge #197 - 3+ Layers at the Crafty Gals Corner.
    
~~~*~~~*~~~
I am going to enter my card in the following challenges:
~~~*~~~*~~~

C.R.A.F.T. Challenge - Challenge 523 – 25th of July – Inspiration Picture
I was inspired by the flowers and filled my vase with them

Colour Crazy Challenge - Week 28 – Anything Goes
Crafty Catz - Challenge #471 – Anything Goes
optional twist – On The Beach
Crafty Sentiments Designs Challenge Blog - Anything Goes Challenge
Crafty Creations - Challenge #395 – Anything Goes
Creatalicious Challenges - Challenge #168 – Anything Goes optional Distress It
Creative Inspirations Challenge Blog - July Challenge – Anything Goes
Digi Choosday Craft Challenge - Wk 31 – Anything Goes
Get Creative Challenges - Challenge #82 – Anything Goes
optional twist: Monochromatic
Incy Wincy Designs - July 15 – August 3 – Flowers and Colour Palette

Penny’s Paper-Crafty Challenge Blog - Challenge 441 – Anything Goes
Polkadoodles Craft Challenge - Wk 30 – Anything Goes
QKR Stampede - Challenge #358 – Anything Goes
Simon Says Stamp Monday Challenge Blog - Simon Says: Bright & Cheerful
Simon Says Stamp Wednesday Challenge Blog - Simon Says: Anything Goes
The Corrosive Challenge Blog - Challenge #7 – July Anything Goes
Through The Craft Room Door - TTCRD Anything Goes week 30th July
Time Out Challenges - Challenge #140 – Home Sweet Home photo inspiration
my card design reminds me of a painting on display


Thursday, 17 January 2019

Making it SPARKLE at the Crafty Gals Corner

It's time for another challenge with us at the

This week we are letting our creative juices flow with
Challenge #183 - Make It Sparkle
Crafty Gals Corner Challenges are bi-weekly.
Each crafter may only submit 3 projects per challenge.

~~~*~~~*~~~

The sponsors for this challenge are:


Morgan's ArtWorld
Prize ~ 3 Digital Images

Prize ~ 3 Digital Images

Prize ~ 3 Digital Images

Prize ~ $5 Gift Certificate

~~~*~~~*~~~

Today I have used the Flower Tag 5 digital stamp from Morgan's ArtWorld,
one of our generous sponsors this week, to make a sparkly card.

I opened the image in Silhouette Studio, along with an ornate frame cut file (details below) and sized them both to fit each other on an A5 panel.  I printed the image on X-Press It blending card, heat set, coloured with Copic markers, adding a touch of Wink Of Stella sparkle to the frame to make it look like it was silver.  Next came even more sparkle.  I cut the ornate frame with my Cameo, painted it with liquid adhesive then smothered it with luscious black glitter ... and despite my best efforts, I have to confess that our house now sparkles too!  I scored an A4 sheet of heavy smooth cardstock, trimmed to size then adhered the image panel and frame in place to complete my card filled with sparkle and love.


I was so nervous when I went to stamp the sentiment, I stupidly waiting until after I had coloured it.  I knew it was going to be a tight fit but apart from loving the words, I thought font went perfectly with the fabulous flowers.  Luckily the flourishes fitted in nicely between the stamens.


PS - I have another confession ... this was my 3rd attempt at making this card
I had almost finished colouring the image panel, got a cramp in my hand, dropped my marker and ended up with a big line of YR09 across it.  No amount of colourless blender was able to get that graffiti out!  While I was colouring the 2nd image panel, adding the deepest red-orange accents to the petals and ... you guessed it, a giant blob of R08 flooded out.  Why did I get out of the habit of taking the caps of both ends?  Lesson learnt, 3rd attempt was done in short stints with both caps off while colouring, luckily there were no more cramps and no more inky floods.

~~~*~~~*~~~


NOW it's YOUR turn!

I hope that I have inspired you to get creative
and look forward to seeing your projects fill the gallery for
Challenge #183 - Make It Sparkle
Crafty Gals Corner Challenges are bi-weekly.
Each crafter may only submit 3 projects per challenge.

~~~*~~~*~~~
*** WINNER announcement ***
Thanks to "random.org", the lucky winner from my Blog Hop giveaway is
Mel C
Congratulations Mel, you have won $10 to spend at Beccy's Place.
Please contact me via the "contact me" tool on the right-hand-side of my blog.
You have until midnight 23rd January AEST to claim your prize.

~~~*~~~*~~~

*** INGREDIENTS ***
Morgan's ArtWorld - digital stamp - Flower Tag 5
Copic markers - buds - YG 01 + Y21-35-38
Copic markers - petals - Y21-35-38 + YR04-09 + R08
Copic markers - leaves - YG01-03-25-17-67
Copic markers - stamens - YG01-03-17 + Y35 + YR04 + E19
Copic markers - frame - T1-3-5-7
A4 smooth cardstock (for card base)
scoreboard & bone folder (for card base)
American Crafts - 12x12 textured cardstock
Silhouette Cameo
Silhouette Design Store - Design ID #59022
Ornate Rectangle Frame by Jamie Koay
MISTI
Versafine Pigment Ink Pad - Onyx Black
Kaisercraft - Sage & Grace - stamp & die set
"love always" sentiment
Helmar Acid Free Professional Glue - to adhere glitter to frame
Helmar 450 Quick Dry adhesive - to adhere the layers

~~~*~~~*~~~
Sending a big Thank You to Morgan's ArtWorld for supplying the digital stamp I used today and for being a sponsor for Challenge #183 at the Crafty Gals Corner.
    
~~~*~~~*~~~
I am going to enter my card in the following challenges:
~~~*~~~*~~~

A Perfect Time To Craft - January Challenge #1 – Anything Goes
Classic Design Team Challenge Blog – Open Challenge January #1
Crafting By Designs – Anything Goes January Edition
Crafts Galore Encore Challenge Blog – January Anything Goes Challenge #59
Crafty Calendar Challenge - January Challenge – Make It Flowery
Creative Inspirations Challenge Blog - January Challenge – Anything Goes
Love To Scrap Challenge Blog - LTSCB #117 - Anything Goes
Morgan’s ArtWorld Open Challenge - Challenge #01 1st Jan-19 - Anything Goes
Penny’s Paper-Crafty Challenge Blog - Challenge 413 – Anything Goes
Stamping Sensations - January – Fabulously Feminine
The Corrosive Challenge Blog - Challenge #1 – Anything Goes January
The Crafty Addicts Challenge Blog - Challenge 56 – Anything Goes
optional theme – It’s A Purrfect Day
The Paper Shelter – Challenge #366 – Digital Stamp
Word Art Wednesday - Anything Goes #370 – 371
Worldwide Open Design Team Challenge - Challenge #01 - 15th January 2019

Thursday, 3 August 2017

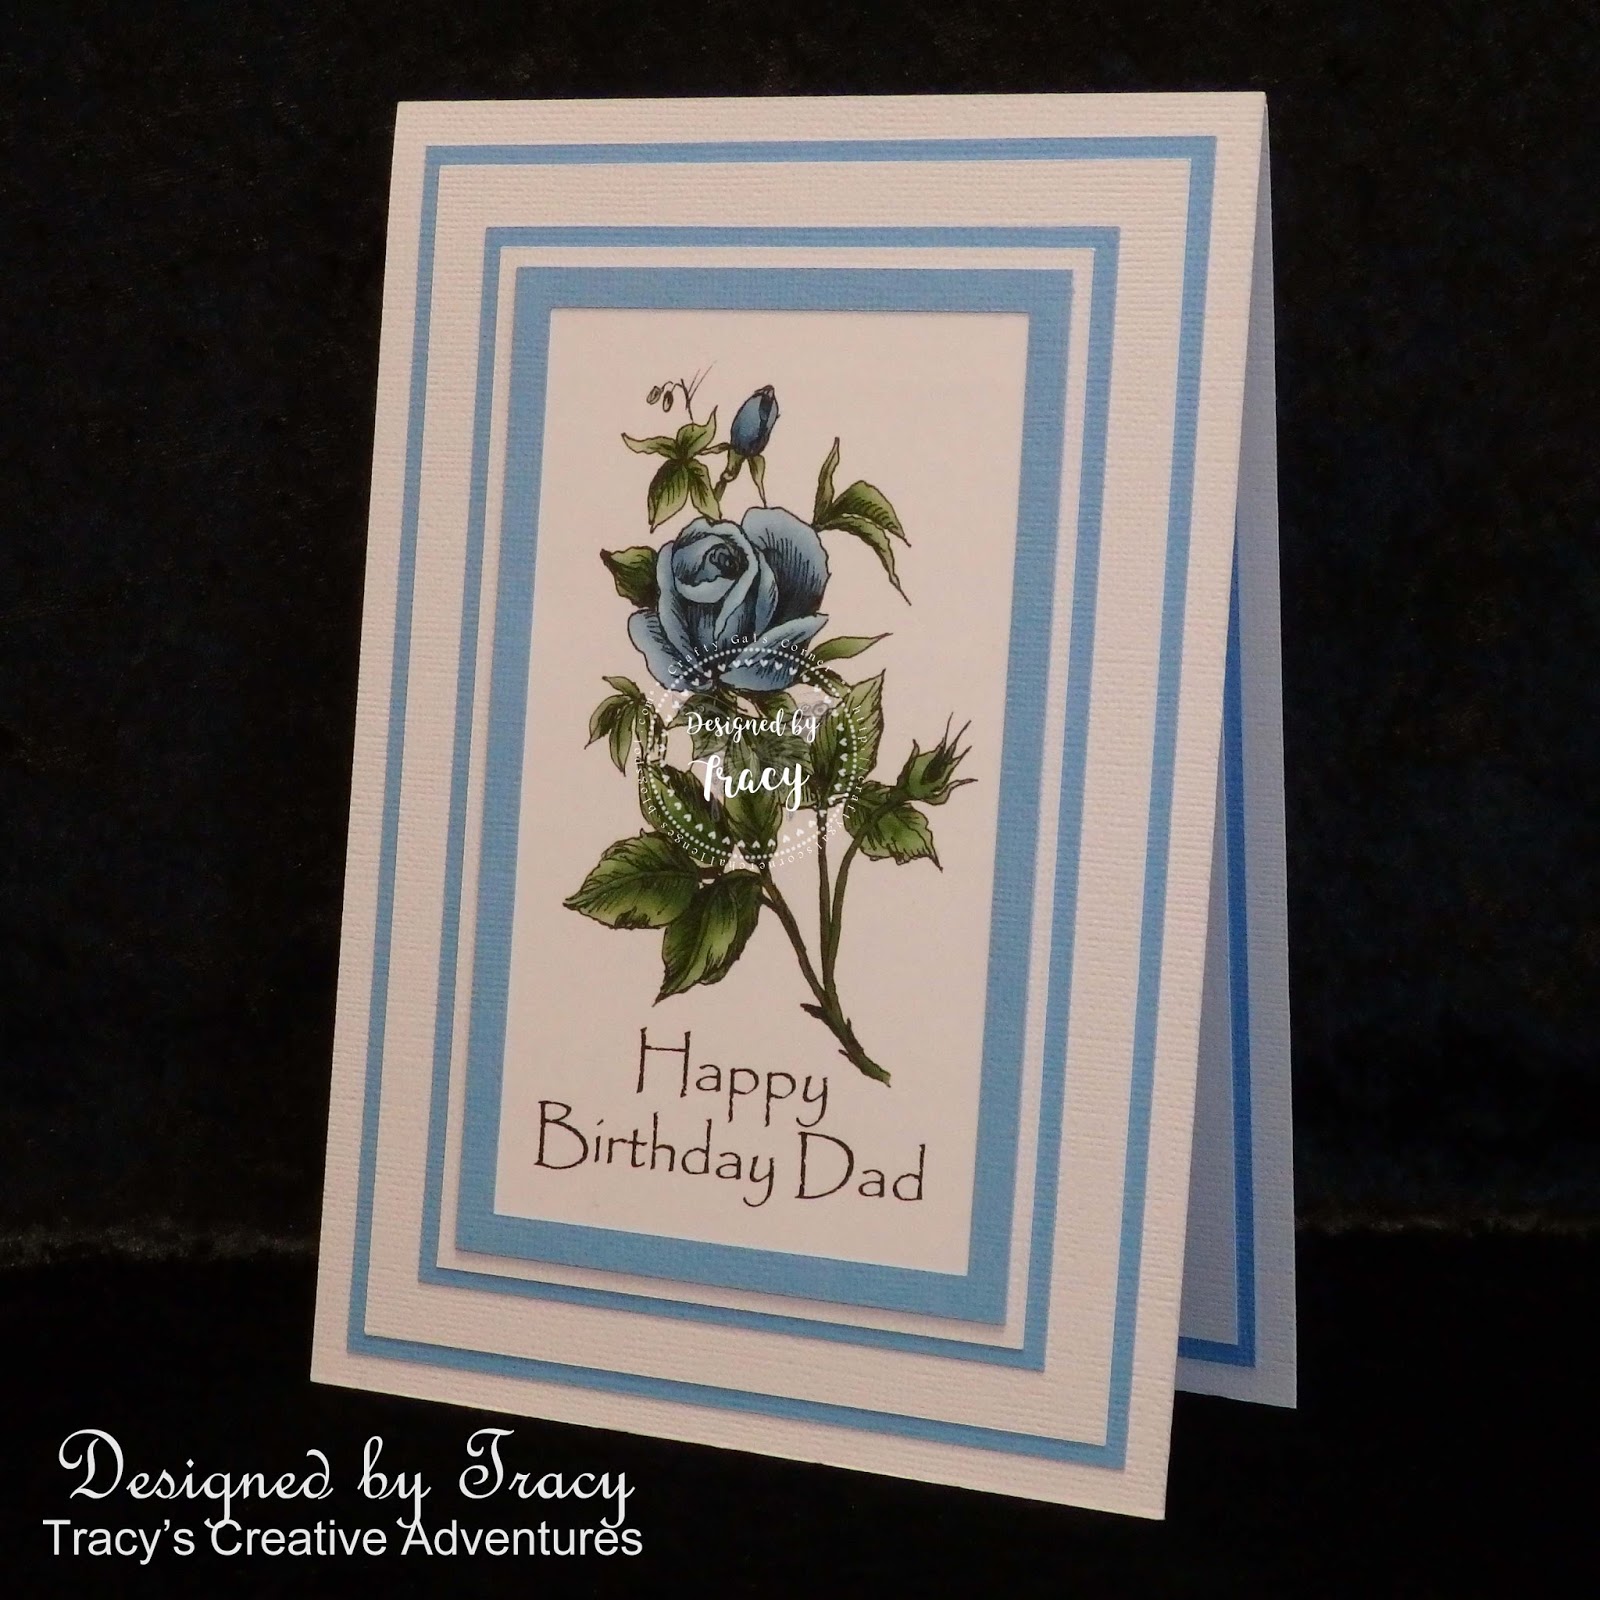
Blue roses filled with love - Happy Birthday Dad

You may have seen these two A5 top folding birthday cards,
His & Hers Roses HERE.


This post is to focus on the blue rose I made for my Father's birthday.


Yes, I know there is no such a thing as a blue rose.

The "blue rose" is something that rose growers all over the world dream of
and are trying to grow.  My Father really loves his roses, so I have made
a one-of-a-kind blue rose from my beloved, one-of-a-kind Dad.

The inside of the card is matted and finished off with a die cut sentiment.


*** INGREDIENTS ***
Valentine 12 digital stamp from Morgan's ArtWorld
the sentiment on the card front is Papyrus
X-Press It - A4 blending card
Copic markers - roses - B0000-91-93-95-97
Copic markers - foliage - YG61-63-67-99
American Crafts - 12x12 textured cardstock - white
American Crafts - 12x12 textured cardstock - Ocean
(this colour comes as individual sheets or as part of the Winter pack)
A5 top folding card base
Sizzix Big Shot
Couture Creations - Intricutz Dies - Script Happy Birthday
Kaisercraft release paper
this makes die cutting delicate sentiments a pleasure
Helmar 450 Quick Dry liquid adhesive - to adhere layers
Tombow Mono Multi liquid adhesive - to adhere sentiment & frame
there is a frame over the image panel


~~~*~~~*~~~
You can read all about the pink rose card and 
Challenge #134 with us at the Crafty Gals Corner HERE.
I do hope you head on over, get inspired and join our challenge.
    
~~~*~~~*~~~
I am going to enter my card in the following challenges (alphabetical order):

Wednesday, 2 August 2017

Roses for Him, Roses for Her

It's time for another challenge with us at the

This week we are letting our creative juices flow with
Challenge 134 - Celebrate

The sponsors for this challenge are:

Morgan's ArtWorld
Prize: 3 Digital Images

Prize: 1 Bundle of your choice - no combo packs

~~~*~~~*~~~


Today I have used the Valentine 12 digital stamp from Morgan's ArtWorld, one of our generous sponsors this week, to make two A5 top folding birthday cards, His & Hers Roses.


The rose image is so elegant that I went with a CAS style to celebrate its beauty.


Do you think I should add some sparkling clear sequins to the "hers" card?
I was thinking of a cluster of 3 or 5 down on the RHS of the sentiment.


Before you say anything, yes, I know there is no such a thing as a blue rose.
The "blue rose" is something that rose growers all over the world dream of
and are trying to grow.  My Father loves his roses, so I have made a 
one-of-a-kind blue rose from my beloved, one-of-a-kind Dad.

The inside of each card is matted and finished off with a die cut sentiment.


*** INGREDIENTS ***
Valentine 12 digital stamp from Morgan's ArtWorld
the sentiment on the card front is Papyrus
X-Press It - A4 blending card
Copic markers - pink rose - RV0000 + R81-83-85-89
Copic markers - blue rose - B0000-91-93-95-97
Copic markers - foliage - YG61-63-67-99
American Crafts - 12x12 textured cardstock - white
American Crafts - 12x12 textured cardstock - black
American Crafts - 12x12 textured cardstock - Ocean
(this colour comes as individual sheets or as part of the Winter pack)

A5 top folding card bases
Sizzix Big Shot
Couture Creations - Intricutz Dies - Script Happy Birthday
Kaisercraft release paper
Helmar 450 Quick Dry liquid adhesive - to adhere layers
Tombow Mono Multi liquid adhesive - to adhere sentiment & frame

~~~*~~~*~~~
Sending a big Thank You to Morgan's ArtWorld for supplying the digital stamp I used today and for being a sponsor for Challenge #134 with us at the Crafty Gals Corner.
    
~~~*~~~*~~~
I am going to enter my card in the following challenges (alphabetical order):
~~~*~~~*~~~

A Perfect Time To Craft - 1st August 2017 - Open Challenge
Come And Get It Challenges - Just Add Flowers
Crafting By Designs - August Anything Goes Challenge
Crafts Galore Encore Challenge Blog - August Anything Goes
Creative Moments - Challenge #123 - Anything Goes
Hiding In My Craft Room - HIMCR #311 - Freestyle!
Morgan's ArtWorld - Challenge #15 - Anything Goes
Penny's Paper-Crafty Challenge Blog - Penny's Challenge #340 - Anything Goes
QKR Stampede - Challenge #254 - Down On The Farm or Anything Goes
SheepSki Designs Challenges - Challenge #5 - Flower Power
The Crafty Addicts Challenge Blog - Challenge #39 - Anything Goes / option Girly
The Paper Shelter - Summer Break 2 Week Challenge - Anything Goes
Through The Craft Room Door - Anything Goes Week of August 1-7, 2017


Wednesday, 24 May 2017

. . . raid your stash, gather all your pretty papers

It's time for another challenge with us at the

This week we are letting our creative juices flow with
Challenge #124 - 2+ Designer Papers

The sponsors for this challenge are:

Star Stampz

Prize: 3 Digital Images

Morgan's Art World
Morgan's ArtWorld
Prize: 3 Digital Images

~~~*~~~*~~~
Today I have used the Butterflies Fae 18 digital stamp set from
Morgan's Art World, one of our generous sponsors this week.
This stamp set comes with four beautiful butterflies to I decided to be adventurous, try my hand at making a twist & pop card and showcase all four images in one card.

closed front view

open view

The challenge this week is asking for 2+ patterned papers and I have used three,
one "digital" and two "real paper" patterned papers.


To get myself started, I found a tutorial to make a Twist & Pop card.
HERE is the one I used.

Once I had the dimensions, I made a custom sized template in Adobe Photoshop and added a digital patterned paper to it.  Next I used the magic wand tool to trace each image, selected the inverse then pasted them on to the patterned panel (saving as a different file each time).  To ensure that the images would print the exact size, I placed them all together on an A5 mat in Silhouette Studio and printed them on A5 X-Press It cardstock, making sure to heat set them before I started colouring.

After spending ever-such-a-long time looking at butterflies online, I decided that these magical creatures come in all the colours of the rainbow and an infinite variety of patterns, so I decided to go with shades of pink and orange, matching the flowers of the patterned paper used on the front of the card.  I coloured the butterflies using Copic markers.


See the butterfly on the far right?  Well I have to confess that I made an "oops" when I traced the image.  There was a small white area between the bottom delicate "decorative" wing and the real "flying" wing.  Luckily my Copic markers came to the rescue, with a mottled blend of G43 and G46 matching the background perfectly ... whew!

Next came the exciting folds.
I decided on a dark green base and sparkling black matting as they complemented the patterned papers (digital & real) perfectly and it is always nice to have a touch of sparkle, especially with butterflies and bling.

Here are the dimensions that I used:
base - 6" x 12" - scored at 6" to make a top fold
image (accordion) panel strip - 3 1/2" x 10" - scored at 3 1/2", 5" and 7 1/2"
the side score lines are valley folds, the central score line a mountain
twist & pop mechanism - 3 1/2" x 8", first score lengthways at 1 3/4", make a make  2 1/4 and 5 3/4" along each side and make the next two score lines diagonally across, crossing centrally with the original horizontal  score line.

FOLD and BURNISH each of the folds so that they will move smoothly when the card is opened and closed.  The horizontal score makes a mountain fold, the diagonal ones are all valley folds.

Mat the inside panels of the card base (I layered patterned paper over glitter cardstock), adhere the triangle of the fully folded mechanism to the inside base of the matted card base, aligning the point to just under the middle of the centre fold, apply adhesive to the top triangle of the folded mechanism then fold the card down on to it.
Fully open the card and apply the accordion panel, making sure the centre of the accordion panel aligns with the centre of the mechanism, fold the left & right accordion panels towards the centre, place adhesive on the top RHS and bottom LHS of the mechanism (above / below the score line), then fold the flaps down on to the mechanism.

GENTLY open the card the first time, making sure that the folds work properly, they may need a little assistance the first time and should operate smoothly after that.  Adhere the matted images to each of the accordion panels then have another go at opening and closing the card ... there is no special reason to it at this stage, it is just so much fun seeing everything unfold before your eyes.

I made two sentiment panels to decorate inside my card.  I used the same digital patterned paper so that they matched the butterflies and the Swirl Dance digital font by Samantha Walker, printing them from Silhouette Studio then matting them with the same glitter cardstock used on all all the panels.

For the front of the card I used another panel of patterned paper, matted it with black glitter cardstock and embellished with a black glitter cardstock die cut butterfly and a bling flourish.

Here are some pics showing the fold in action:


Do you see the green mechanism in the pic above?
Since making this card, I have since found THIS tutorial and will be giving it a try next time, as I really like how the mechanism panel is the size of the card and how the matting covers the mechanism too.  One thing to note in the tutorial is that the accordion panel should be 3" x 10 3/4", not 11" as listed.

~~~*~~~*~~~
Sending a big Thank You to Morgan's Art World for supplying the digital stamp set I used today and for being a sponsor for Challenge #124 with us at the Crafty Gals Corner.
    
~~~*~~~*~~~
I am going to enter my card in the following challenges (alphabetical order):
~~~*~~~*~~~

A Perfect Time To Craft - Challenge #5 - Anything Goes
Aloha Friday Challenges - Challenge #95 - Animals
Aud Sentiments Challenge Blog - Challenge #180 - Anything Goes + a Sentiment
Butterfly Challenge - #79 - Butterflies + L is for Layers and/or the Colour Cream
Colour Crazy Challenges - WK20 Anything Goes
Crafty Catz - Challenge #371 - Anything Goes with a twist "More Than 2 Layers"
Create with Tlc - Challenge #10 - Anything Goes with a Create with Tlc Element
Creative Moments - Challenge #118 - Anything Goes
Di's Digi Designs Challenge - TIC TAC TOE 3-in-a-row Challenge
I have used 3 patterned papers, 4 digital images and 2 sentiments
I'm sure that the surprise of finding these butterflies in the fancy folds
as the card opens will bring a smile to the birthday girl's face :)
Simon Says Stamp Monday Challenge Blog - Simon Says: Little Critters
Sparkles Monthly Challenges Blog - Challenge #92 - Four (4) Or More Legs
The Crazy Challenge - CCH #249 - Birthday
Through The Craft Room Door - TTCRD Anything Goes Wk 5-23
Your Next Stamp - Sketch and Color Challenge #64