Wednesday, 1 December 2021

Day 1 at Beccy's Place - A is for Accordion Fold

I'm playing along with the

Ninth Annual Month Of Holiday Cards

at

Beccy's Place


I'm not colouring at the moment but I am working on Christmas craft projects for creative little hands around our neighbourhood ... the endless months of Covid-19 lockdowns has brought our community much closer and I look forward to sharing more crafty adventures with them over the coming weekends and school holidays now that restrictions have eased.

(Beccy's post with "A" inspiration words and
a snow angel card to inspire is HERE)

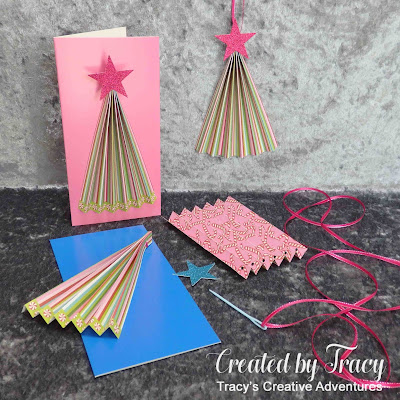
My "A" kids Christmas activity kit is for Accordion fold Christmas Tree cards and ornaments.  This wasn't the project that I originally planned for "A" but I have a new toy and felt the need to test my Crop-A-Dile!


One sheet of pretty patterned paper makes four of these fabulous accordion fold Christmas trees.  I started by scoring the sheet every 1/2" on the scoreboard, this is something that I haven't shown little hands before but I'm sure they will be interested and keen to give it a try.  I cut the sheet into four panels and folded the mountains-valleys-mountains of the accordion fold.  I squashed the folds together then punched a 1/8" hole in all twelve layers at once with my handy-dandy new Crop-A-Dile, so that all the holes were perfectly aligned.  I threaded a thin ribbon through the holes then tied the layers tightly together to make the accordion fold tree shape, so quick, easy and fun.  I know this part will be popular, as we used these plastic round tip needles to sew cobwebs for Halloween.


To make the ornament, take a length of ribbon, tie the top of the accordion folds tightly, knotting firmly, then take the ends and tie to make a loop for hanging the ornament.  Glue a star at the top to finish it off.

To make the card, do the same steps for making the ornament, cutting the ends off the ribbon after knotting the folds together (no hanging loops needed) then glue a star at the top of the tree.  Run a thin line of liquid adhesive along the edge of the folds at the back of the tree, place it on to the front of the card base and the card is finished.  I have several packs of blank card bases for these kits in assorted colours and sizes, DL (10cmx21cm), square (14cm) and A6 (10.5cmx14.8cm), so we're sure to see an wonderful variety of cards made.  ... I confess, I have a pretty big variety of patterned papers too.
 
Here is a completed card and ornament.


The bonus with using double-sided paper is that you can choose the design you want for the front of your card / ornament, or, in the case of the ornaments, you can enjoy both sides of the pattern.


The accordion fold trees are just over 1/2" thick, as the score lines for the folds are 1/2" apart.  The patterned paper I used had a real bonus, because one side has a patterned accent strip along the bottom, so it looks like the tree has already been trimmed.


*** INGREDIENTS ***
card bases
patterned paper - for Christmas Tree
scoreboard and bone folder
brown cardstock - for tree trunk
crop-a-dile (or hole punch) - to punch holes at along the top of the folds
to make the top of the tree
ribbon / string / cord - to tie the top of the tree
and make hanging loop for the ornament
star punch + glitter cardstock - for star on top of tree
or pre-cut foam stickers
adhesive
optional - assorted adhesive gems

*** REFERENCE ***
This project was inspired by the "Easy Accordion Tree Ornaments Craft" post on the "Mom On Time Out" blog HERE.

Day 28 at Beccy's Place - Y is for Yarn and Stick

  I'm playing along with the

Ninth Annual Month Of Holiday Cards

at

Beccy's Place


I'm not colouring at the moment but I am working on Christmas craft projects for creative little hands around our neighbourhood ... the endless months of Covid-19 lockdowns has brought our community much closer and I look forward to sharing more crafty adventures with them over the coming weekends and school holidays now that restrictions have eased.

Beccy's prompt for Day 28 is the letter "Y"
(Beccy's post with "Y" inspiration words and
gorgeous yellow poinsettia card to inspire is HERE)

My "Y" kids Christmas activity kit is for a Yarn & Stick Christmas Tree Ornament.


Little hands helped me gather sticks a few days ago.  Some were used to make a "Magical Music Maker" and a "Twig Tree", now we get to use some for the project they were originally intended.  I used my secateurs to cut sticks into four pieces, two for the long sides of the tree, one for across the base and one to make the trunk.  I glued the sticks together with wood glue and left them to dry overnight.  Knot (or glue) the end of the yarn to the tree and wind the wool round and round until the tree is filled as much as you want, knotting the end to the tree and trimming off the excess.  Parts of the sides were quite smooth, so I turned the tree over and dotted some glue to the wool to keep it in place on the stick.  Decorate the tree by adding assorted embellishments, from pom poms and sequins to buttons, bows and bling.  Add a star to the top of the tree.  I used a squeeze punch, little hands love using these punches, to make a large sparkling star.  Before I glued it to the top of the tree, I knotted a length of ribbon, adhered it to the top of the tree with a dot of glue then glued the star on top.


Little hands are going to have so much fun making these.
They can supply the sticks to go with the kit bags filled with wool, embellishments, glue and, if it's out on our front lawn, some glittery cardstock and assorted star punches because everyone knows little hands love punches.

*** INGREDIENTS ***
sticks / twigs - gathered from the garden or park
optional - secateurs - to cut sticks to desired lengths
liquid adhesive - wood glue to adhere the sticks
yarn / wool - green - to wind around the stick tree
pom poms / buttons / bling - to decorate the tree
liquid adhesive - Helmar 450 Quick Dry to adhere the pom poms and star
large star - to decorate the top of the tree
I used a squeeze punch and cardstock, little hands love squeeze punches
ribbon / string / twine - loop to hang the ornament

*** REFERENCE ***
This project was inspired by the "Yarn And Stick Christmas Tree Craft" post on the "Kids Craft Room" blog HERE.

Day 22 at Beccy's Place - T is for Twig Tree

I'm playing along with the

Ninth Annual Month Of Holiday Cards

at

Beccy's Place


I'm not colouring at the moment but I am working on Christmas craft projects for creative little hands around our neighbourhood ... the endless months of Covid-19 lockdowns has brought our community much closer and I look forward to sharing more crafty adventures with them over the coming weekends and school holidays now that restrictions have eased.

Beccy's prompt for Day 22 is the letter "T"
(Beccy's post with "T" inspiration words and
twinkling lights card to inspire is HERE)

My "T" kids Christmas activity kit is for a Twig Tree ornament.


This fun ornament starts with getting out in the fresh air picking up sticks.  Pick up a variety of sizes that are as smooth and as straight as possible but not too smooth or straight because we want our trees to have character.  As my favourite little hands are not well at the moment, I used the twigs we gathered the other day.  In a way it has worked out for the best because it has been terribly hot all day and evening ... it's "tomorrow" now and the forecast is for it to be even hotter today, so I think I will be hibernating inside with the air conditioner.

Cut a strip of felt.  My sheet was A4 size, so I cut it lengthways, 1" wide and just over 11 1/2" long, rounding the end for the bottom.  About 1 1/4" from the bottom, start making the slots for the twigs by cutting two vertical parallel slits in the felt - I cut the 1st slit about 1/3 the way in from the side and about 5/8" long, went across another 1/3 the of the way to the other side and cut another slit.  I continued along the length of felt, cutting twin slits starting about 1" from the end of the previous slit, until seven slots were made.

Line the twigs up largest to smallest, breaking (or snipping with secateurs) so that you have seven twigs working inwards to a point for the tree shape.  My widest twig is 5" long, the top, smallest one, is 1 1/2" long.  Thread the twigs through the twin slits and continue until all seven have been put in place.  I folded the top end of the strip, snipping the end off to leave a 1 1/8" flap and applied liquid adhesive to the end of the flap, adhering it to the back of the felt tree "stem" to make a loop.  Cut a length of ribbon, string or twine to make the loop to hang the ornament.  I used thick string (OK, it's natural jute with a gold thread through it to but it's too much to keep saying, so I will stick with string) to add to the rustic charm of the ornament.  Thread one end of the string through the felt loop at the top of the tree, tie a knot to make a hanging loop then pull the string loop until the knot is hidden inside the felt loop for a neater finish.  Finish off the twig tree with a star or large button.  I was lucky to have found a huge 1 1/2" red button in a pack of assorted Christmas buttons I bought the other day, it fitted perfectly, so I used liquid adhesive to glue it in place.  It contrasts perfectly with the green felt and string with golden thread.


The finished ornament is 14 1/2" long (including the loop for hanging).
The widest twig is 5" long.


*** INGREDIENTS ***
felt
scissors
twigs / sticks - gathered from the garden or park
optional - secateurs - to cut sticks to desired lengths
liquid adhesive - I used Helmar 450 Quick Dry
large button or star - to decorate the top of the tree
ribbon / string / twine - loop to hang the ornament

*** REFERENCE ***
This project was inspired by the "Twig Christmas Tree Ornament" post on the "Arty Crafty Kids" blog HERE.