Monday, 24 July 2017

EXCITING news + The Stencil Specialist Blog Hop

Today I have some exciting news to share!

I have been invited by the talented Julie to join her Design Team at

The Stencil Specialist is the Australian Wholesaler for Stampendous products and much, much more.

My first post is part of a Blog Hop filled with creative inspiration and it's topped off with the chance to win a bundle of seriously awesome crafting goodies.
The prize pack includes:
- Two Stampendous stamps
- Two Dreamweaver Die sets
- Two packs of adhesive rhinestones
- Two specialty embossing powders
- One jar of the new "Twinkle Glitter"
Pretty awesome, right?!?!?

but before you go, I do hope you will check out my projects using the beautiful Stampendous Pine Ornaments Cling rubber stamp and leave a comment for your chance to be a lucky winner.
To enter for your chance to win, all you need to do is leave a comment on one or all of the Designers Blogs, one comment equals one entry, four comments equals four entries.  Only one comment per blog please.  Please include what state you live in, as this competition is open to Australian residents only.  Entries close Friday 29th July AEST.

The Stencil Specialist - Julie
Robyn
Donna
Tracy - that's me and you're here
    
~~~*~~~*~~~

Now, time for my first projects with The Stencil Specialist.
You can learn more about each card by clicking on the photo.

This pair of cards use the Pine Ornaments Cling Rubber Stamp and Gold Tinsel Glitter Embossing Powder.  These CAS designs were quick and easy to prepare and assemble.


Here is a close-up pic showing the delicate detail of the stamp
and the stunning sparkle of the tinsel embossing powder.


This pair of cards use the Pine Ornaments Cling Rubber Stamp and Rose Gold Embossing Enamel.


Here is a close-up pic showing the beautiful detail of the stamp
and the delicate shimmer of the rose gold embossing enamel.


For this next card, I stamped the Pine Ornaments and coloured them with Copic markers.


And lucky last comes some burlap and woodgrain.
I stamped the Pine Ornaments, masked the ornaments, inked the background with Distress Inks, coloured the ornaments with Copic markers and finished them off with a touch of Wink Of Stella.
I considered adding some sparkling clear sequins to this card.
What do you think?  Add some?


Here is a close-up pic showing the sparkle of the golden ornaments.


That's all my cards for today.
I hope that I have inspired you and that you can see how versatile
the Pine Ornaments stamp can be, from sparkling elegance
to bold & bright, even rustic too.

*** INGREDIENTS ***
Stampendous Pine Ornaments Cling Rubber Stamp
Stampendous - Gold Tinsel Glitter Embossing Powder
Stampendous - Rose Gold Embossing Enamel
FULL details for each card can be found on the individual posts for each card found by clicking on the images or
HERE for the sparkling gold tinsel cards
HERE for the shimmering rose gold cards
HERE for the bright, bold, pine & bow card
HERE for the rustic burlap & woodgrain card

~~~*~~~*~~~

Sending a big Thank You to Julie for supplying the Stampendous Pine Ornaments cling rubber stamp that I used today and for being a inviting me to join the Design Team at The Stencil Specialist.  I look forward to having exciting inky adventures with the team.

Don't forget to leave a comment with state (Australian residents only) for your chance to win the awesome prize pack and then head on over to The Stencil Specialist blog to complete the Blog Hop.

We have a Blog Hop with prizes every month, so you might want to follow me so that you don't miss out on Stampendous inspiration and more chances to win with The Stencil Specialist.

Wednesday, 19 July 2017

Blue Christmas

It's time for another challenge with us at the

This week we are letting our creative juices flow with
Challenge #132 - Christmas In July

The sponsors for this challenge are:

Sparkle N Sprinkle
Prize: $15 Gift Certificate

Prize: $15 Gift Certificate

My Besties
   
Prize: The following 3 images
 
Scan0075                 Scan0083


Scan0098

~~~*~~~*~~~
Today I have used the My Besties Scan0098 digital stamp from My Besties, one of our generous sponsors this week, to make a centre step card.

While you're reading about my card, I hope that you will have Elvis singing "Blue Christmas" in your mind ... I know that I do as I type.


As has become a habit of late, I started by placing the digital image on my Silhouette Studio design mat and started planning the elements of my card.  First came the card base, a centre step card (details & link below).  The cut file comes with the card base and mats to go on each of the front panels.  I sized the image to fit into the oval feature panel, printed it on a laser printer, heat set then cut using my Cameo.  I coloured the image using Copic markers.

I added an 0.050" offset to each of the mat panels to make aditional matting layers.

I cut the card base and original matting layers in white textured cardstock and the extra matting layers in dark blue cardstock ... a nice match to Copic marker B99.

Next came the poinsettia flowers and leaves.  I took some from a cut file in my library (details & link below) and set up a sheet using a variety of sizes, from original size & 75% reduced to 130% & 160% enlarged.  I cut them in white cardstock and coloured them with my Copic markers (broad end) to match the image.  I curled and layered the petals and leaves, adhered them together and filled the middle of each one with sparkling clear rhinestones.  Are you feeling like a Blue Christmas yet?

I adhered all the layers together then positioned the blue poinsettias around the image and side panels.

Here are another couple of pics on my Blue Christmas card.
I love this cute image, fancy folds and the sparkle coming from each poinsettia,
I hope you do too.


*** INGREDIENTS ***
Sherri Baldy My Besties - digital stamp - My Besties Scan0098
X-Press It - A4 blending card
Copic markers - skin - E0000-000-00-11 + R01
Copic markers - lips - R21-22
Copic markers - eyes - G40-43-46
Copic markers - hair - E55-57-59
Copic markers - clothes - B0000-91-93-95-97-99
Copic markers - fur - B0000-000
Copic markes - flowers B91-93-97
Copic markers - leaves - G46
American Crafts - textured cardstock - white
American Crafts - textured cardstock - Earthtones
Silhouette Cameo
Silhouette Design Store - card base - Square Center Step Card Basic
Design ID #64594 by Lori Whitlock
Silhouette Design Store - poinsettias - Poinsettia Box Card
Design ID #109579 by Snapdragon Snippets
clear rhinestones
Tombow Mono Multi Liquid Adhesive - to adhere poinsettias
Helmar 450 Quick Dry Liquid Adhesive - to adhere layers

~~~*~~~*~~~
Sending a big Thank You to Sherri Baldy My Besties for supplying the digital stamp I used today and for being a sponsor for Challenge #132 with us at the Crafty Gals Corner.
    
~~~*~~~*~~~
I am going to enter my card in the following challenges (alphabetical order):
~~~*~~~*~~~

Aloha Friday Challenges - Challenge #99 - Color Challenge
A Perfect Time To Craft - 1st July 2017 - Open Challenge #07
Colour Crazy Challenge - WK 27 - Anything Goes
Colour It! Create It! Show It Off! - July Challenge - Diva Birthday option Anything Goes
Crafty Catz - Challenge #379 - Anything Goes with optional twist Ice Cream
Crafty Hazelnut's Christmas Challenge - CHNC Challenge #342
Anything Christmas Goes
Crafty Hazelnut's Christmas Challenge Extra - CHNC Extra for July
Anything Christmas Goes
Digi Choosday Craft Challenge - Wk 28 - Anything Goes
Glitter 'N' Sparkle Challenge Blog - Challenge #248 - Anything Goes
Hiding In My Craft Room - HIMCR #309 - Christmas In July
Ike's World Challenges - Challenge #93 - Anything Goes
with optional twist Bunch of Kindness
Koala T Crafts - July Theme - Red or Blue or Stars
Morgan's ArtWorld - Challenge #14 - Anything Goes
My Besties 3D and More - Challenge #7 - Anything Goes with a Bestie
My Besties Art Spain - Challenge #15 - World Cooperation Day / Anything Goes
My Besties Aussies Challenge Blog - July Challenge #7 - Anything Goes/Dry Embossing
My Besties Brazil - Challenge #25 - Handmade Flowers + My Besties
My Besties Dutch Girls - Challenge - Anything Goes option Summer / Vacation
My Besties France - Challenge #65 - Anything My Besties Goes
My Besties Germany - Challenge #43 - Anything Goes with My Besties
My Besties International Challenge Blog - July Challenge - Anything Goes
with option Sparkle, Glam & Glitter
My Besties Spanish Challenge Blog - Challenge #37 - Anything Goes
Pammie's Inky Pinkies - PIP Challenge 1729 - Anything Goes
QKR Stampede - Challenge #252 - By The Seaside or Anything Goes
Sasayaki Glitter Challenge Blog - July Challenge - Your Favourite Colour Combo
Blue & green is one of my favourite colour combos ... even though I remember being told that blue & green should never be seen without another colour in between 
Scrapbook Stamp Society Challenge Blog - Challenge #121 - Anything Goes
with option Monochrome
Simon Says Stamp Blog - Work It Wednesday - July 2017
Add sparkle, glitter, sequins, glimmery paper etc.  Just add some bling!
... my card has 17 flowers filled with sparkling rhinestones
Star Stampz - Christmas In July Challenge
The 12 Months Of Christmas Link Up - Challenge #31 - Anything Christmas Goes
optional theme Oh Deer!
The Paper Shelter - Challenge #303 - Holiday Time
In the Southern Hemisphere we have a HOT summery Christmas, so my dream
holiday would be a White Christmas surrounded by snow and pretty poinsettias

Sunday, 16 July 2017

Dragonfly Hi

... my card says hello but the image is called Dragonfly Hi
It's a cute freebie (on FB group) by Createful Heart Digis & Designs.


This fancy fold is called a Shadow Box card and was made using a cut file with my Silhouette Cameo.  I opened the file in Silhouette Design Studio and placed the digital stamp on the back panel, printed it on pale blue textured cardstock, heat set, cut with my Cameo then started colouring.  I coloured the eye with a combination of white pencil and Copic markers.  The dragonfly and foliage were coloured with Copic markers.

Once the ink was dry, I added a delicate sparkle to the wings with my Wink Of Stella Clear Glitter Brush and a generous dollop of Glossy Accents to the eye to give it dimension and shine.
I'm thrilled with how the wings turned out.


I decorated around the image, inside and out, with layered die cut foliage.


 The cool thing about these fancy folds is that the card folds flat for mailing.


*** INGREDIENTS ***
Createful Hearts Digis - Dragonfly Hi
FREE digital stamp - Createful Heart Digis & Design FB Group
Copic markers - body - B0000-000-01-12-14
Copic markers - wings - B0000 V0000 R0000 Y0000
Copic markers - harness - E55 E57 E59
Copic markers - foliage - YG0000 YG01 YG03
Copic markers - eyes - C00 C0 C1
Prismacolor Pencil - eyes - white PC938
Wink Of Stella Clear Glitter Brush - sparkling wings
Silhouette Cameo
Silhouette Design Store - Shadow Box Card cut file - Design ID #26664 
American Crafts - 12x12 weave cardstock - Pastel - pale blue
American Crafts - 12x12 weave cardstock - Winter - darker blue
American Crafts - 12x12 textured cardstock - black
Sizzix Big Shot
Kaisercraft Decoratibe Dies - Foliage
Helmar 450 Quick Dry liquid adhesive - to adhere sides & layers
Tombow Mono Multi liquid adhesive - to adhere sentiment & foliage

~~~*~~~*~~~


Sending a big Thank You to Createful Heart Digis & Design for the free digital stamp that I used today.  I am hoping that my card will bring a smile when it arrives.

~~~*~~~*~~~

I am going to enter my card in the following challenges (alphabetical order):

~~~*~~~*~~~


2 Crafty Critter Crazies - Challenge #4 - Anything with critters Goes
Alphabet Challenge Blog - I for Insects

Thursday, 13 July 2017

. . . and the Blog Candy winner is . . .

THANK YOU
to everyone who visited and commented on my
BLOG CANDY giveaway
on this Blog Hop post from last week

The lucky winner is ... 

Donna Mundinger

CONGRATULATIONS Donna!

Please contact me via the "contact me" section on the top right side bar with your email address and I will arrange for your Gift Certificate to be sent through for your shopping spree.

If the prize is not claimed by 10pm AEST 20th July, I will need to draw another winner, so I hope to hear from you soon.

BINGO with Team Lou at the Southern Girls

It's time for another challenge with us at the Southern Girls.

This fortnight Team Lou have created projects to inspire you for the new challenge

YES, we get to play BINGO together!
You need to create a project that uses three of the BINGO elements in a straight line.
It can be horizontal, vertical or diagonal.
You can use more than three elements in a row ... my card uses 7 of the 9 in the grid.


Our generous sponsor for this challenge is
Lacy Sunshine Stamps
Lacy Sunshine

*** EDITED 2019 ***
Lacy Sunshine Stamps is now Colour Of Love

~~~*~~~*~~~

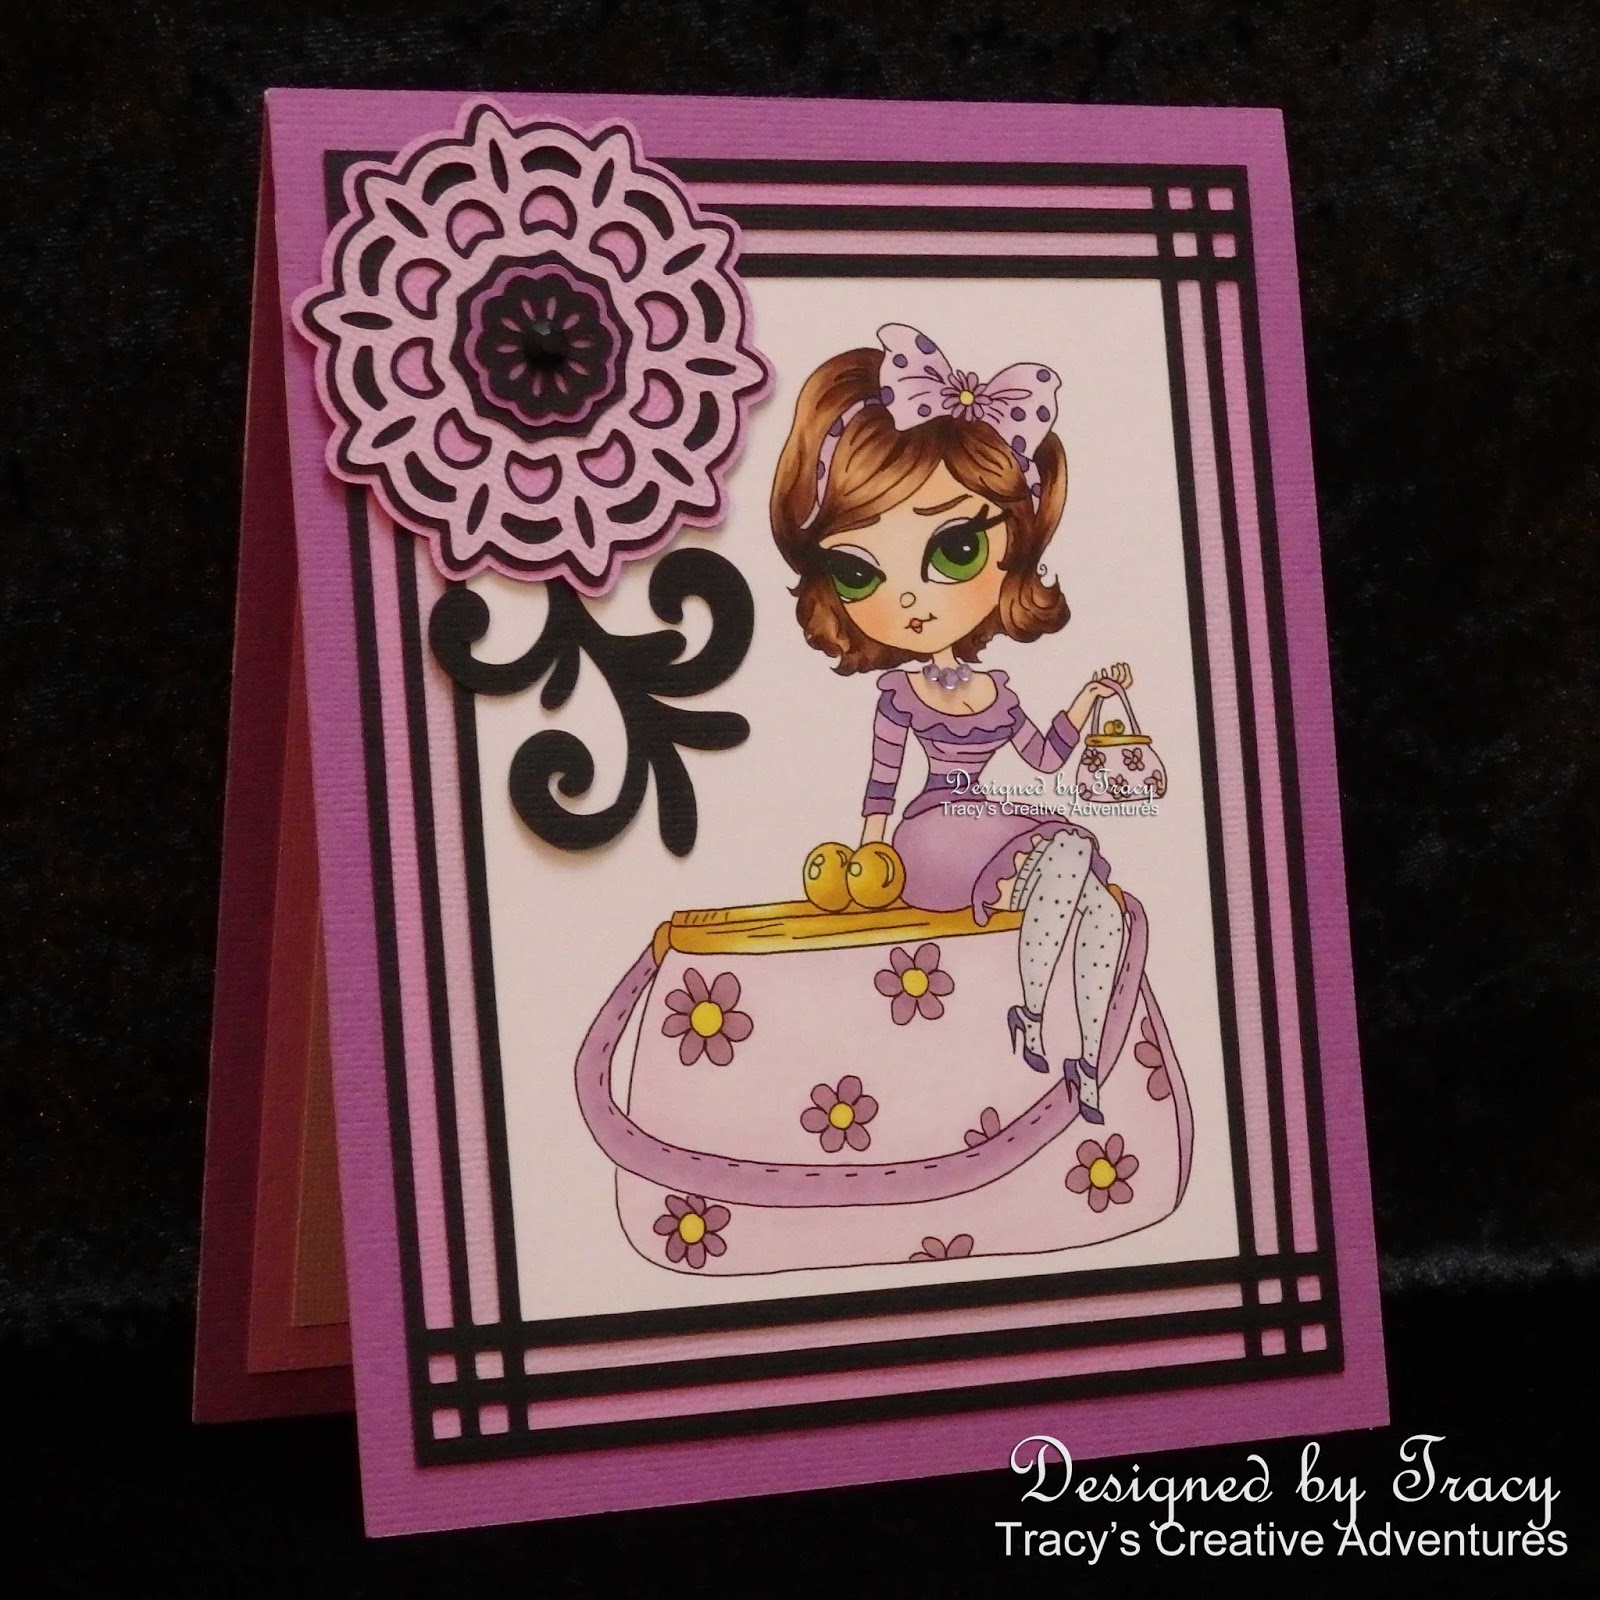
Today I have used the absolutely fabulous Daisy Delite Sunshine Girl Pin Up digital stamp by Lacy Sunshine Stamps, our generous sponsor this fortnight.

I have used several of the BINGO lines for my card.
flowers-bling-doily and glitter-image-doily and dies-image-bling


My card is an A5 top fold using a pre-scored base.

I planned the design on my Silhouette Cameo mat, sizing the image panel and the three shades of purple matting layers.  I sized the layered doily and flourish there too.

I printed the image on X-Press It blending card, heat set, cut the panel using my Silhouette Cameo then started colouring with Copic markers. .  After the colouring was completed I added some delicate glitter sparkle to the gold clasps on both hand bags and bling to her necklace.


I cut the groovy black frame, matting layers, layered doily and flourish using my Silhouette Cameo.  I cut the sentiment using my Sizzix Big Shot.

Next came assembly.  I started by running a thin line of liquid adhesive (Tombow) along the inner panels of the frame and positioned the image panel in place.  I smothered the back of the image panel with liquid adhesive (Helmar) then put the palest purple panel in place, followed by the darker and darkest panels.  The entire panel was then adhered to the A5 card base.  I matted the inside of the card using the same sized purple panels used on the front of the card.

I used liquid adhesive (Tombow) to secure the doily layers together and topped it off with a large black rhinestone.  I used liquid adhesive (Helmar) to adhere the layered doily in place and tucked the flourish in underneath.


I used liquid adhesive (Tombow) to secure the sentiment inside the card.


*** INGREDIENTS ***
Copic markers - skin - E0000-000-00-11
Copic markers - hair - E31-33-35-37
Copic markers - eyes - YG03-25-17-67
Copic markers - eyelids - V00-01
Copic markers - lips - R20-22
Copic markers - clothes - V0000-000-01-12-15-17
Copic markers - stockings - C00-0-1
Copic markers - shoes - V15-17
Copic markers - hand bags - V0000-000-01-12 + Y00-11-15
Copic markers - bag clasp - Y00-11-15 + YR23
 Wink Of Stella Clear Glitter Brush - sparkle added to bag clasp
American Crafts - 12x12 textured cardstock - Summer (darkest purple)
American Crafts - 12x12 textured cardstock - Winter (lighter purple shades)
American Crafts - 12x12 textured cardstock - black
Silhouette Cameo
Silhouette Design Store - Rectangle Deco Frame
Silhouette Design Store - Flower Set Mix and Match (layered doily)
Sizzix Big Shot
Couture Creations - Intricutz Dies - Script Happy Birthday
bling - purple and black rhinestones
Helmar 450 Quick Dry adhesive - to adhere the layers & doily
Tombow Mono Multi Liquid Adhesive
- to adhere the black frame, doily layers & sentiment

~~~*~~~*~~~

Sending a big Thank You to Lacy Sunshine Stamps for sponsoring

I hope I have inspired you to create a project filled with sticky elements and look forward to seeing your work shared in the challenge gallery.  
Remember we are not just a card blog, we love to see scrapbook layouts, artjournal pages and all types of papercraft.

~~~*~~~*~~~
I am going to enter my card in the following challenges (alphabetical order):
~~~*~~~*~~~


Wednesday, 5 July 2017

Hopping and Creating at the Crafty Gals Corner

It's an exciting time at the Crafty Gals Corner
This week have our weekly challenge and a BLOG HOP

Hello! Welcome to the Crafty Gals Corner Blog Hop!
We do these blog hops twice a year in order to welcome our newest team members! Some of these lovely ladies even have extra candy you can win, in addition to the sponsor prizes! 

In order to win the sponsor prizes you need to leave a comment ON EACH of the gals below, in addition each of these gals has a letter you must collect. At the end of the hop return to the Crafty Gals Corner post and leave a comment with the Secret Word!


Annie
Debs
Jana
Jeanie
Judy M.
Judy V.
Kimberly
Kleri
Lena
Noemi
Rae Ann
Samantha
Tracy - that's me and my secret letter is "O"
and I have some Blog Candy too ... keep reading!
Yaiza

~~~*~~~*~~~
This week we are hopping along, getting to know the new Design Team
and letting our creative juices flow with
Challenge #130 - Anything Goes

The sponsor for this challenge is:
Prize: $10 Gift Certificate

~~~*~~~*~~~

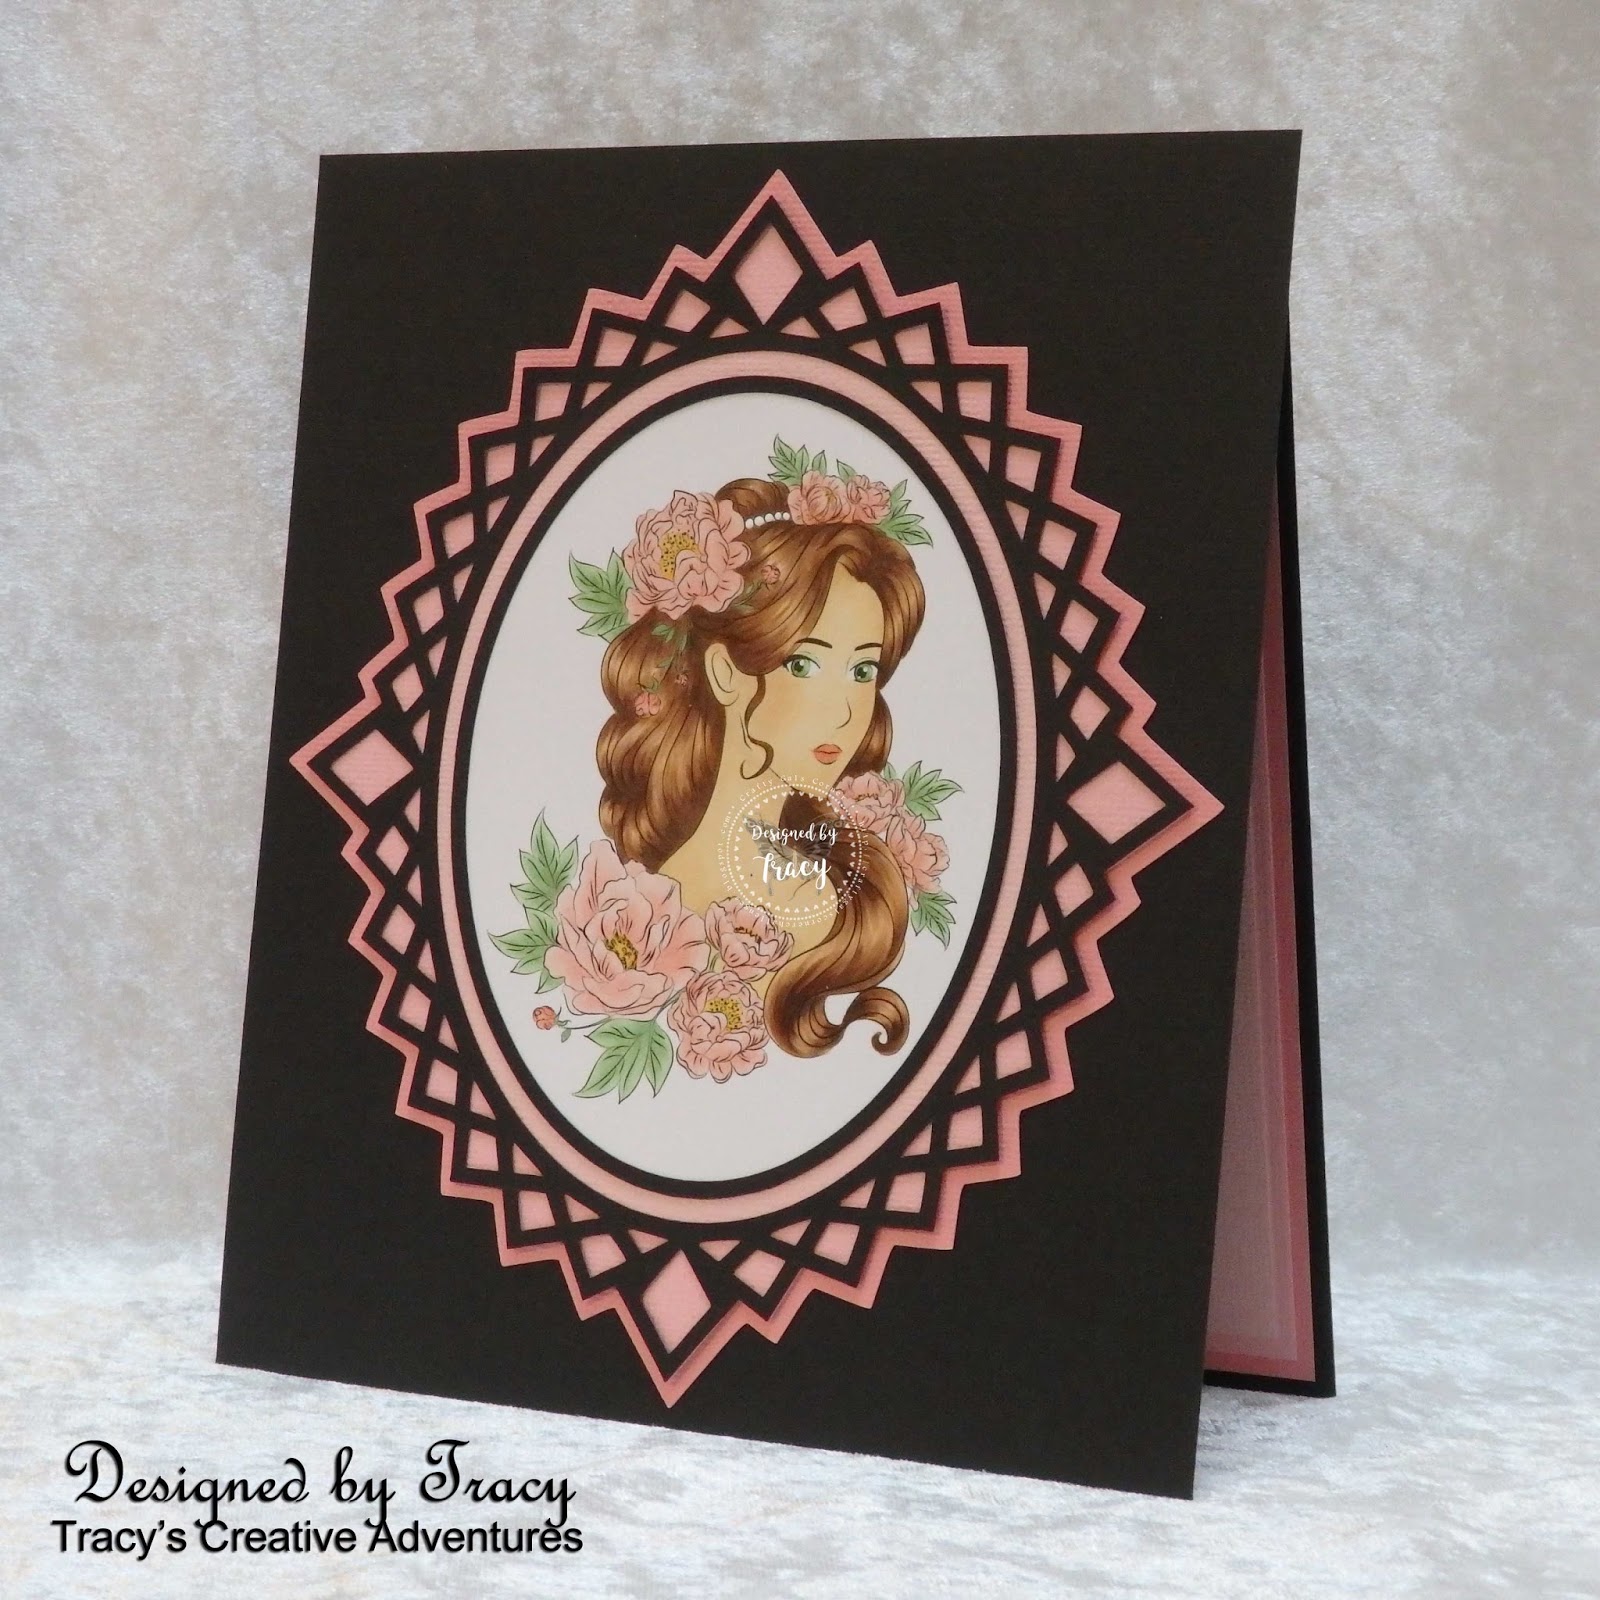
Today I have used the Peony Maiden digital stamp from MoonFlower Digital Stamps, our generous sponsors this week.


I knew that I wanted to frame this delightful image, so I placed it on my Silhouette Cameo design mat and sized it to fit neatly inside the smallest oval, then made a bundle of layers to suit.

The original ornate diamond frame cut file is a freebie,
yes, I said FREEBIE,
from Monica's Creative Room called Framed Toppers 8d.
I made a panel 1/8" larger than the ornate frame, one the same size, an oval that fitted neatly under the outer edge of the oval in the ornate frame and an oval ring, 1/8" thick with a 1/8" space inside the oval of the ornate frame ... sure hope that makes sense.  In summary, the layers for the image panel are Salmon, Peony, Flamingo, black ornate frame, image panel then the final black oval ring.

I printed the image on X-Press It blending card, heat set then coloured with Copic markers.
I adhered all the layers together with liquid adhesives.


Next came the card base, which is huge at 8 x 6 13/16".  I cut two black panels, scoring the back panel 1" from the top and adhered to the front to make a top fold.  I matted the inside with three layers of pink cardstock using the same shades under the ornate frame on the image panel.

The sentiment inside is a delight die cut.


*** INGREDIENTS ***
MoonFlower Digital Stamps - digital stamp - Peony Maiden
X-Press It - A5 blending card
Copic markers - skin - E50 E51 E53 E93
Copic markers - lips - R20 R21 R22
Copic markers - eyes - G40 G43 G46
Copic marker - eyelids - G40
Copic markers - hair - E21 E23 E25 E27
Copic markers - flowers - R000 R20 R21 R22 R24
Copic markers - foliage - G40 G12 G82 Y32 Y35 Y17
uni-ball signo broad white pigment ink pen (pearls)
Silhouette Cameo
Monica's Creative Room - free, yes, FREE cut file - Framed Toppers 8d

American Crafts - 12x12 weave cardstock - Salmon, Peony and Flamingo
American Crafts - 12x12 textured cardstock - black
Sizzix Big Shot
Couture Creations - Intricutz Dies - Script Happy Birthday
Helmar 450 Quick Dry liquid adhesive - to adhere layers
Tombow Mono Multi liquid adhesive - to adhere sentiment & ornate frame

~~~*~~~*~~~

Sending a big Thank You to MoonFlower Digital Stamps for supplying the digital stamp I used today and for being a sponsor for Challenge #130 with us at the Crafty Gals Corner.
    
Don't forget to complete the Blog Hop
~~~ my secret letter is "O" ~~~

... and I have some Blog Candy too!
If you would like to win a $10 shopping spree at Beccy's Place, all you need to do is include the words "Blog Candy" somewhere in your comment and you will go into the random prize draw.
GOOD LUCK!
Entries close 9pm AEST 12th July 2017
Winner to be announced 13th July 2017

~~~*~~~*~~~
I am going to enter my card in the following challenges (alphabetical order):
~~~*~~~*~~~

A Perfect Time To Craft - 1st July 2017 - Open Challenge #07
Colour It! Create It! Show It Off! - July Challenge - Diva Birthday option Anything Goes
Crazy Challenge - Challenge #25 - Anything Goes
Crafting When We Can Challenges - Challenge #147 - Use An Image
Crafty Catz - Challenge #377 Anything Goes with optional twist EMBOSSING
Di's Digi Designs Challenge - Layer It Up
Digi Choosday Crafty Challenge - Wk 26 Anything Goes
Ike's World Challenges - Challenge #92 - Anything Goes with optional twist Relax
In The Pink - Challenge #122 - Special Occasion
Love To Scrap Challenge Blog - LTSCB #99 - Anything Goes
Morgan's ArtWorld - Challenge #13 - Anything Goes
Pammie's Inky Pinkies - PIP Challenge 1727 - Anything Goes
Penny's Paper-Crafty Challenges - Challenge #336 - Anything Goes
QKR Stampede - Challenge #250 - Christmas In July or Anything Goes
Sasayaki Glitter Challenge Blog - July Challenge - Your Favourite Colour Combo
Pink and black is one of my favourite colour combos
Scrapbook Stamp Society - Challenge #120 - Anything Goes
with option to use the colours Blue & Green

The Paper Shelter - Challenge #301 Going Digital
Through The Craft Room Door - TTCRD 4th July - Anything Goes