Thursday, 3 August 2017

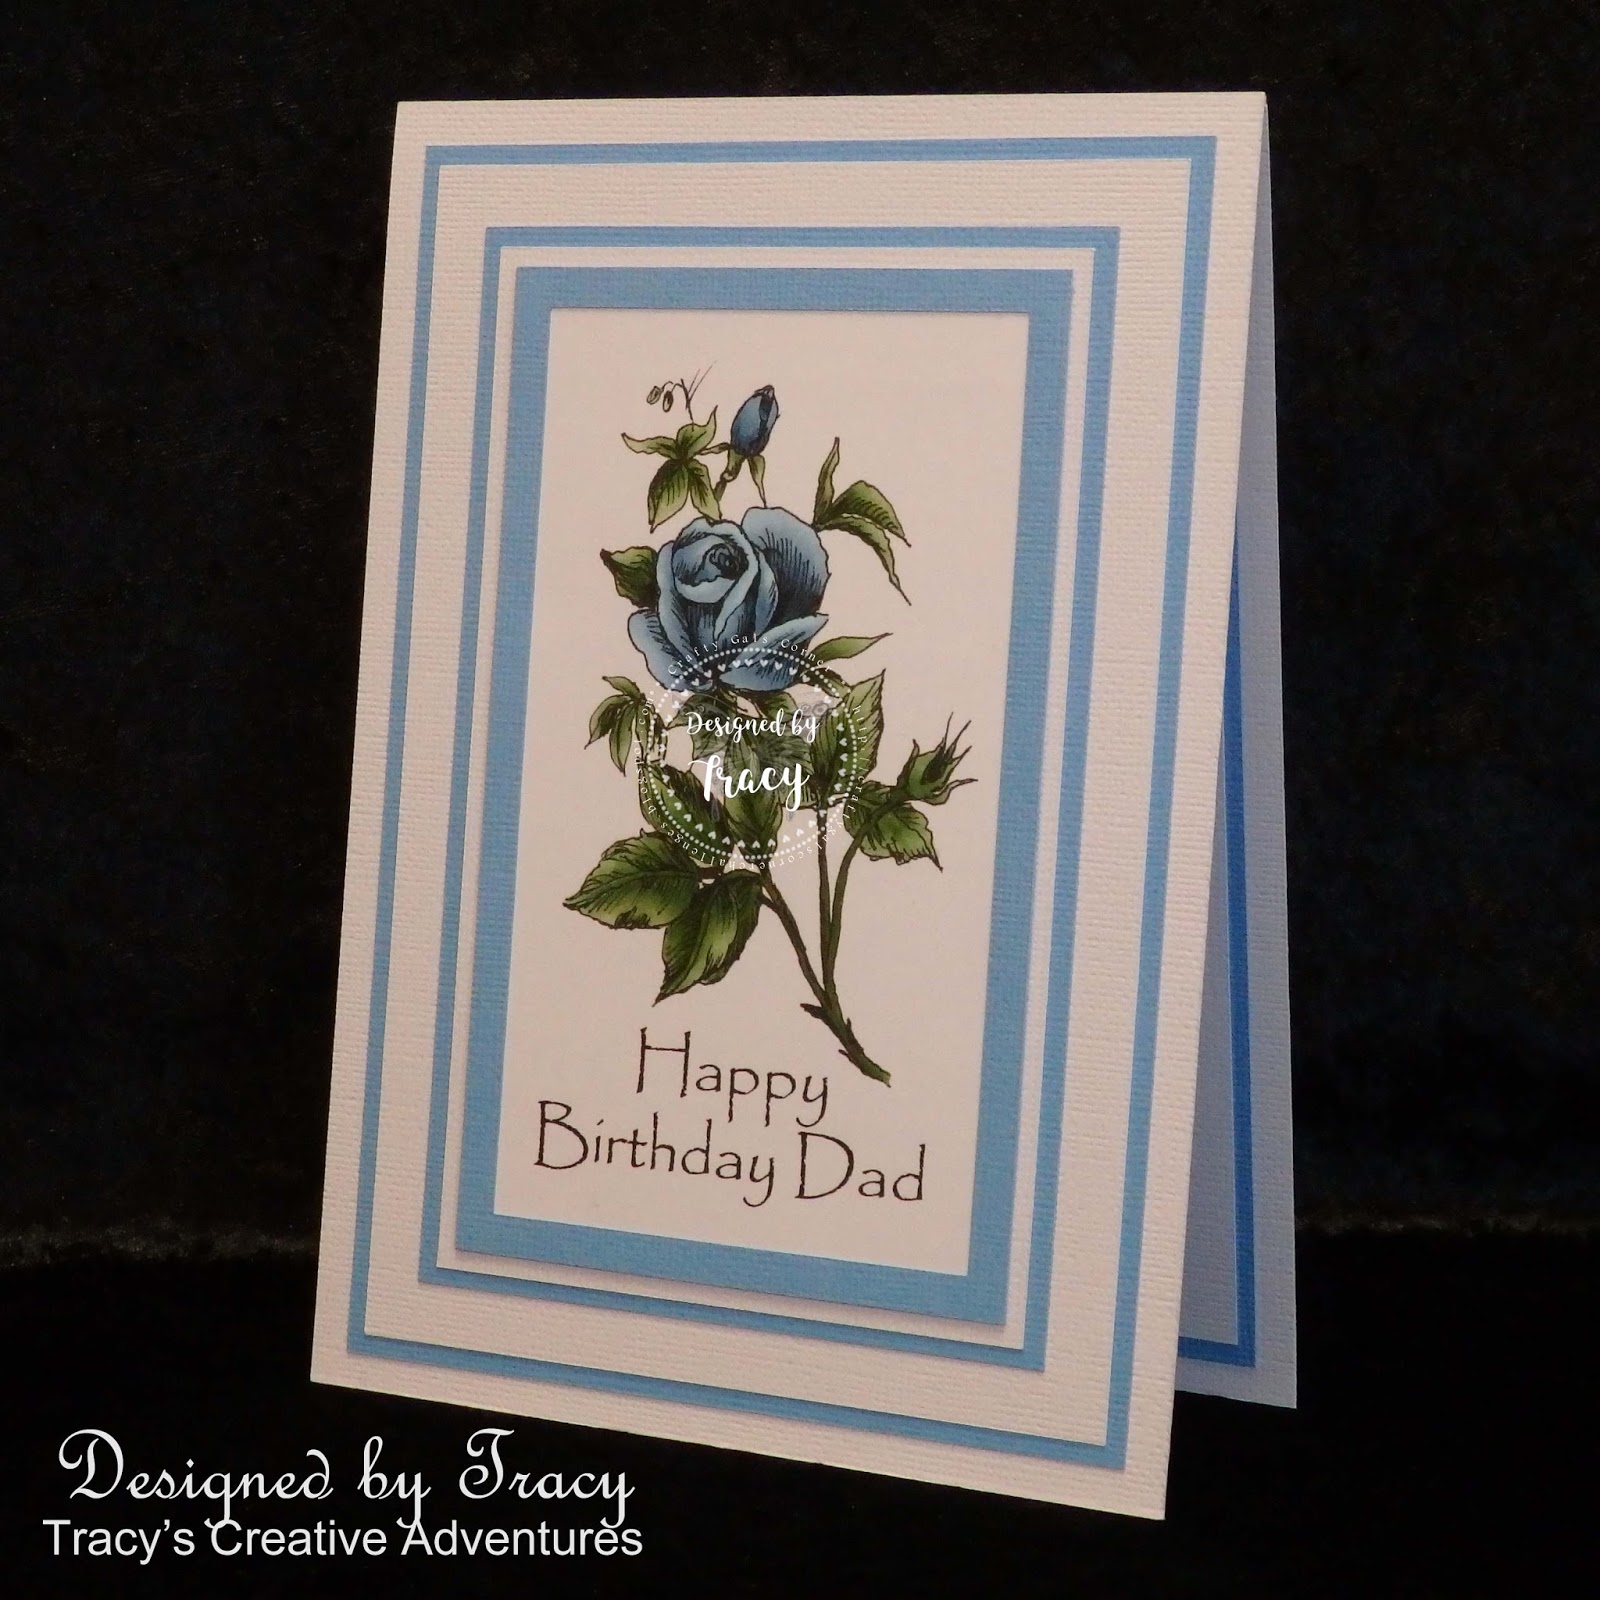
Blue roses filled with love - Happy Birthday Dad

You may have seen these two A5 top folding birthday cards,
His & Hers Roses HERE.


This post is to focus on the blue rose I made for my Father's birthday.


Yes, I know there is no such a thing as a blue rose.

The "blue rose" is something that rose growers all over the world dream of
and are trying to grow.  My Father really loves his roses, so I have made
one-of-a-kind blue rose from my beloved, one-of-a-kind Dad.

The inside of the card is matted and finished off with a die cut sentiment.


*** INGREDIENTS ***
Valentine 12 digital stamp from Morgan's ArtWorld
the sentiment on the card front is Papyrus
X-Press It - A4 blending card
Copic markers - roses - B0000-91-93-95-97
Copic markers - foliage - YG61-63-67-99
American Crafts - 12x12 textured cardstock - white
American Crafts - 12x12 textured cardstock - Ocean
(this colour comes as individual sheets or as part of the Winter pack)
A5 top folding card base
Sizzix Big Shot
Couture Creations - Intricutz Dies - Script Happy Birthday
Kaisercraft release paper
this makes die cutting delicate sentiments a pleasure
Helmar 450 Quick Dry liquid adhesive - to adhere layers
Tombow Mono Multi liquid adhesive - to adhere sentiment & frame
there is a frame over the image panel


~~~*~~~*~~~
You can read all about the pink rose card and 
Challenge #134 with us at the Crafty Gals Corner HERE.
I do hope you head on over, get inspired and join our challenge.
    
~~~*~~~*~~~
I am going to enter my card in the following challenges (alphabetical order):

Wednesday, 2 August 2017

Roses for Him, Roses for Her

It's time for another challenge with us at the

This week we are letting our creative juices flow with
Challenge 134 - Celebrate

The sponsors for this challenge are:

Morgan's ArtWorld
Prize: 3 Digital Images

Prize: 1 Bundle of your choice - no combo packs

~~~*~~~*~~~


Today I have used the Valentine 12 digital stamp from Morgan's ArtWorld, one of our generous sponsors this week, to make two A5 top folding birthday cards, His & Hers Roses.


The rose image is so elegant that I went with a CAS style to celebrate its beauty.


Do you think I should add some sparkling clear sequins to the "hers" card?
I was thinking of a cluster of 3 or 5 down on the RHS of the sentiment.


Before you say anything, yes, I know there is no such a thing as a blue rose.
The "blue rose" is something that rose growers all over the world dream of
and are trying to grow.  My Father loves his roses, so I have made a 
one-of-a-kind blue rose from my beloved, one-of-a-kind Dad.

The inside of each card is matted and finished off with a die cut sentiment.


*** INGREDIENTS ***
Valentine 12 digital stamp from Morgan's ArtWorld
the sentiment on the card front is Papyrus
X-Press It - A4 blending card
Copic markers - pink rose - RV0000 + R81-83-85-89
Copic markers - blue rose - B0000-91-93-95-97
Copic markers - foliage - YG61-63-67-99
American Crafts - 12x12 textured cardstock - white
American Crafts - 12x12 textured cardstock - black
American Crafts - 12x12 textured cardstock - Ocean
(this colour comes as individual sheets or as part of the Winter pack)

A5 top folding card bases
Sizzix Big Shot
Couture Creations - Intricutz Dies - Script Happy Birthday
Kaisercraft release paper
Helmar 450 Quick Dry liquid adhesive - to adhere layers
Tombow Mono Multi liquid adhesive - to adhere sentiment & frame

~~~*~~~*~~~
Sending a big Thank You to Morgan's ArtWorld for supplying the digital stamp I used today and for being a sponsor for Challenge #134 with us at the Crafty Gals Corner.
    
~~~*~~~*~~~
I am going to enter my card in the following challenges (alphabetical order):
~~~*~~~*~~~

A Perfect Time To Craft - 1st August 2017 - Open Challenge
Come And Get It Challenges - Just Add Flowers
Crafting By Designs - August Anything Goes Challenge
Crafts Galore Encore Challenge Blog - August Anything Goes
Creative Moments - Challenge #123 - Anything Goes
Hiding In My Craft Room - HIMCR #311 - Freestyle!
Morgan's ArtWorld - Challenge #15 - Anything Goes
Penny's Paper-Crafty Challenge Blog - Penny's Challenge #340 - Anything Goes
QKR Stampede - Challenge #254 - Down On The Farm or Anything Goes
SheepSki Designs Challenges - Challenge #5 - Flower Power
The Crafty Addicts Challenge Blog - Challenge #39 - Anything Goes / option Girly
The Paper Shelter - Summer Break 2 Week Challenge - Anything Goes
Through The Craft Room Door - Anything Goes Week of August 1-7, 2017


Monday, 24 July 2017

It's beginning to look a lot like Christmas

I have Christmas cards everywhere at the moment and
it's a good feeling too ... less stress come November.


I measured the stamp and cut some 3" x 4 1/4" panels to stamp them on.
I aligned the stamp with a panel in my MISTI and started stamping.

I stamped the panel with Memento Tuxedo Black Ink (Copic friendly) and zapped it with my heat gun to make sure it was completely dry.  Then came the Copic marker colouring to give the ornaments a pop of colour and dimension.  I finished them off with a luscious coating of sparkle with a Wink Of Stella clear glitter brush.

I matted the image panel with black cardstock,
giving it a 1/2" border using my Perfect Layers Ruler.

I die cut the dimensional bow (Winnie & Walter) in white cardstock and shaded with yellow (Y-YR) Copic markers to match the ornaments, adding Wink Of Stella sparkle to them too.  I die cut bundles of pine broughs (Cottage Cutz) in black cardstock, then layered them all together with the image panel on the card base.  I popped the bow in place with a foam dot.

Here are a couple of close-up pics to show the sparkle,
detail and dimension of the image and embellishments.


Lucky last came some little bells.  I threaded each one with metallic black thread, knotted them together then secured them around the bow, moving some of the pine needles to have them dangle neatly.  These "true" bells make a delicate tinkle as they move too.


*** INGREDIENTS ***
Stampendous - Pine Ornaments Cling Rubber Stamp
X-Press It - A5 Blending Card
MISTI
Memento Tuxedo Black Ink
heat tool
Copic markers - Y000-00-11-15 + YR23-24-27
Wink Of Stella Clear Glitter Brush
American Crafts - textured cardstock - black
American Crafts - textured cardstock - white
Perfect Layers Ruler - 1/2" border to the image panel
Sizzix Big Shot
Kaisercraft Release Paper
Winnie & Walter - bow - Take A Bow Cutaways
Cottage Cutz - dies - Spruce Stems
Helmar 450 Quick Dry Liquid Adhesive - to adhere layers
Helmar Acid Free Professional Glue - to adhere bow elements together
Tombow Mono Multi Adhesive - to adhere the pine broughs
foam squares - to adhere the bow
Arbee - True Bells - 10mm
black thread - to secure the bells

~~~*~~~*~~~

Don't forget to hop on over to my The Stencil Specialist Blog Hop post for your chance to win the awesome prize pack - good luck!

~~~*~~~*~~~
I am going to enter my card in the following challenges (alphabetical order):
~~~*~~~*~~~


Fabrika Fantasy - Challenge #11 - Christmas In July
I have rotated the sketch 180 degrees
Happy Little Stampers - HLS Christmas Challenge - A/Goes optional twist Die Cuts
Happy Little Stampers - HLS July Anything Goes with Dies Challenge
   
Pile It On - Challenge #132 - Primary Colors and/or Something Beginning With "S"
my card is filled with GOLDEN YELLOW, SPARKLE and SHINE
Sasayaki Glitter Challenge Blog - July Challenge - Your Favourite Colour Combo
Bold black & white with a pop of colour is one of my favourite combos,
today it is black and white and golden yellow

Scrapbook Stamp Society Challenge Blog - Challenge #121 - Anything Goes
with option Monochrome
SheepSki Designs - Challenge #4 - Square Cards
There are stars on the ornaments and background
Star Stampz - Christmas In July Challenge
Tuesday Throwdown - TT352 - Tic Tac Toe
my line is Christmas - Sparkle - Bells

~~~*~~~*~~~


Rustic Christmas wishes with burlap & woodgrain

Hopefully you have already heard my exciting news,
seen my cards in THIS post and
entered for your chance to win on The Stencil Specialist Blog HOP.

This card features the Stampendous Pine Ornaments Cling Rubber Stamp.


I measured the stamp and cut some 3" x 4 1/4" panels to stamp them on.
I aligned the stamp with a panel in my MISTI and started stamping.

I stamped the panel with Memento Tuxedo Black Ink (Copic friendly) and zapped it with my heat gun to make sure it was completely dry.  I stamped some extra panels on scrap cardstock, covered with X-Press It Mask-It and fussy cut out the ornaments to make a mask.

I peeled off the mask and carefully layered over the image panel.  I inked the background using Old Paper Distress Ink, peeled off the mask and heat set to ensure the ink was dry.

Next came the Copic marker colouring to give the ornaments a pop of colour and dimension.  I finished the ornaments off with a touch of clear Wink of Stella glitter brush sparkle.

I cut a length of burlap and frayed the edges to make a rustic mat for the image panel.  The burlap tended to move out of shape, so I matted it with some black cardstock (no, you can't see it) before adhering the image panel in place.

I took a panel of Kaisercraft woodgrain cardstock (Base Coat paper pad) and adhered it to an A5 top folding card base, trimming off the bottom of the card.  Yes, my card is an odd size but I wanted to use as much of the 6 1/2" paper panel as possible.

Here is a close-up pic showing the delicate detail and sparkle of the golden ornaments.


I considered adding some sparkling clear sequins to this card.
What do you think?  Add some?

*** INGREDIENTS ***
Stampendous - Pine Ornaments Cling Rubber Stamp
X-Press It - A5 Blending Card
MISTI
Memento Tuxedo Black Ink
heat tool
X-Press It Mask It
Old Paper Distress Ink
Small Round Ink Blending Tool
Copic markers - Y000-00-11-15 YR 23-24-27
Wink Of Stella Clear Glitter Brush
Kaisercraft - 6 1/2" Basecoat Paper Pad
burlap
Helmar 450 Quick Dry Liquid Adhesive - to adhere layers

~~~*~~~*~~~

Don't forget to hop on over to my The Stencil Specialist Blog Hop post for your chance to win the awesome prize pack - good luck!

~~~*~~~*~~~
I am going to enter my card in the following challenges (alphabetical order):
~~~*~~~*~~~

Fabrika Fantasy - Challenge #11 - Christmas In July
Get Creative Challenges - Challenge #60 - CAS
Happy Little Stampers - HLS July Mixed Media Challenge - Texture
Happy Little Stampers - HLS Christmas Challenge - A/Goes optional twist Die Cuts
   
Incy Wincy Designs - 17th July - 6th August - 1 paper layer only
Koala T Crafts - July Theme - Red or Blue or Stars
Love To Scrap Challenge Blog - LTSCB #99 - Anything Goes
Morgan's ArtWorld - Challenge #14 - Anything Goes
Pile It On - Challenge #132 - Primary Colors and/or Something Beginning With "S"
the ornaments on my card are filled with SPARKLE
QKR Stampede - Up, Up and Away or Anything Goes
Sparkles Christmas Challenges - Challenge #78 - An Ornament
Star Stampz - Christmas In July Challenge
The Paper Shelter - Challenge #303 - Holiday Time
In the Southern Hemisphere we have a HOT summery Christmas,
so my dream holiday would be a wintery white Christmas

Bold and beautiful Christmas wishes

Hopefully you have already heard my exciting news,
seen my cards in THIS post and
entered for your chance to win on The Stencil Specialist Blog HOP.

This card uses the Stampendous Pine Ornaments Cling Rubber Stamp,
Winnie & Walter bow die and Cottage Cutz spruce stems.


I measured the stamp and cut some 3" x 4 1/4" panels to stamp them on.
I aligned the stamp with a panel in my MISTI and started stamping.

I stamped the panel with Memento Tuxedo Black Ink (Copic friendly) and zapped it with my heat gun to make sure it was completely dry.  Then came the Copic marker colouring to give the ornaments a pop of colour and dimension.  I used a gold metallic gel pen to colour the top of the ornaments, the round accent on the largest ornament and the accent star bursts & splatters.

I matted the image panel with black cardstock,
giving it a 1/2" border using my Perfect Layers Ruler.

I die cut the dimensional bow (Winnie & Walter) in white cardstock and shaded with red Copic markers to match the ornaments.  I die cut bundles of pine broughs (Cottage Cutz) in black cardstock, then layered them all together with the image panel on the card base.

*** INGREDIENTS ***
Stampendous - Pine Ornaments Cling Rubber Stamp
X-Press It - A5 Blending Card
MISTI
Memento Tuxedo Black Ink
heat tool
Copic markers - R20-21-22-24-27
Kaisercraft metallic gel pen
American Crafts - textured cardstock - black
Perfect Layers Ruler
Sizzix Big Shot
Kaisercraft Release Paper
Winnie & Walter - bow - Take A Bow Cutaways
Cottage Cutz - dies - Spruce Stems
Helmar 450 Quick Dry Liquid Adhesive - to adhere layers
Helmar Acid Free Professional Glue - to adhere bow elements together
Tombow Mono Multi Adhesive - to adhere the pine broughs
foam squares - to adhere the bow

~~~*~~~*~~~

Don't forget to hop on over to my The Stencil Specialist Blog Hop post for your chance to win the awesome prize pack - good luck!

~~~*~~~*~~~
I am going to enter my card in the following challenges (alphabetical order):
~~~*~~~*~~~

A Perfect Time To Craft - 1st July 2017 - Open Challenge #07
Crafty Hazelnuts Christmas Challenge Extra - CHNC Extra for July - Anything Goes
Digi Choosday Craft Challenge - Wk 28 - Anything Goes
Fabrika Fantasy - Challenge #11 - Christmas In July
Hiding In My Craft Room - HIMCR #310 - Any Holiday
Koala T Crafts - July Theme - Red or Blue or Stars
Morgan's ArtWorld - Challenge #14 - Anything Goes
Pammie's Inky Pinkies Challenges - PIP Challenge #1730 - Anything Goes
Pile It On - Challenge #132 - Primary Colors and/or Something Beginning With "S"
QKR Stampede - Up, Up and Away or Anything Goes
SheepSki Designs - Challenge #4 - Square Cards
Sparkles Christmas Challenges - Challenge #78 - An Ornament
The 12 Months Of Christmas Link Up - Challenge #31 - Anything Christmas Goes
optional theme Oh Deer!
The Paper Shelter - Challenge #303 - Holiday Time
In the Southern Hemisphere we have a HOT summery Christmas,
so my dream holiday would be a wintery white Christmas

Glamorous rose gold Christmas wishes . . . part 2

This card features the Stampendous Pine Ornaments Cling Rubber Stamp and Rose Gold Embossing Enamel, the sentiment by Ultimate Crafts.  This CAS design was quick and easy to prepare and assemble and I know I will be making more to send out in time Christmas this year.


Here is a close-up pic showing the beautiful detail of the stamp
and the delicate shimmer of the rose gold embossing enamel.


*** INGREDIENTS ***


~~~*~~~*~~~
I am going to enter my card in the following challenges (alphabetical order):

Glamorous rose gold Christmas wishes

Hopefully you have already heard my exciting news,
seen my cards in THIS post and
entered for your chance to win on The Stencil Specialist Blog HOP.

This pair of cards use the Stampendous Pine Ornaments Cling Rubber Stamp and
Rose Gold Embossing Enamel with sentiments by Kaisercraft and Ultimate Crafts.
These CAS designs were quick and easy to prepare and assemble.


I measured the stamp and cut some 3" x 4 1/4" panels to stamp them on.
I aligned the stamp with a panel in my MISTI and started stamping.

I stamped each panel with Tattered Rose Distress Ink first, to give a solid background for the heat embossing to come.  I heat set each panel, dusted with my powder tool, stamped with Versamark ink, smothering each panel with embossing powder, then held my breath in awe as the magic happened before my eyes with the heat gun - WOW!

I cut some slightly larger panels to mat each image panel, went around the edges with Versamark ink and heat embossed to match the image panel to give me perfectly matching matting panels.
I die cut the pair of Merry Christmas sentiments and heat embossed them too.

The smaller card is 5x7", the larger A5.


Here is a close-up pic showing the beautiful detail of the stamp
and the delicate shimmer of the rose gold embossing enamel.


It's gorgeous, so hard to photograph, pure magic in real life,
a delicate pinkish gold that shimmers & sparkles in the light!

*** INGREDIENTS ***
Stampendous - Pine Ornaments Cling Rubber Stamp
MISTI
Tattered Rose Distress Ink
EK Success Powder Tool
Versamark Ink Pad
Stampendous - Rose Gold Embossing Enamel
heat tool
Sizzix Big Shot
Kaisercraft Release Paper
Kaisercraft Decorative Die Words - Merry Christmas
Ultimate Crafts - Merry Christmas Script Die
(Ultimate Crafts are the parent company of Couture Creations)
Helmar 450 Quick Dry Liquid Adhesive - to adhere layers
Tombow Mono Multi Adhesive - to adhere the sentiments

~~~*~~~*~~~

Don't forget to hop on over to my The Stencil Specialist Blog Hop post for your chance to win the awesome prize pack - good luck!

~~~*~~~*~~~
I am going to enter my card in the following challenges (alphabetical order):

Sparkling tinsel Christmas wishes . . . part 2


This card features the Stampendous Pine Ornaments Cling Rubber Stamp and Gold Tinsel Glitter Embossing Powder, the sentiment by Ultimate Crafts.  This CAS design was quick and easy to prepare and assemble and I know I will be making more to send out in time Christmas this year.


Here is a close-up pic showing the delicate detail of the stamp
and the stunning sparkle of the tinsel embossing powder.


*** INGREDIENTS ***


~~~*~~~*~~~
I am going to enter my card in the following challenges (alphabetical order):

Sparkling tinsel Christmas wishes

Hopefully you have already heard my exciting news,
seen my cards in THIS post and
entered for your chance to win on The Stencil Specialist Blog HOP.

This pair of cards feature the Stampendous Pine Ornaments Cling Rubber Stamp and Gold Tinsel Glitter Embossing Powder, with sentiments by Kaisercraft and Ultimate Crafts.  These CAS designs were quick and easy to prepare and assemble.


I measured the stamp and cut some 3" x 4 1/4" panels to stamp them on.
I aligned the stamp with a panel in my MISTI and started stamping.

I stamped each panel with Fossilized Amber Distress Ink first, to give a solid background for the heat embossing to come.  I heat set each panel, dusted with my powder tool, stamped with Versamark ink, smothering each panel with embossing powder, then held my breath in awe as the magic happened before my eyes with the heat gun - WOW!

I cut some slightly larger panels to mat each image panel, went around the edges with Versamark ink and heat embossed to match the image panel to give me perfectly matching matting panels.
I die cut the pair of Merry Christmas sentiments and heat embossed them too.

The smaller card is 5x7", the larger A5.


Here is a close-up pic showing the delicate detail of the stamp
and the stunning sparkle of the tinsel embossing powder.


It's gorgeous, so hard to photograph, pure magic in real life!

*** INGREDIENTS ***
Stampendous - Pine Ornaments Cling Rubber Stamp
MISTI
Fossilized Amber Distress Ink
EK Success Powder Tool
Versamark Ink Pad
Stampendous - Gold Tinsel Glitter Embossing Powder
heat tool
Sizzix Big Shot
Kaisercraft Release Paper
Kaisercraft Decorative Die Words - Merry Christmas
Ultimate Crafts - Merry Christmas Script Die
(Ultimate Crafts are the parent company of Couture Creations)
Helmar 450 Quick Dry Liquid Adhesive - to adhere layers
Tombow Mono Multi Adhesive - to adhere the sentiments

~~~*~~~*~~~

Don't forget to hop on over to my The Stencil Specialist Blog Hop post for your chance to win the awesome prize pack - good luck!

~~~*~~~*~~~
I am going to enter my card in the following challenges (alphabetical order):