Here is a card that I have been thinking about making since
the day I first saw the Roses Dies from Paper Smooches.
 I confess that the dies have been waiting since March this year to escape
the packaging and have a workout and boy did they have a workout. I spent ages cutting the leaves in preparation for my mosaic and it was worth every second!!!
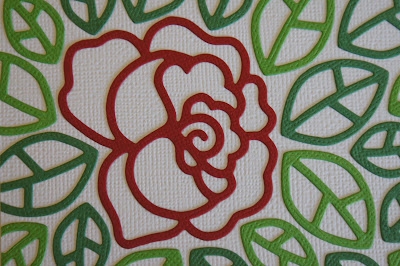
I used the largest rose from the set as the focal point.
I adhered the rose in place first using Tombow Mono Multi Liquid Adhesive, then I placed the leaves around it, trying to get a fairly even space between them all, then started adhering them in place. Things didn't go as smoothly as a I planned, with the leaves moving around in the breeze flowing through the house and from me knocking them as I worked. My TOP TIP if you want to make one too, is to apply a small dollop of Tombow Mono Multi to the tip of each leaf and allow it to dry. They then become repositionable, so that they can be moved around until you're happy with their placement and they stay in place until you adhere them permanently. I will definitely be making more mosaic cards and it will be much easier and faster next time.
Here is a close-up of the layered sentiment tag.
 I used the Fiskars XXL Tag Lever Punch to cut the cardstock and vellum layers.
The "thanks" is a stamp from Paper Smooches
(a freebie that came with one of my orders, Thank You Kim)
I used Stazon Jet Black ink to stamp on the vellum.
The sequins are Sparkling Clear 4mm & 6mm from Pretty Pink Posh and they really do sparkle!!!
I adhered them in place using Ranger Multi Medium Matte.
I put a tiny dollop of Tombow Mono Multi Liquid Adhesive on the back of the vellum tag, under the top two sequins above the sentiment and the top two sequins from the cluster of three below it and secured it to the white tag, then spread some under the white tag to layer it to the black one.
I used foam dots to secure the tag to the card.
I am really pleased with my 1st use of the Ranger Multi Medium Matte, the sequins are securely in place. You can't see any of the adhesive showing around or in the middle of the sequins.
On the Tombow front, you can't see any of the adhesive under the vellum either.
Here is a close-up pic of the rose and some of the leaves.
 I LOVE this die set!!!
I have entered my card in the following challenges:
Paper Smooches SPARKS Challenge Blog
the day I first saw the Roses Dies from Paper Smooches.

the packaging and have a workout and boy did they have a workout. I spent ages cutting the leaves in preparation for my mosaic and it was worth every second!!!
I used the largest rose from the set as the focal point.
I adhered the rose in place first using Tombow Mono Multi Liquid Adhesive, then I placed the leaves around it, trying to get a fairly even space between them all, then started adhering them in place. Things didn't go as smoothly as a I planned, with the leaves moving around in the breeze flowing through the house and from me knocking them as I worked. My TOP TIP if you want to make one too, is to apply a small dollop of Tombow Mono Multi to the tip of each leaf and allow it to dry. They then become repositionable, so that they can be moved around until you're happy with their placement and they stay in place until you adhere them permanently. I will definitely be making more mosaic cards and it will be much easier and faster next time.
Here is a close-up of the layered sentiment tag.

The "thanks" is a stamp from Paper Smooches
(a freebie that came with one of my orders, Thank You Kim)
I used Stazon Jet Black ink to stamp on the vellum.
The sequins are Sparkling Clear 4mm & 6mm from Pretty Pink Posh and they really do sparkle!!!
I adhered them in place using Ranger Multi Medium Matte.
I put a tiny dollop of Tombow Mono Multi Liquid Adhesive on the back of the vellum tag, under the top two sequins above the sentiment and the top two sequins from the cluster of three below it and secured it to the white tag, then spread some under the white tag to layer it to the black one.
I used foam dots to secure the tag to the card.
I am really pleased with my 1st use of the Ranger Multi Medium Matte, the sequins are securely in place. You can't see any of the adhesive showing around or in the middle of the sequins.
On the Tombow front, you can't see any of the adhesive under the vellum either.
Here is a close-up pic of the rose and some of the leaves.

I have entered my card in the following challenges:
*********************************
The theme this week is Anything Goes featuring Paper Smooches product
I used the Paper Smooches Roses Dies and "thanks" stamp.


Entries close 11:59pm PST Saturday 12th September 2015
*********************************
(Never-Before-Used-Schtuff)
hosted by Darnell J. Knauss on her Blog djkardcreations.com

The theme is Anything Goes
Entries close 11:55pm PST Friday 18th September 2015
The NBUS items I used include the PS Roses Dies that have been sitting unopened in my stash for too many months and the new-to-me Ranger Multi Medium Matte.
*********************************
The challenge is to use a stamp AND to complete their Blog Hop
My stamping is on the sentiment tag and yes, I completed the Blog Hop too,it was filled with fabulous projects using new release SSS products.
Entries close 08:00 Ohio Wednesday 16th September 2015
*********************************
The challenge is to create TAGS, stand alone tags or tags on projects.
It must include sequins and can use the colours of the inspiration photo below.I used Sparkling Clear sequins from Pretty Pink Posh and attached my layered tag to my card.


Entries close 11:55pm Friday 11th September 2015
*********************************
card base 5 x 7"
black mat 4 5/8 x 6 5/8"
white mat 4 1/2 x 6 1/2"
mosaic panel 4 x 6"
Tracy, this is gorgeous! I love how the rose just pops off the card! The leaves look so pretty in all the shades of green! So happy you joined us at Sparkle and Shine! XX
ReplyDeleteThank You Claire :)
DeleteI haven't crafted for a few months was thrilled to find that trying this new style has given my mojo a boost!!!
This is so pretty!
ReplyDeleteThank You Ruth :)
DeleteI was thrilled with how this new-to-me style turned out and look forward to making more.
Awesome card. Cutting out all those leaves certainly was worth the effort. Love it.
ReplyDeleteThank You Jean :)
DeleteI plan on cutting lots more leaves and making another one real soon!
I really love the way you used this die set. Great card!
ReplyDeleteThank You Jeanne :)
DeleteIt really is a beautiful die set, I've only used the large rose and leaves so far => I need to work on using the smaller rose and stem next.
Your mosaic is awesome!!! Super design.
ReplyDeleteSo glad you joined us at Sparkle and Shine!
Thank You Janet :)
DeleteI confess that I'm thrilled with how it turned out and look forward to making more.
Absolutely BEAUTIFUL!!! Love what a gorgeous card this is with the die cuts layered on that way! Thanks so much for playing along at Sparkle and Shine!!!
ReplyDeletehousesbuiltofcards@gmail.com
www.housesbuiltofcards.blogspot.com
Thank You Heather :)
DeleteI am really enjoying the world of die cutting with my Big Shot and experimenting with different techniques. Now that I've worked out how to secure the placement in readiness for adhering the pieces in place, I look forward to cutting more leaves and trying it again real soon.
WOW - this is Amazing!!! I love your card! Thanks so much for playing with us at SPARKS. /Karin
ReplyDeleteThank You Karin :)
DeleteIt was exciting for me to try a different style and have it work out like I was hoping it would.
Great design...and yes, I'm sure that this card took you a long time to do. I like dies too and you have inspired me to give your design a try...makes your flower really pop!
ReplyDeleteThank You Jill :)
DeleteI hope you do try it!!! Once I started adding a tiny dot of Tombow to temporarily hold them in place it went much faster and smoother, so you will enjoy it :)
Hi Tracy, I'm finally here! I'm so sorry life has made it hard for me to get here, but I know with your RA that you understand how that happens. I came in through the front door and have been enchanted by both your coffee hop shaped cards and all three of your wonderfully created NBUS cards!! Thank you so much for joining in the Challenge #5! This one in particular really rocked my world! It's a winning design in my eyes and I'm pinning it. Well, wait, I pin all my NBUS cards ... okay then, I'm putting it in my own personal "CASE Someday" folder!
ReplyDeleteAnd thank you so much for following me! It is my pleasure to return the flavor and follow you back! I hope to see you again soon! Hugs, Darnell
Wow! That's all, just Wow!
ReplyDelete