Thursday, 23 July 2020

Spotlight on Thank You

Earlier today I shared

Sadly, the Southern Girls Challenge Blog has now closed.
The Design Team members, past and present have shared projects to say
farewell and thank you in The Final Encore.
These cards are my special Thank You to Lou and Trace, the blog co-owners.


~~~*~~~*~~~

This post is to focus on my card using the "Flower Bouquet 2" digital stamp
from the Floral Bouquet digital stamp set by Star Jam Lines.


I opened the "Flower Bouquet 2" digital stamp in Silhouette Studio and added a digital "Thank You" (details below).  I added a round "window" to cut in the middle of the image, printed on X-Press It blending card, heat set then cut the circle out with my Silhouette Cameo.  To make a matting layer for the floral circle, I added a 1/16" offset to the circle window shape and cut with my Silhouette Cameo I coloured around the edges and the outer 1/8" of the circle with a Memento Tuxedo Black Dual Tip marker so that the black matches the black printing of the image and sentiment.  I coloured the circle of the floral image with Copic markers, went around the edges with a Memento Tuxedo Black Dual Tip marker and adhered to the matting panel.  I made a card base and adhered the card front panel in place with liquid adhesive.  To finish off the card, I put liquid adhesive on the back of the matted spotlight panel and carefully aligned it with the image on the card front.


You can read all about my other card, using the "Flower Bouquet 1" digital stamp
from the Floral Bouquet digital stamp set from Star Jam Lines
by clicking


~~~*~~~*~~~

*** INGREDIENTS ***
Star Jam Lines - Floral Bouquet digital stamp set
I have used the Floral Bouquet 2 image
Font Bundles - Dream of Spring - font used for sentiment
this is a FREE font
Copic markers - foliage - YG61-63-67 + YG61-03-17-67
Copic markers - pink flowers - R81-83-85 + YR68
Copic markers - yellow flowers - Y11-13-15-18 + YR61-65-68
Copic markers - background - B0000-000-00
Silhouette Cameo
Memento Tuxedo Black Dual Tip Marker
scoreboard and bone folder - to make the card base
Helmar 450 Quick Dry adhesive - to adhere the layers

~~~*~~~*~~~

Sending a big Thank You to Lou and Trace, my time with you and the Design Team at the  has been a wonderful, creative adventure!


~~~*~~~*~~~
I am going to enter my card in the following challenges

The Final Encore from the Southern Girls

... they say that all good things must come to an end
and,
sadly,
today is . . .


with past and present members sharing a project to say Thank You and Goodbye

~~~*~~~*~~~

I have had a wonderful time being a member of Team Lou

and I will miss seeing all the projects shared by the Design Team
and all the fabulous challenge entries submitted to the linky too.

I'm putting the spotlight on Lou and Trace,
the Co-Owners of the Southern Girls Challenge Blog
 by making cards using the new-to-me "spotlight technique".

~~~*~~~*~~~

Today I have used two of the stamps from the 
from the Floral Bouquet digital stamp set by Star Jam Lines.


I opened the "Flower Bouquet 1" and "Flower Bouquet 2" digital stamps in Silhouette Studio and added a digital "Thank You" (details below).  I added a "window" to cut in the middle of the images, printed on X-Press It blending card, heat set then sent each one through my Silhouette Cameo.  The landscape card panels with the circle window over the Flower Bouquet 1 image cut perfectly.  It was a completely different story with the Flower Bouquet portrait card panels.  For some reason I could not get the page to register, I tried everything, from torches to printing again, with no luck, so I gave my trusty stainless steel ruler and craft knife a workout and manually cut the rectangle window.  I added a 1/16" offset to the windows and cut them to mat the spotlight panels.  (I coloured around the edges and the outer 1/8" of the matting panels with a Memento Tuxedo Black Dual Tip marker so that the black matches the black printing of the image and sentiment.)  I coloured the floral image panels with Copic markers, went around the edges with a Memento Tuxedo Black Dual Tip marker and adhered to their matting panels.  I made some card bases and adhered the card front panels in place with liquid adhesive.  Next came the challenging bit ... OK, I confess, it was a challenge for me to colour the partial images for the spotlight too ... I put liquid adhesive on the back of the matted spotlight panels and carefully aligned them with the images on the cards and the cards were done.

Here is Flower Bouquet 1


and here is Flower Bouquet 2


~~~*~~~*~~~

*** INGREDIENTS ***
Star Jam Lines - Floral Bouquet digital stamp set
I have used the Floral Bouquet 1 and Floral Bouquet 2 images
Font Bundles - Dream of Spring - font used for sentiment
this is a FREE font
X-Press It A4 Blending Card
Copic markers - foliage - YG61-63-67 + YG61-03-17-67
Copic markers - pink flowers - R81-83-85 + YR68
Copic markers - yellow flowers - Y11-13-15-18 + YR61-65-68
Copic markers - background - B0000-000-00
Silhouette Cameo
scoreboard and bone folder - to make the card bases
Helmar 450 Quick Dry adhesive - to adhere the layers

~~~*~~~*~~~

Sending a big Thank You to Lou and Trace, my time with you and the Design Team at the  has been a wonderful, creative adventure!

I am going to enter my card in the following challenges

Wednesday, 22 July 2020

Butterfly Birthday Wishes

It's time for a new challenge with us on the
As always, the challenge is Anything Goes.

~~~*~~~*~~~

The sponsors for this challenge are:
Fred She Said Digital Designs


~~~*~~~*~~~

Today I have used the SwallowTail Butterfly digital stamp by Fred She Said Digital Designs to make a pair of shaker cards.  This digital stamp set comes with a combination of black & white and pre-coloured images.  I have used the pre-coloured SwallowTail Butterfly digital stamp to try a new-to-me shaker card technique.


My cards started on my Silhouette Studio design mat.  I opened the pre-coloured SwallowTail Butterfly digital stamp and a pretty blue digital watercolour paper.  I confess, I printed a bundle of these butterflies, fussy cut each one, carefully inked the outer edges then decided on a different card design, so my kaleidoscope of butterflies (yes, I looked it up) have been set aside for another day.  I added an offset to the butterfly, printed a sheet of them then cut with my Cameo.  I trimmed the digital paper to 4 3/4" x 6 1/2", added a 3 1/2" round window and sized the butterfly to fit neatly inside, printed then cut with my Cameo.  I added an 1/16" offset to make a matting layer for the window panel and cut it with my Cameo.  I matted a card base 5 1/8" x 6 7/8" to allow for a 1/8" border around the matted shaker panel.  I die cut sets of black and white alphas to make layered "HAPPY" and sets of a layered "Birthday" for both cards, adhering the layers together before adhering to the card fronts.
I used double-sided tape to adhere acetate to the shaker window then added foam around the back of the matted card front, carefully sealing around the edges of the window.  I went around the outer and inner edges of the foam with a black marker to match the matting layer.  The butterflies were adhered together with some clear jewellery bead thread between the layers along the middle body line.  The layered butterfly was secured in place with double-sided tape, with the length at the top allowing the butterfly to float down in the window but not to the bottom and the length at the bottom allowing the butterfly to float up to the top of the window ... sure hope this makes sense ... the idea is to allow the butterfly to flutter around the window without going upside down.  You can read all about it HEREin this fabulous tutorial by Jennifer McGuire.  I put some double-sided tape on top of the thread, cutting slightly longer, folding back and putting more tape on top, to ensure the thread doesn't work loose.  I had so much fun making a special shaker mix, combining cupped and flat sequins, seed beads and bugle beads in a range of blues, black and sparkling clear.  The photo below was my second attempt at making the card.  The first time I sealed it closed it was way too full, so I quickly peeled off the backing layer before the liquid adhesive had dried, luckily my "Quick Dry" wasn't too quick!  I tipped the shaker mix out, made a huge mess, eventually dividing all the different elements in half and sharing them between the two cards.  This time I sealed the card again and it was much better.


Before I sealed the second card, I decided to carefully pick out the beads and add more sparkling clear flat sequins to give the butterfly more room to float around the window.  If you look closely in the shaker windows above and below, you will be able to see the clear thread limiting the movement of the butterflies.


~~~*~~~*~~~

I also had the pleasure of working the Paper Nest Dolls


~~~*~~~*~~~

NOW it's YOUR turn!
I hope that I have inspired you to get creative
and look forward to seeing your projects fill the gallery for
Penny's Challenge 476
on the
Penny's Paper-Crafty Challenge Blog

~~~*~~~*~~~

*** INGREDIENTS ***
Fred She Said Digital Designs - digital stamp - SwallowTail Butterfly
digital paper - Watercolor Backgrounds
this was a freebie set of nine papers from The Hungry JPEG
Silhouette Cameo
Sizzix Big Shot
Kaisercraft - decorative dies - Alphabet Uppercase
Cottage Cutz - layered Happy Birthday dies
acetate -
X-Press It - foam tape - X-Press It - double-sided tape -
Helmar 450 Quick Dry adhesive - to adhere the layers
Tombow Mono Multi Liquid Adhesive - to adhere the alphas

~~~*~~~*~~~
Sending a big Thank You to for supplying the digital stamp I used today and for being a sponsor for Challenge 476Penny's Paper-Crafty Challenge Blog
    
~~~*~~~*~~~
I am going to enter my card in the following challenges

The Secret Ingredient Is Always . . .

L O V E

It's time for a new challenge with us on the
As always, the challenge is Anything Goes.

~~~*~~~*~~~

The sponsors for this challenge are:
Fred She Said Digital Designs


~~~*~~~*~~~

Today I have used the Paper Nest Dolls
very special secret ingredient, LOVE.


My cards started on my Silhouette Studio design mat, with a plan for a 6" square design.  As soon as I saw Chef Owen, I immediately thought of the traditional white hat and jacket, along with the houndstooth patterned pants, so decided to go with a bold black, white and red design.  Starting with a 6" square white base, I built up the layers around houndstooth digital patterned paper (details & link below).  The houndstooth panel is 5 5/8", the black mat 5 3/4", the white mat 6" and all layers were adhered with liquid adhesive on 6" square card bases..  I sized Chef Owen to allow for double matting and sized a digital sentiment (details & link below) to suit. The images and sentiments were printed on X-Press It blending card, heat set, images coloured with Copic markers, then all were trimmed to size.  I matted the image and sentiment panels, using 1/16" and 1/8" Perfect Layers rulers.  I wanted to add some flavoursome flourishes (details and link below), so cut some from red cardstock, along with a mirrored version, so they could go above and below the sentiment.  They were very hard to see against the patterned paper, so I added an offset to the flourish, cut from white cardstock and adhered the layers together.  I used liquid adhesive to secure all the layers in place and I've got two more cards to send paper birthday hugs while we're all isolated in Covid-19 pandemic lockdown.


~~~*~~~*~~~

I also had the pleasure of working with the 


~~~*~~~*~~~

NOW it's YOUR turn!
I hope that I have inspired you to get creative
and look forward to seeing your projects fill the gallery for
Penny's Challenge 476
on the
Penny's Paper-Crafty Challenge Blog

~~~*~~~*~~~

*** INGREDIENTS ***
Paper Nest Dolls - digital stamp - Chef Owen
X-Press It A4 Blending Card
Copic markers - chef hat & jacket - C00-0-1 + "0"
Copic markers - neckerchief & buttons - R22-24-27
Copic markers - skin - E0000-000-00-02
Copic markers - hair - E31-33-35
Copic markers - cooktop - C00-0-1-3-5-7
Copic markers - pots - R22-24-27-29 + C9 + "100"
Copic markers - food - E31-33-35 + YG61-63
Copic markers - background - E50-51
Kaisercraft weave cardstock -
Silhouette Cameo
Silhouette Design Store - 
Houndstooth Pattern by Ginny Nilson
Silhouette Design Store -
Tea Towel Secret Ingredient by Lori Whitlock
Silhouette Design Store -
Flourish by Lori Whitlock
Helmar 450 Quick Dry adhesive - to adhere the layers
Tombow Mono Multi Liquid Adhesive - to adhere the flourishes

~~~*~~~*~~~
Sending a big Thank You to for supplying the digital stamp I used today and for being a sponsor for Challenge 476Penny's Paper-Crafty Challenge Blog
    
~~~*~~~*~~~
I am going to enter my card in the following challenges

Wednesday, 15 July 2020

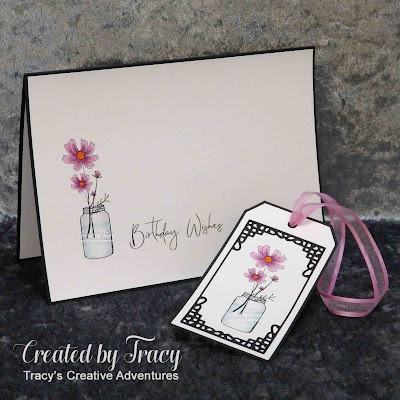
Jars of Birthday Wishes . . .

It's time for another challenge with us at 

This fortnight 

Our generous sponsors for this challenge are:

https://krafterscart.co.nz/
N&T

~~~*~~~*~~~

Today I have used the , one of our generous sponsors this fortnight, to make a birthday card and matching tag.  


T


I die cut the tag (


It was quite a challenge to photograph this set, so here are
some more pics that hopefully show you how pretty it is.


~~~*~~~*~~~
NOW it's YOUR turn!

I hope that I have inspired you to get creative
and look forward to seeing your projects fill the gallery for

~~~*~~~*~~~
*** INGREDIENTS ***
Copic markers - jar / water - C00-0-1 + B0000-000
Copic markers - flowers - RV52-63-66 + YR16-18
Copic markers - foliage - YG03
Sizzix Big Shot
Ultimate Crafts - dies - Tag & Corner Option
from Rambling Rose Collection
Perfect Layers Ruler
1/8
ribbon
Helmar 450 Quick Dry adhesive - to adhere the layers
Tombow Mono Multi Liquid Adhesive - to adhere the die cuts

~~~*~~~*~~~

Sending a big Thank You to All Dressed Up for sponsoring

R

I am going to enter my card & tag set in the following challenges

Sending you sunshine and ...

It's time for a new challenge with us on the

As always, the challenge is Anything Goes.
Three to five random winners are drawn and
each get to choose 3 set of papers from the Paper Pick Tab

~~~*~~~*~~~

Today I have used papers from the Droplets and Micro Dots digital paper sets by Lozzy at A Bit More Time To Craft, to make a fun set of cheery swing cards.


I opened the Sunshine Swing Card cut file (details & link below) in Silhouette Studio, along with papers from the Droplets and Micro Dots digital paper sets (details & links below).  The cut file comes with sweet sentiments but I decided to make my own by combining different fonts (details & links below).  I sized the sentiments for the font panel cloud and the middle of the back of the sun, printed and cut with my Silhouette Cameo.  I sized the digital papers to 6" square then overlay the card matting panels, the sun and the smiling face, roughly "slicing" off the excess before printing and cutting with my Silhouette Cameo.  I used my Cameo to cut the card bases, burnishing the folds with a bone folder.

I used liquid adhesive to adhere the layers of one card together and, although it's pretty, I decided it needed "more".  Here is what the first "no-ink" card looked like.
I'm so glad I only adhered one to start with . . . 

 After deciding the first card didn't have enough contrast, I pulled out my distress inks and blending brushes then inked up the edges of all the layers before adhering them to complete another five cards.  Here you can see the difference that adding a little ink around the edges makes, it was definitely time well spent.


Here are some more photos of my set of cards.
They will be in the mail soon, cheery "paper hugs" that will hopefully bring a smile while we're in Covid-19 lockdown . . . again . . . battling the dreaded "second wave".


~~~*~~~*~~~

Did you notice the white in the middle of the sun of the ink blending photo?  When I'm printing lots of images to cut, I often leave portions that will be covered with other layers "blank", saving printer ink for another day.

~~~*~~~*~~~


NOW it's YOUR turn!
I hope that I have inspired you to get creative
and look forward to seeing your projects fill the gallery for
Challenge 120
on the
A Bit More Time To Craft Challenge Blog

~~~*~~~*~~~

*** INGREDIENTS ***
A Bit More Time To Craft - digital paper - Droplets D7
this digital paper set has 10 lovely colours and it's the 13th digital paper set in the Paper Picks tab
A Bit More Time To Craft - digital paper - Micro Dots 21 & 22
this digital paper set has 55 pretty colours and it's 13th set from the bottom on the paper picks tab
My Scrap Chick - cut file - Sunshine Swing Card
this was a recent Friday Freebie for My Scrap Chick subscribers
and comes with sweet sentiments but I decided to make my own
sentiment fonts
smiles + warm - Curlz MT font - source unknown
sending you + hugs + across the miles - Alcubierre by The Hungry JPEG
Silhouette Cameo
bone folder
Distress Inks - Tumbled Glass + Fossilized Amber
ink blending brushes
Helmar 450 Quick Dry adhesive - to adhere the layers
Tombow Mono Multi Liquid Adhesive - to adhere the delicate pieces

~~~*~~~*~~~
Sending a big Thank You to Lozzy from A Bit More Time To Craft
for supplying the digital papers I have used today.
    
~~~*~~~*~~~
I am going to enter my card in the following challenges: