Monday, 30 September 2024

Another Vase of Timeless Tulips


No, you're not seeing things, 
this is my second vase of timeless tulips today.
Here is the first one
you can read the full details HERE.

My 5 1/2" square card uses the delightful new September release
Timeless Florals digital stamp set from the Beccy's Place Store.  

I combined the Tulips pre-coloured digital stamp from the Timeless Florals digital stamp set and combined it with the Beautiful Day digital sentiment from the retired Build-A-Wreath digital stamp set.  I sized the vase of tulips fit on a 4" square panel and to make it same-but-different from my first card using this image, I mirrored the vase of tulips, so the handle was on the right.
I added the sentiment, printed the image panel on smooth white cardstock, then trimmed the image panel.  I anchored the vase of tulips to my card by adding a shadow using Warm Grey Copic Markers W0-W1-W3-W5.


Next came the matting layers.  I matted the image panel with black cardstock and trimmed to a 1/16" matting layer, with the Perfect Layers Ruler against the edge of the image panel and a sharp knife to trim.  I them matted the image panel again, this time with Jewel cardstock and trimmed to a 3/16" matting layer by putting the Perfect Layers Ruler against the edge of the image panel and a sharp knife to trim.


I adhered the matted image panel to a 5 1/2" square top folding
card base made from the same smooth white cardstock.  


Looking at the photos, I'm wondering whether my card needs embellishments.
Do you think I should add some pearls, rhinestones or sequins?

~~~*~~~*~~~

I have made two cards same-but-different using this beautiful Tulips image.
My second card uses the same image panel mirrored before adding the sentiment.
My first card is on the right.


You can read all about my first card HERE.

~~~*~~~*~~~
INGREDIENTS
Timeless Florals digital set from the Beccy's Place store
Tulips pre-coloured digital stamp
Build A Wreath digital stamp set – now discontinued but you can read more about it and see creations shared using the stamps and sentiments HERE on the Beccy’s Place Blog or by clicking on “wreath” in the labels list on Beccy’s Blog.
Beautiful Day - digital sentiment
Copic Markers - Warm Grey W0-W1-W3-W5
to add a shadow to "anchor" the vase to the card
textured cardstock - American Crafts - white and black
textured cardstock - Kaisercraft - Jewel
300gsm smooth white cardstock - for card base
scoreboard & bone folder - to make card base
sharp craft knife + self healing cutting mat + steel ruler
- for cutting image panel and matting layers
Perfect Layers Rulers - for matting layers
Helmar 450 Quick Dry -
liquid adhesive - to adhere the layers

~~~*~~~*~~~
I have entered my card in the following challenges:


A Vase of Timeless Tulips


My 5 1/2" square card uses the delightful new September release
Timeless Florals digital stamp set from the Beccy's Place Store.  

I combined the Tulips pre-coloured digital stamp from the Timeless Florals digital stamp set and combined it with the Beautiful Day digital sentiment from the retired Build-A-Wreath digital stamp set.  I sized the vase of tulips fit on a 4" square panel.  I added the sentiment, printed the image panel on smooth white cardstock, then trimmed the image panel.  I anchored the vase of tulips to my card by adding a shadow using Warm Grey Copic Markers W0-W1-W3-W5.


Next came the matting layers.
I love using my Perfect Layers Rulers to create matting layers for my cards.
With the two rulers, I have eight different matting widths at my fingertips
from 1/16" up to 1/2".


Next came the matting layers.  I matted the image panel with black cardstock and trimmed to a 1/16" matting layer, with the Perfect Layers Ruler against the edge of the image panel and a sharp knife to trim.  I them matted the image panel again, this time with Jewel cardstock and trimmed to a 3/16" matting layer by putting the Perfect Layers Ruler against the edge of the image panel and a sharp knife to trim.


I adhered the matted image panel to a 5 1/2" square top folding
card base made from the same smooth white cardstock.  


Looking at the photos, I'm wondering whether my card needs embellishments.
Do you think I should add some pearls, rhinestones or sequins?

~~~*~~~*~~~

I have made two cards same-but-different using this beautiful Tulips image.
My second card uses the same image panel mirrored, then added the sentiment.
My first card is on the left, my second card on the right.


You can read all about my second card HERE.

~~~*~~~*~~~
INGREDIENTS
Timeless Florals digital set from the Beccy's Place store
Tulips pre-coloured digital stamp
Build A Wreath digital stamp set – now discontinued but you can read more about it and see creations shared using the stamps and sentiments HERE on the Beccy’s Place Blog or by clicking on “wreath” in the labels list on Beccy’s Blog.
Beautiful Day - digital sentiment
Copic Markers - Warm Grey W0-W1-W3-W5
to add a shadow to "anchor" the vase to the card
textured cardstock - American Crafts - white and black
textured cardstock - Kaisercraft - Jewel
300gsm smooth white cardstock - for card base
scoreboard & bone folder - to make card base
sharp craft knife + self healing cutting mat + steel ruler
- for cutting image panel and matting layers
Perfect Layers Rulers - for matting layers
Helmar 450 Quick Dry -
liquid adhesive - to adhere the layers

~~~*~~~*~~~
I have entered my card in the following challenges:

Another Kaleidoscope of Butterflies


No, you're not seeing things,
this is my second kaleidoscope of butterflies today.
Here is the first one,
you can read the full details HERE.

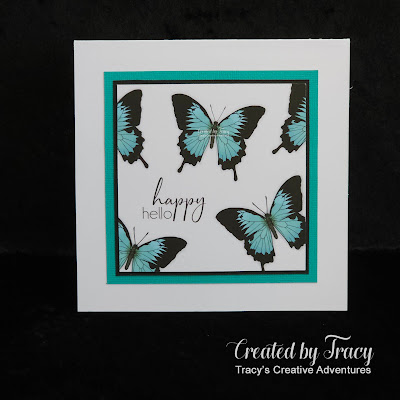
My 5 1/2" square card uses the delightful new Butterfly House 
digital stamp set from the Beccy's Place Store.  
I took the Ulysses pre-coloured digital stamp image panel I created earlier, flipped it horizontally, then added the same happy hello sentiment.  THEN I took it up a level and tried my hand using the technique Beccy shared HERE and used Copic C0 and C1 Cool Grey markers to add shadows around each butterfly, giving the illusion of dimension.


The shading is subtle, it might be easier to see the shadows
by clicking on the photo to view it in full screen.
I might have to take a brave pill and try this again with darker markers.


  I trimmed the image panel, matted with a 1/16" black panel, matted with a 3/16" Mermaid panel (much darker than the Capri used on the first card, both colours work perfectly with the colours in the butterfly wings) then added the panel to a 5 1/2" square top folding card base made from the same smooth white cardstock.


~~~*~~~*~~~

I have made two cards same-but-different using this Ulysses Butterfly image.
Here they are, side by side, 2nd card on the left, 1st card on the right.
You can read all about my first card HERE.


~~~*~~~*~~~
INGREDIENTS
Butterfly House digital set from the Beccy's Place store
Ulysses pre-coloured digital stamp
happy hello - digital sentiment - from the same set
Copic Markers - Cool Grey C0-C1 - to add shading for dimension
textured cardstock - American Crafts - white & black
textured cardstock - Kaisercraft - Mermaid
300gsm smooth white cardstock - for card base
scoreboard & bone folder - to make card base
sharp craft knife + self healing cutting mat + steel ruler
- for cutting image panel and matting layers
Perfect Layers Rulers - for matting layers
Helmar 450 Quick Dry -
liquid adhesive - to adhere the layers

~~~*~~~*~~~
I have entered my card in the following challenges:

A Kaleidoscope of Butterflies

 I was inspired by Beccy's stunning cards HERE
and made my very own kaleidoscope of butterflies.


I confess, I was delighted when Beccy released the delightful Butterfly House stamp set in August this year, it reminded me of our first trip to Cairns and Far North Queensland.
Our trips to the rainforest were filled with flashes of vibrant colours from the fluttering wings of Ulysses Butterflies, Cairns Birdwing Butterflies and many, many more.  It was a combination of joy and frustration, as it was near impossible to get good photos,
making the memories even more precious and colourful.

My 5 1/2" square card uses the delightful new Butterfly House 
digital stamp set from the Beccy's Place Store.  

I combined the Ulysses pre-coloured digital stamp from the Butterfly House digital stamp set and combined it with the happy hello digital sentiment from the same set.  I sized the butterfly to 2" wide and added a "kaleidoscope" to fill a 4" square panel, with one full butterfly and four partial butterflies fluttering around it.  I added the sentiment then printed the image panel on smooth white cardstock.  I trimmed the image panel, matted with a 1/16" black panel, matted with a 3/16" Capri panel then added the panel to a 5 1/2" square top folding card base made from the same smooth white cardstock.


~~~*~~~*~~~

I have made two cards same-but-different using this Ulysses Butterfly image.
My second card uses the same image panel mirrored, the same sentiment, with
shadowy dimension added using Copic markers and a darker matting layer.
You can read all about my second card HERE.


~~~*~~~*~~~
INGREDIENTS
Butterfly House digital set from the Beccy's Place store
Ulysses pre-coloured digital stamp
happy hello - digital sentiment - from the same set
textured cardstock - American Crafts - white & black
textured cardstock - Kaisercraft - Capri
300gsm smooth white cardstock - for card base
scoreboard & bone folder - to make card base
sharp craft knife + self healing cutting mat + steel ruler
- for cutting image panel and matting layers
Perfect Layers Rulers - for matting layers
Helmar 450 Quick Dry -
liquid adhesive - to adhere the layers

~~~*~~~*~~~
I have entered my card in the following challenges:

Sunday, 22 September 2024

A Flamboyance of Flamingos - 5

 September and October are filled with female birthdays, so what better time than now
for me to revisit the Flockstar digital stamp set from the Beccy's Place Store and
make a FLAMBOYANCE of FLAMINGOS.

I just love the vibrant pinks, quirky expression and fun sentiment.

Five more new "same-but-different" Kenneth the Flamingo cards are now filled with
birthday wishes, neatly tucked into their envelopes, along with a bundle of love.

A Flamboyance of Flamingos - 5


My 6" square card uses the fun Flockstar digital stamp set from the Beccy's Place Store.  I combined the "Kenneth" pre-coloured digital stamp with the "Love Cake" digital sentiment from the same digital stamp set on a 5" square panel, printed, matted with a 1/16" black panel, matted with a 1/16" bright pink panel, matted with another 1/16" black panel, added the panel to a 6" square top folding card base.  I finished off the card with a trio of layered flowers created using assorted punches and a pop of black bling rhinestones.


~~~*~~~*~~~

I mentioned earlier about my FLAMBOYANCE of FLAMINGOSwell,
you can see them all here, just click on the photos to read all about each one.


~~~*~~~*~~~
INGREDIENTS
Flockstar digital set from the Beccy's Place store
textured cardstock - American Crafts
sharp craft knife + self healing cutting mat + steel ruler
- for cutting image panel and matting layers
Helmar 450 Quick Dry -
liquid adhesive - to adhere the layers
Perfect Layers Rulers - for matting layers
assorted flower punches - for the layered flowers
black rhinestones - for the flowers

~~~*~~~*~~~
I have entered my card in the following challenges:
 

A Flamboyance of Flamingos - 4

September and October are filled with female birthdays, so what better time than now
for me to revisit the Flockstar digital stamp set from the Beccy's Place Store and
make a FLAMBOYANCE of FLAMINGOS.

I just love the vibrant pinks, quirky expression and fun sentiment.

Five more new "same-but-different" Kenneth the Flamingo cards are now filled with
birthday wishes, neatly tucked into their envelopes, along with a bundle of love.

A Flamboyance of Flamingos - 4


My 6" square card uses the fun Flockstar digital stamp set from the Beccy's Place Store.  I combined the mirrored "Kenneth" pre-coloured digital stamp with the "Love Cake" digital sentiment from the same digital stamp set on a 5" square panel, printed, matted with a 1/16" black panel, matted with a 1/16" bright pink panel, matted with another 1/16" black panel, added the panel to a 6" square top folding card base.  I printed, trimmed and matted the sentiment panel to match the card front then adhered in place.  I finished off the card with a trio of layered flowers created using assorted punches and a pop of black bling rhinestones.


~~~*~~~*~~~

I mentioned earlier about my FLAMBOYANCE of FLAMINGOSwell,
you can see them all here, just click on the photos to read all about each one.


~~~*~~~*~~~
INGREDIENTS
Flockstar digital set from the Beccy's Place store
textured cardstock - American Crafts
sharp craft knife + self healing cutting mat + steel ruler
- for cutting image panel and matting layers
Helmar 450 Quick Dry -
liquid adhesive - to adhere the layers
Perfect Layers Rulers - for matting layers
assorted flower punches - for the layered flowers
black rhinestones - for the flowers

~~~*~~~*~~~
I have entered my card in the following challenges: