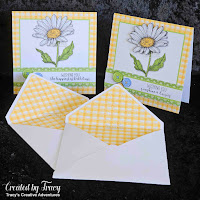
I had some fun making a cheery, tall, slimline card using the
Daisy Elements digital set from the Beccy's Place Store.
.... when I say "digital set", it's two little words for a "MEGA digital set"
filled with digital stamps (to colour and pre-coloured), digital sentiments, digital papers and card toppers too, definitely worth heading over to check it out!
.... when I say "digital set", it's two little words for a "MEGA digital set"
filled with digital stamps (to colour and pre-coloured), digital sentiments, digital papers and card toppers too, definitely worth heading over to check it out!

I designed my card in Silhouette Studio (no, I didn't use it to cut but it's a handy program to size and design cards and card elements), starting with the Daisy Flower digital stamp from the Daisy Elements digital stamp set from the Beccy's Place store. I sized the image panel to 2.875” x 7.875” and the Sunshine and Daisies digital sentiment to fit neatly on a tall slimline card (3 1/2" x 8 1/2"). I printed the image panel on white textured cardstock (printer is pigment ink), coloured with alcohol (Copic) markers, trimmed to size, matted with pink textured cardstock, trimmed to 1/16" border using a Perfect Layers Ruler, adhered to a 3 1/2" x 8 1/2" cardstock panel, then adhered the panel to a slimline card base that I made from 300gsm smooth cardstock. I trimmed the sentiment panel and matted to match.

It felt so good to give my Copic markers a pretty workout
and to try some new-to-me colour blends too ++

~~~*~~~*~~~
I mentioned earlier how wonderful the Daisy Elements digital stamp set
I have made using other elements from the set.


~~~*~~~*~~~
INGREDIENTS
- Daisy Flower digital stamp
- sunshine and flowers digital sentiment
white textured cardstock - American Crafts
sharp craft knife + self healing cutting mat + steel ruler
- for cutting image panel
++ Copic Markers - pink - RV63-V05-RV66
++ Copic Markers - green - G21-G94-G99
Copic Markers - yellow - Y17-YR24-YR27
"O" Colourless Blender - for fixing when I went outside the lines
pink textured cardstock - a perfect match to the flowers for matting the layers
Perfect Layers Ruler - to cut 1/16" matting layers
300gms smooth white cardstock - to make card base
Helmar 450 Quick Dry -
liquid adhesive - to secure all the layers in place
~~~*~~~*~~~
++ Kit and Clowder (Alyce Keegan) is an excellent resource for colouring with markers and pencils. The pink marker combo I used was Mulberry, a Kit and Clowder Colour Blend of the Week (they can all be found HERE). The green marker combo I used was from Alyce's Favourite Copic Marker Colour Combos found HERE (click on Copic).
~~~*~~~*~~~
I have entered my card in the September Challenge at Beccy's Place Challenges

Oooooh, they are pretty in pink! And you've matched the cardstock perfectly, Tracy. I love the slimline design too. Gorgeous!
ReplyDeleteCheers,
Beccy