A is for ADVENT
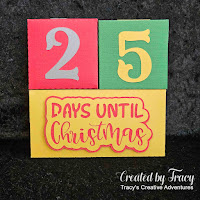
I opened the Christmas Countdown Cubes cut file (free from Craft With Sarah) in Silhouette Studio and set up all the score lines and colours for cutting. I did make a change before cutting, I used one of my favourite fonts (Sweetie Pie) to create new numbers for the sides of each cube. Once cut, I folded all the scorelines inwards, burnishing with a bone folder for a crisp fold. Before assembly, I adhered the numbers as per Sarah’s guide, so that all the right combinations will work for each day, I didn’t want to get things mixed up after it was assembled. Also, it's much easier to adhere things in place on a solid flat surface. No, in case you were worried, there are no numbers missing, the number “6” doubles as a “9” when needed. I followed the instructions for assembling the base then popped the layered title panel in place with foam squares. As for the number cubes, I want to add an activity/treat to each day, so I left one of the sides with tabs open, like a gift box, not glued together as a “solid” cube. I found that they were a little short to stay tucked in neatly, to I grabbed some bits of matching cardstock from my "scraps-for-later" stash and there were some pieces with a nice curve that I trimmed to fit. I glued them on the the outside of the tab so that it made it even a more snug fit to stay closed. I may make a half circle notch with my round squeeze punch (or put a little ribbon tab there) to make it a little easier to open.
Some festive fun for everyone.
NOTE: I'm trying to use a design from Beccy's Place for the prompt each day.
This project doesn't include any BUT I shared some
"A" cards earlier that use a Beccy's Place digital stamp.
- by Lori Whitlock
metallic gold and silver cardstock
red and green textured cardstock
bone folder – for burnishing folds
Tombow Mono Multi liquid glue – to glue the smaller pieces
foam squares to pop the title panel
Helmar 450 Quick Dry liquid adhesive – to glue the larger pieces


I love this Tracy! What a great idea for an advent calendar... and with a hidey hole for treats! It doesn't get much better than that. You did a fabulous job adding the extra pieces of cardboard so that your little boxes could open. Awesome choice of fonts too.
ReplyDeleteCheers,
Beccy
What a fun and delicious way to count down to Christmas, Tracy :-) So pretty!
ReplyDeleteHugs,
Lena